This one has been in our sites for years. We loved the E2 De-esser (which needs to show back up for AAX) and knew that if Fabrice Gabriel designed Slate Digital’s incredible algorithms, his own non-analog modeled project would be just as impressive. But we’re not going to give AirEQ Premium a pass just because of its maker’s reputation. We wanted to see for ourselves if it was worth the years of hype and a blank “coming soon” website that plagued me for years… Seriously, I checked that page monthly.
What we have upon first glance is a very sleek and inviting interface, akin to a high-end rack mount EQ, complete with an analyzer and metering. This plugin comes standard in all of the usual 32-bit and 64-bit flavors of AAX, RTAS, VST, and AU for both Windows and Mac, but requires an iLok 2 and iLok account. Installation is straightforward as well.
Upon opening AirEQ, it would appear that with the interface, analyzer, and amount of sonic tools at your disposal, this plugin would be a DSP hog. This actually wasn’t the case at all. The plugin can be used across a great number of tracks without bogging the system to any noticeable degree. I couldn’t tell if hiding the analyzer lightened the load, but Pro Tools and Maschine didn’t seem to blink even with it enabled.
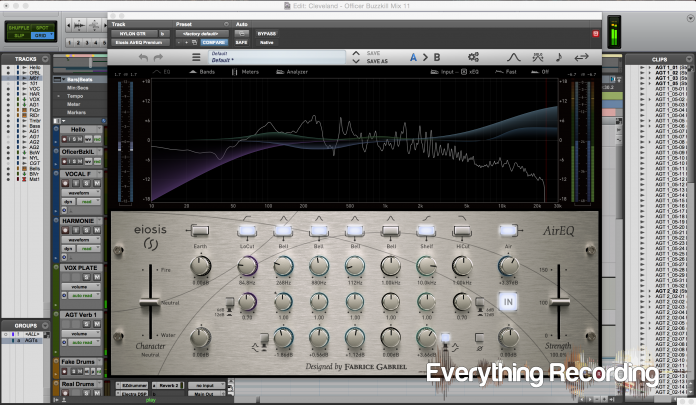
As far as features go, you do not feel without. You are given an In Gain, Out Gain, Phase button, EQ Slope Selection, choice of shelf of bell filter on the corner bands, and an “In” button which works as a bypass for comparing original with your EQ’ed version. Pretty standard stuff for an EQ and do not set AirEQ apart from the hundreds of other plugins out there; but when your eyes start wandering to the corners of the interface, you start to see some new concepts.
At each of the corners of the rack display, you will see faders labeled “Character” and “Strength.” This is where things start getting interesting. Essentially, the Character slider affects the curves of the bands’ filter shape. Seeing “catchwords” like “Fire” and “Water” could easily make someone smirk at the concept; but suspending any notions and letting your ears judge will quickly show you the intent. Initially, I turned off the analyzer to do this and saw pretty noticeable results. Using the Water Character, I was able to get subtle but smooth changes in content. With Fire, the EQ became more targeted and focused, enhancing transient content. Upon shift clicking each of the band’s q knobs, I was able to either have the character affect the single band or globally. This can also be set back to control globally by right clicking the button above each band and selecting to use the global character. As I would change each of the bands, the interface started to change. Each band’s knobs would show a ring around the controls with color depending on how much of each character I was using. This made keeping track of type of filter slope per band easier by placing it at a glance.
Over to the right, we see the Strength knob, which works as a blend between the EQ’ed signal and the dry signal. This allows even more control over just how much you want AirEQ to affect your track. Of course, Fabrice realized early on that high and low pass filters should be excluded so he gives a choice to either include or exclude each band from Strength. The same as with the Character, each band’s color will either intensify or dim as you adjust the amount.
Right to the inside of the two sliders on either corner you see two more knobs labeled “Earth” and “Air.” These are custom designed filters that allow for boosting the extreme lows and highs. The Earth produces a very solid low end that will enforce just about any type of content without becoming muddy and the Air works to give you that sparkle you look for without being too thin and ringy.
After using the EQ only for a while, I decided to open up the Analyzer to see what all of the features looked like. The analyzer is very easy to read at a glance and features a less scientific way of looking at audio data. One of the most useful features is the RMS difference meter. This meter can help you tailor the volume of your original signal versus your EQ’ed signal’s average volume. Out of all of the methods out there to enable you to compare volume levels of EQ’ed / original signal, this one is by far the most useful. Now you can rest assured that you are not perceiving better results based on more volume. The analyzer can allow for just about any type of visual monitoring and the bands are easy to identify. Although there is quite a bit of information in this window, it is easy to absorb what’s going on. Of course, any of this data can be hidden or shown in just about any combination.
With all of these features, you have an EQ already at the top of the food chain, but Fabrice added even more features that make this a very formidable go-to plugin. Usually with a standard EQ, the Gain and Q are both controlled separately, but Fabrice has seen in his many hours of modeling analog EQs that there is a very intimate interaction with how these two features work. Due to this interaction, AirEQ works with a direct correlation of Gain and Q. As you turn one of the knobs, the other feature will work in tandem, allowing you to achieve more natural results without just perceiving a volume change in the content. Pairing this with his own Analog Matched Linear Transformer technology, you get the most accurate results no matter the sampling rate.
The extra features aren’t just limited to the quality, AirEQ has workflow enhancements that make getting the mix finished as fast as possible. In the effort to eliminate mouse clicks and drags, a frequency can be swept with a narrow q by simply holding shift while adjusting a band’s frequency. The character can even be selected while sweeping. Certain controls can be “kicked” in and out for comparison by holding the ctrl (windows) or command (mac) while turning on and off a band, bypassing, undoing, filter slope, phase, solo, and bell / shelf. This lets you test the water momentarily while still keeping your original setting.
Sometimes with EQ’s like this, its easy to just start grabbing bands and adjusting without using any sort of order, on the top right of the ribbon bar, you can arrange your bands by frequency with a click of a button. This will allow you to think more linearly once you need to make small tweaks at a glance. The frequency selection can also be changed to scale notes for those times you know the pitch of the frequency you want to adjust.
Combine all of the features, shortcuts, and sound quality, you have an extremely useful swiss-army EQ. Initial operation is very familiar and it is easy to quickly find yourself leaning heavily on the workflow enhancements. Very quickly you will see yourself reaching for this plugin not just for the sound; but for the sheer amount of adaptive features that make a certain plugin shine. I wish I had some critique to balance out the review but this plugin has been very meticulously created.
I consider the wait and attempted monthly website check in completely worth it.
For more information, visit www.Eiosis.com


