Space – the “final frontier.” If you’re going to tackle one of the most critical factors in giving richness and depth to your mixes, you’re going to need the right tool. HOFA plugins may very well be the best and last reverb you’ll ever need.
Explanations and Apologies
We initially discovered HOFA plugins when reviewing IQ-Series EQ V3 (review HERE). What we stumbled into is nothing short of astonishing. This company does it all, and I mean it ALL. They train you to mix, give you the tools to mix, help you press the album, and hell; they even design AND build the treatment for your room. It’s not a stretch by any means to say this company knows all aspects of pro audio. This is evident with their latest version of IQ-Reverb.
I also think I may owe an apology to you, the reader, and HOFA because I’ve been using IQ-Reverb V1 for YEARS without featuring it. Now, hear me out before you come at me with QWERTY keyboard-shaped pitchforks. I have a good excuse – I DIDN’T WANT TO SHARE MY SECRET WEAPON (Just kidding, I was waiting for a V2 because I had a feeling they were going to update). Seriously though, IQ-Reverb V1 has been on too many of my tracks to count, so when V2 came out, I reached out to HOFA to give it a spin.
Espatially Unique
Typically, you either have a convolution or an algorithmic reverb in a plugin. Both are great, but never the two shall meet. While this separation has been a mainstay for eons primarily due to lack of DSP, the “times, they are a-changing.” Sometimes you need a little of each to get the track to sit right in the mix and either don’t feel like stacking plugins or switching between interfaces. IQ-Reverb V2 has both iterations in one plugin (technically, it has six, but we will get into that later). Although Convolution and Algo reverb in one plugin is sufficiently groundbreaking, that’s not even the impressive part of this plugin. The veritable “kitchen sink” has been thrown at Version 2.
Overview
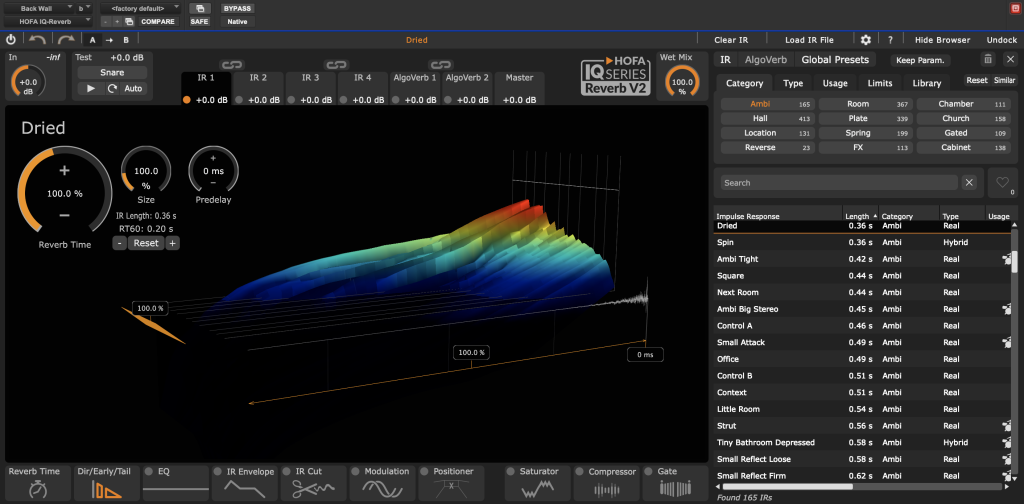
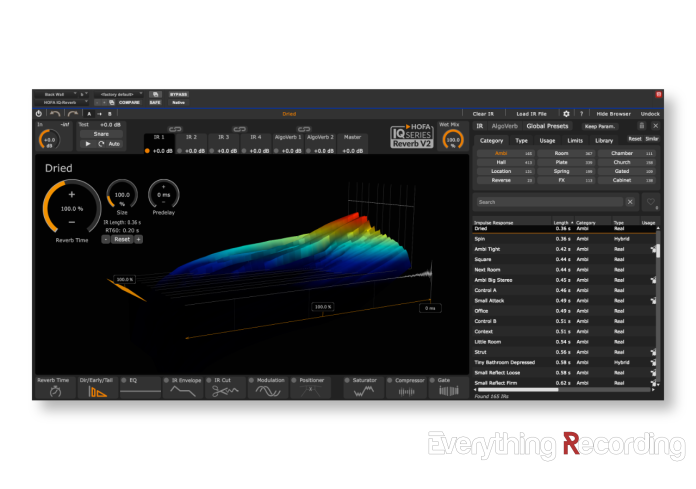
Immediately upon opening the plugin, you can tell there’s a ton going on without being too overwhelming. It’s obvious HOFA put in a lot of hours laying this plugin out. Controls pop into the visualizer area via translucent panels. I appreciate this because, all too often, the onslaught of tabbed windows gives the interface a more “operating system” vibe. Quickly, you begin to feel like you’re constantly searching for controls instead of seamlessly using them. IQ-Series Reverb has tackled this issue masterfully.
The browser section is easy to access with one of the most intuitive breakdowns of presets. Not only do you get the stock-standard names for types of IRs, but also extra tabs like “type of instrument this would work best on” and “whether this is a synthetic or natural reverb type.” You can even set ranges for parameters in the Limits tab to narrow down decay times, brightness, etc.
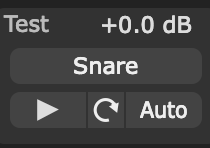 While you’re tinkering with presets, HOFA offers what I think is the best feature ever put on a reverb plugin. At the top left corner is a “Test” section where you can play various samples from instruments within the plugin to hear the reverb. No more looping audio, soloing aux sends, or general DAW tomfoolery to preview reverbs.
Tabbed for you Pleasure

Seven tabs adorn the top of the interface for all of your reverb needs. The first four tabs are specifically for impulse responses. Possibilities abound with IQ-Series Reverb.
You can:
- Use HOFA’s built-in IRs, which are top-notch right out of the gate
- Buy premium expansion packs specifically designed by HOFA
- Import your own IRs.
IQ-Reverb offers up to four individual IRs at once for precision space design. If that’s not enough, the following two tabs add “AlgoVerb,” which borrows from the many presets in HOFA’s SYSTEM plugin reverb section. Lastly, to tie it all in, we have the Master tab that houses a mixer to perfectly blend each piece of your “three bed, two bath condominium” reverb you’ve created.
The top tabs are fun, but like Nicki Minaj, your eyes immediately wander to the bottom. We will get into what each section can do later in the review but take a second to behold the vast array of processing tools at your disposal. HOFA even allows you to change the Saturator, Compressor, and Gate order to mold your creative effects in countless ways.
![]()
A Plugin with a View
While most convolution plugins use the same stock-standard display showing decay over time, the majority pale compared to the amount of info in IQ-Series Reverb displays.
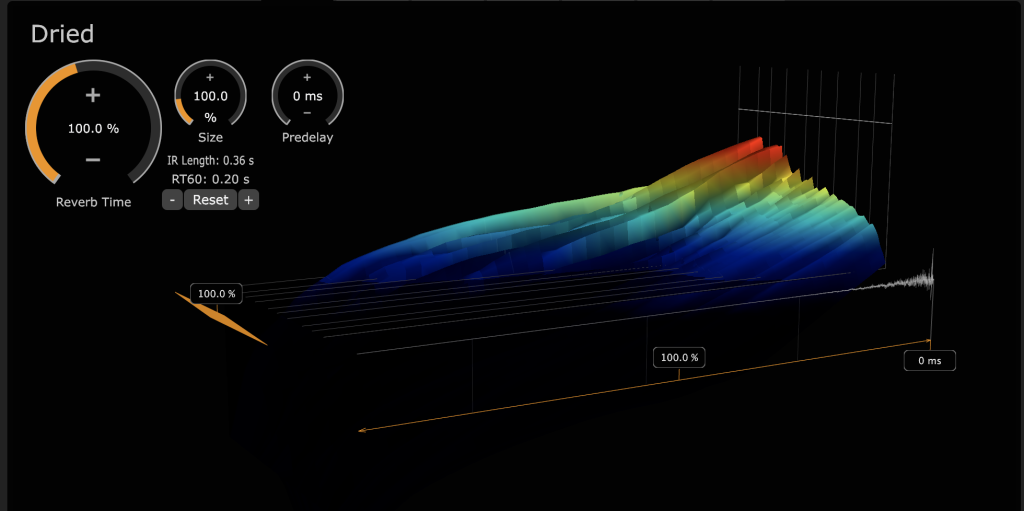
Although a little unorthodox, you’ll get the hang of it quickly. The waterfall display shows the decay time graph from right to left and the frequency decay from the back (low frequencies) to the front (high frequencies). If you understand natural decay across the frequencies (which I know you all do), you’ll quickly see why the lows are in the back and the highs are in the front. This is because it essentially takes longer for the lows to dissipate than the highs, and when you think of visualizing room decays like a sprawling mountainous terrain, HOFA’s approach makes perfect sense. You’re even given the IR’s waveform (in gray) in the foreground.
Of course, if this display doesn’t work for you, the graph is interactive. You can pan, rotate, and zoom with the mouse. However, I would strongly suggest giving it a fair shake in its default state because it genuinely is the most logical way to picture what is going on with your audio.
Unimpulsing the Response
While the visuals are helpful, we are “Engin-EARS,” not “Engin-EYES. (thanks for the quote Joe Baresi).” One of the fallbacks of typical Impulse Response plugins is that you cannot edit much of the impulse response, save a few selective controls. IQ-REVERB changes that with tools to completely transform the IR to lengths unfathomable in most plugins.
To assist with this task, HOFA has integrated two decay times in the visualizer panel. Just below the Size control, you’ll see IR Length and RT60. The IR Length represents the original time of the initial captured impulse, and the RT60 is the calculated length. You may be asking, “why do you need a calculated length?” Simple, IQ-REVERB V2 has controls that allow resizing the initial IR. While IQ-Reverb has many advanced controls to “nuance the hell out of an IR,” initially, let’s stick to the central ones.
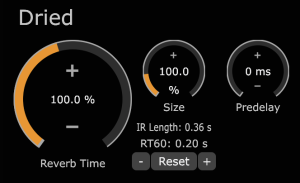 The Reverb Time and Size knobs utilize “damping” and “stretching” to resize the space. These controls work from a percentage of the original impulse, but remember, you can always check your RT60 to see the new decay time. The “+” and “-” controls sandwiched between the “Reset” button work to suggest settings for the Damping and Stretching of the IR. Just note: using the “-” after adjusting the “+” will not set the reverb back to the previous setting. This is due to how the plugin recalculates after each adjustment. To revert, use the undo or simply reset if you’re too far in the weeds. Lastly, for quick access, you’re given a pre-delay control next to the Size knob.
That Was Crazy – How’d They Do That?!
Great question – the Damping control works very much like a see-saw, except instead of adjusting a specific frequency, you’re turning up the volume at the end of the IR. Although this control seems very simple, the stretching is not so much. The stretch control pulls the IR outward like a Slinky to make the decay either longer or shorter. Any further explanation would probably require an NDA on the methods they use, and Everything Recording’s “crack law team” went to Disney World for the week. Suffice to say, they’re hopped up on Churros and Star Wars, so we will keep the explanations simple.
Everything AND the “Kitchen Sink”
No HOFA plugin would be complete without more tools to shape your reverb to unimaginable proportions and IQ-REVERB V2 packs aplenty. Better grab a snack because this section is a doozy.
Reverb Time
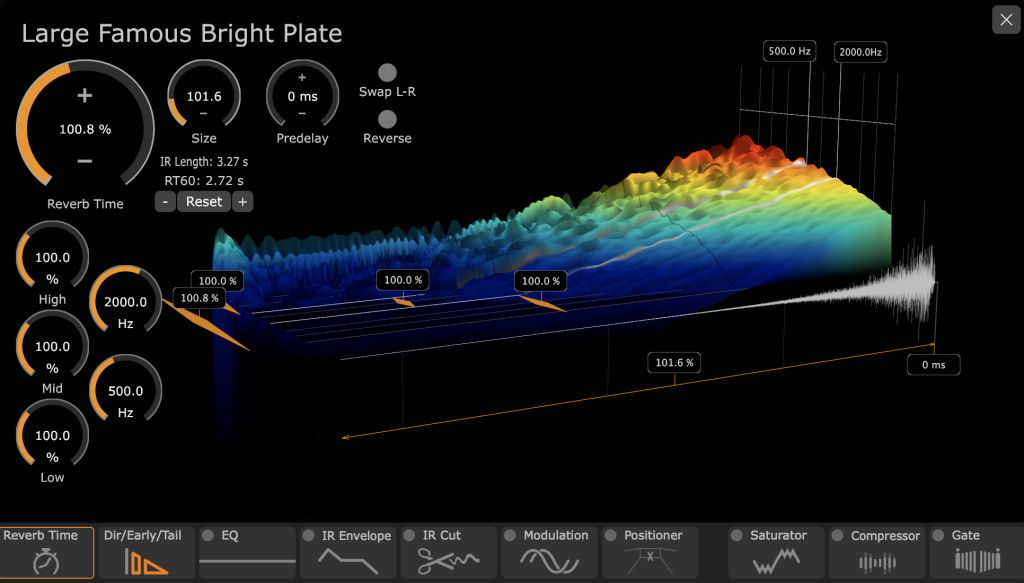
The Reverb Time tab expands on the constantly-visible Reverb Time and Size knobs. Once you click the tab, extra controls slide into view with a few features that look very similar to an EQ… but they’re not. These High, Mid, and Low controls let you tweak the decay times of each set of frequencies. How crazy is that?! With each control adjusted, the IR visual will respond and morph to your new settings. Percentages show up next to the frequencies to show how much you’ve modified from the original, and once you finally have your perfect balance, the central Reverb Time will work as a global control for all three at once.
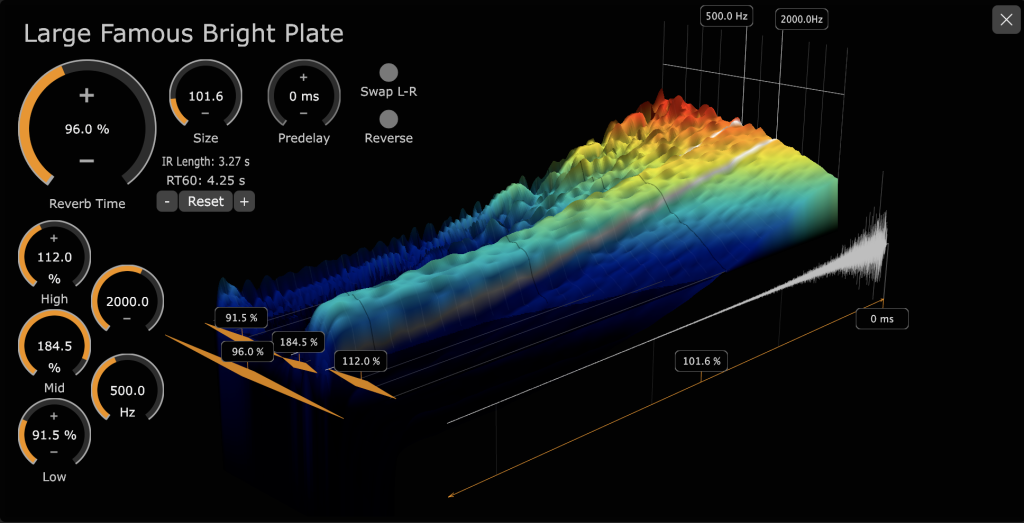
If that’s not fun enough, two more buttons appear next to the Pre-delay control. The Swap L-R button will flip left and right to give a new perspective, and the Reverse does just that by inverting the reverb for those cool backward effects. You can literally “put your thing down, flip it, and reverse it.” Missy Elliott would be so proud.
Direct / Early / Tail
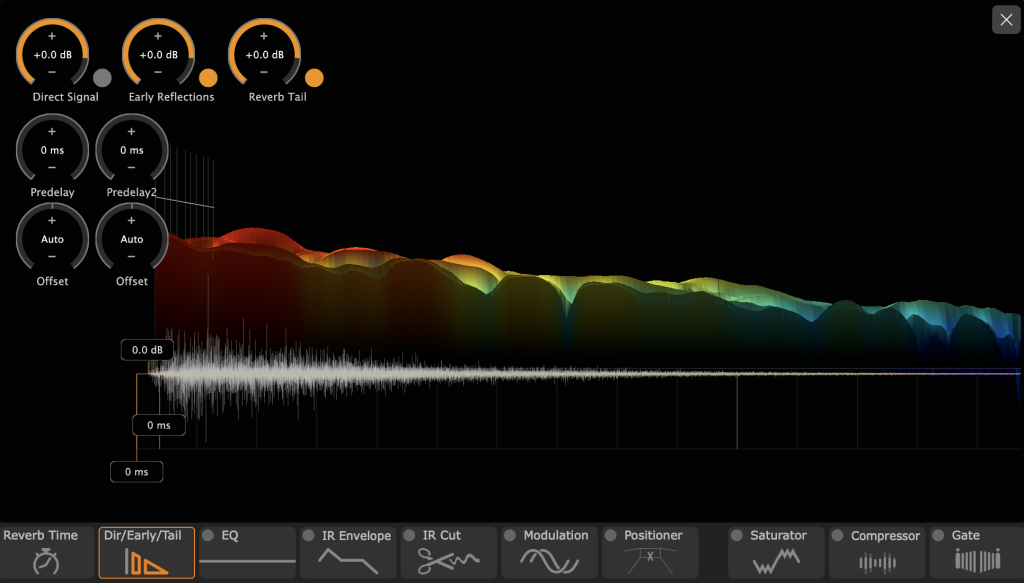
Once again, clicking the next tab smoothly transitions the visualizer to profile view and adds the next set of controls. The Dir/Early/Tail takes the concept of pre-delay and expands it into a universe of controls. The IR separates into three sections: Direct Signal, Early Reflections, and Tail. Using the volume knobs for each, you can tailor the level of individual sections of the reverb. If you want to get highly surgical, HOFA gives you two different Pre-delays for the Direct Signal and Early Reflections. Lastly, there is an Offset control to fine-tune the separations of each Pre-delay. This level of control offers a whole new level of dimensional control of the original impulse response.
EQ
Of course, no reverb will be complete without some form of EQ to shape the frequencies you want to hear in your mix. IQ-Series Reverb V2 doesn’t just have some form of EQ built-in. They have a full-blown EQ plugin inside.
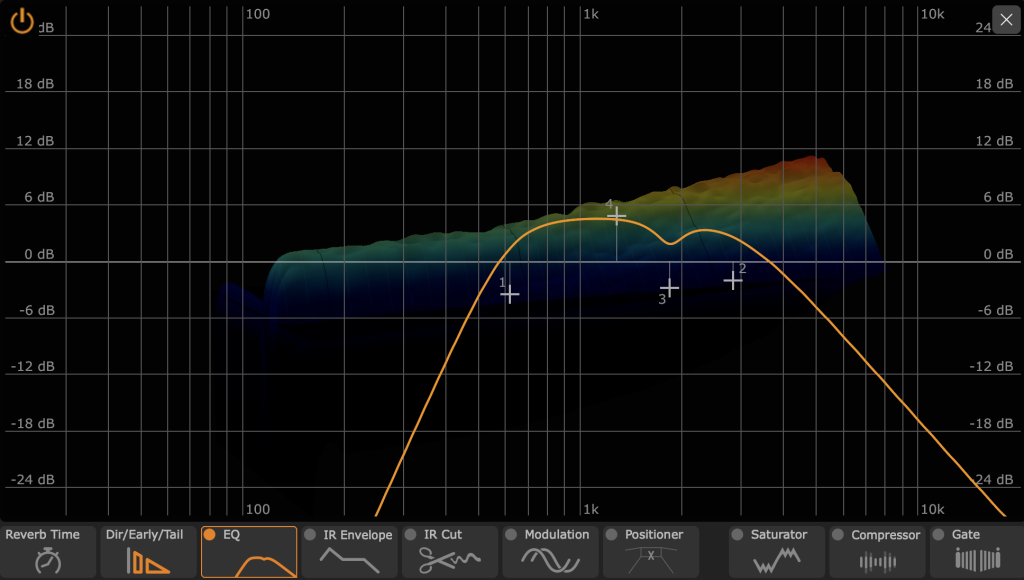
The EQ section sports up to four individual bands with nine different filter types. Adding a band is as easy as double-clicking the interface where you want the band. From there, additional parameters pop up.
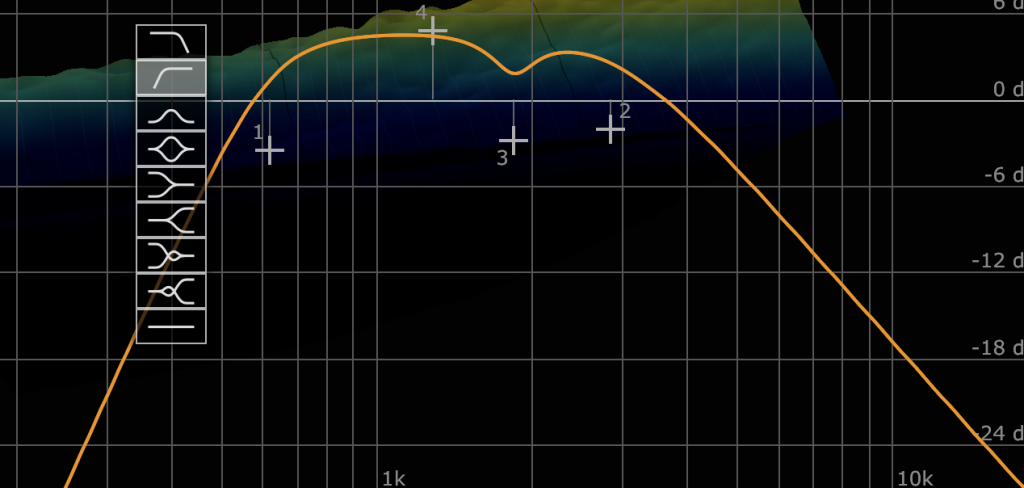
My ONLY suggestion for this EQ section is if I click on the far corners of the reverb, the filter would automatically set to a high or low pass filter. Although a minor gripe, it would save mouse clicks. Overall, I like the controls of this EQ section even better than IQ-EQ V3. Let’s hope in the future, V4 uses this setup.
IR Envelope
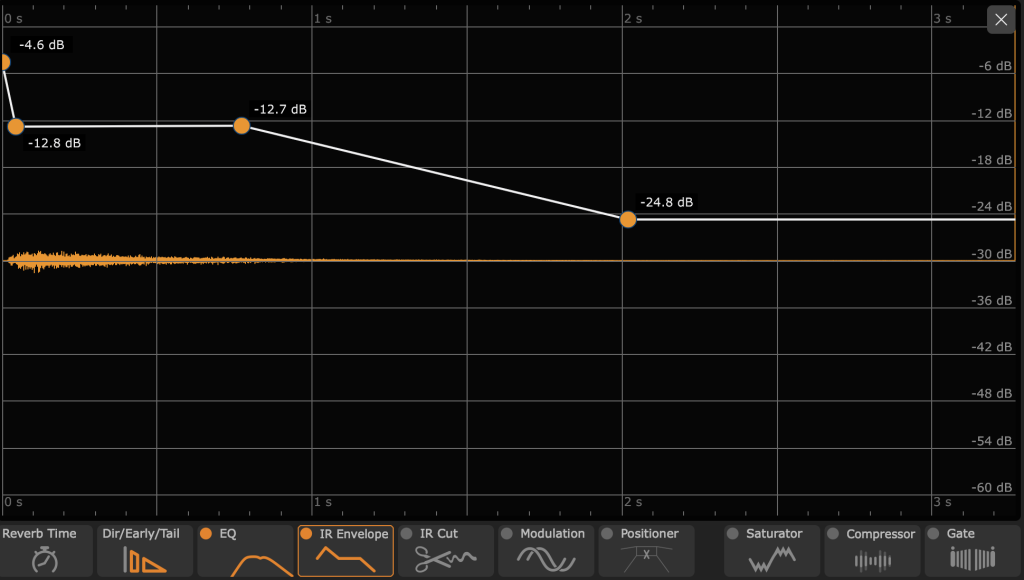
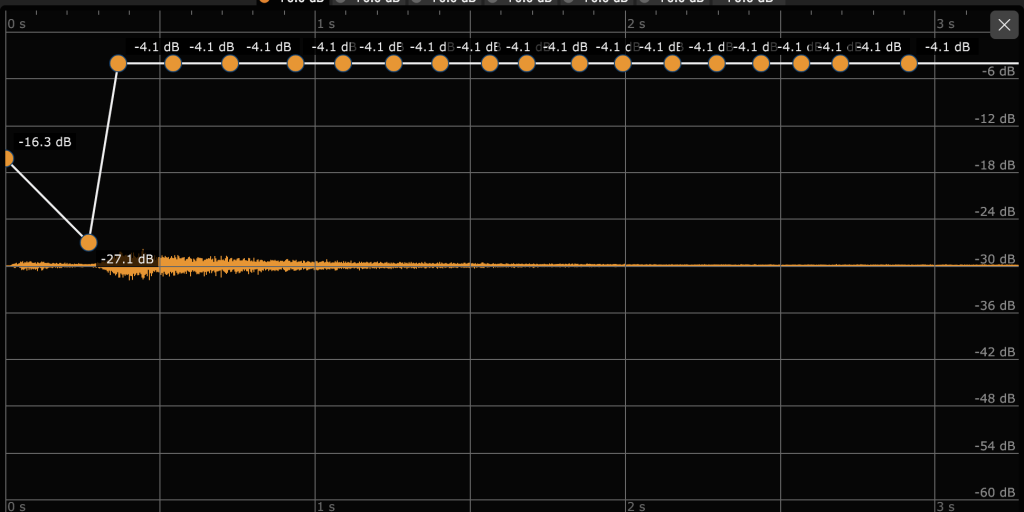
Ever wanted advanced ASDR control over a reverb? Up until now, I had never really thought about it, but HOFA sure has. They’ve taken the Attack, Sustain, Decay, and Release concept to new heights with IR Envelope. Instead of shackling you with just the essentials for each, IQ-Reverb V2 lets you go nuts. Double-click anywhere on the white line to create a breaking point. You can get downright OCD with envelopes by adding to your heart’s content. I made over 20 nodes and only stopped clicking because I got bored. The bottom even has a zoom bar for getting in tight.
This section adds very creative FX to the reverb tail, but if I’m getting nitpicky, I feel the envelope section lacks the ability to edit the curves between envelope changes. Also, I see huge missed potential in this section to create tempo synched pumping effects on the reverb, which would be a first of its kind. I appreciate the IR Envelope, but I want to see more! Also, please help me delete all of these nodes I created in one mouse click!
IR Cut / Gate
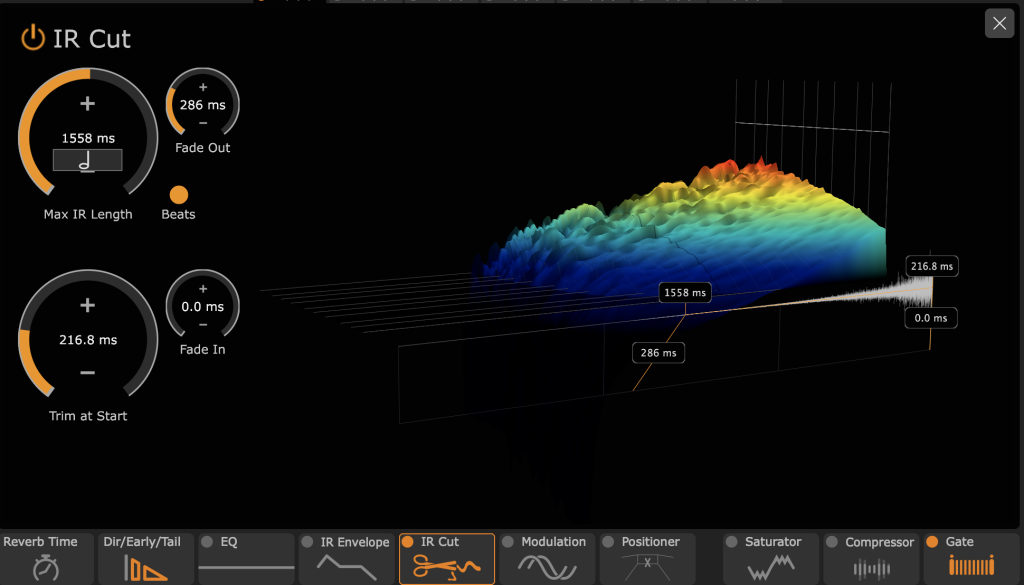
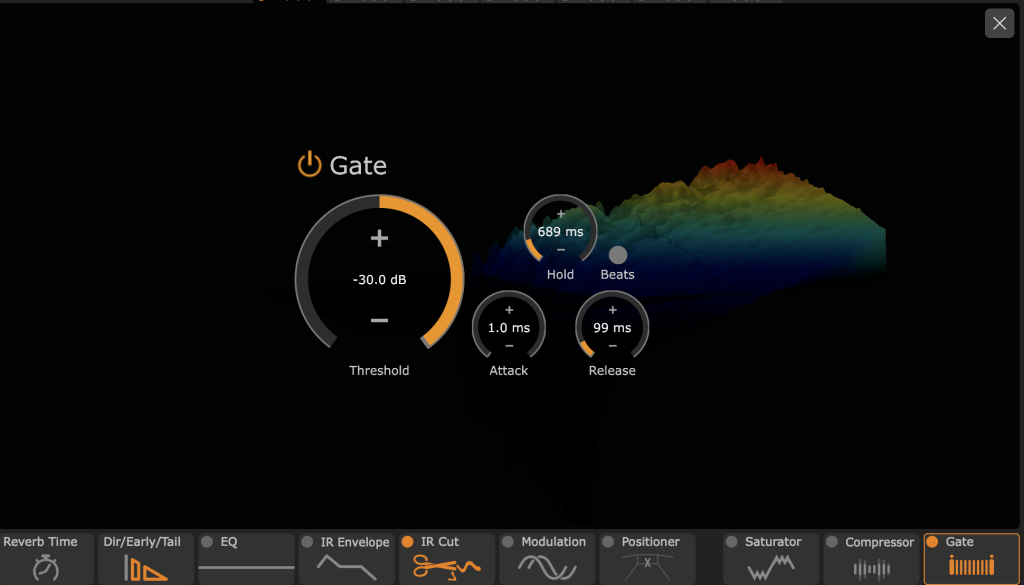
These two are similar, so it’s best to cover them in one section. Both IR Cut and Gate perform the same task, just with different approaches and subtleties. The Gate works like any you’ve encountered. You have a Threshold that once the audio drops below, the reverb tail attenuates based on the attack, hold, and release settings. However, the IR Cut physically trims the IR either at the reverb’s start, end, or a combination of the two. To make things less abrupt, you’re given a Fade In and Fade Out. If we’re going on utility alone, the IR Cut most likely edges out the Gate due to its ability to cut the beginning of the reverb. For instance, if your IR has a much longer Pre-delay than you need.
The joy of this plugin is that you can use both at different stages for some awe-inspiring results. Both tools additionally have a Beats control that will sync the release or length of the IR with the song’s tempo. Finally, you can put away that dirty printed Tempo / Decay sheet on your desk.
Modulation
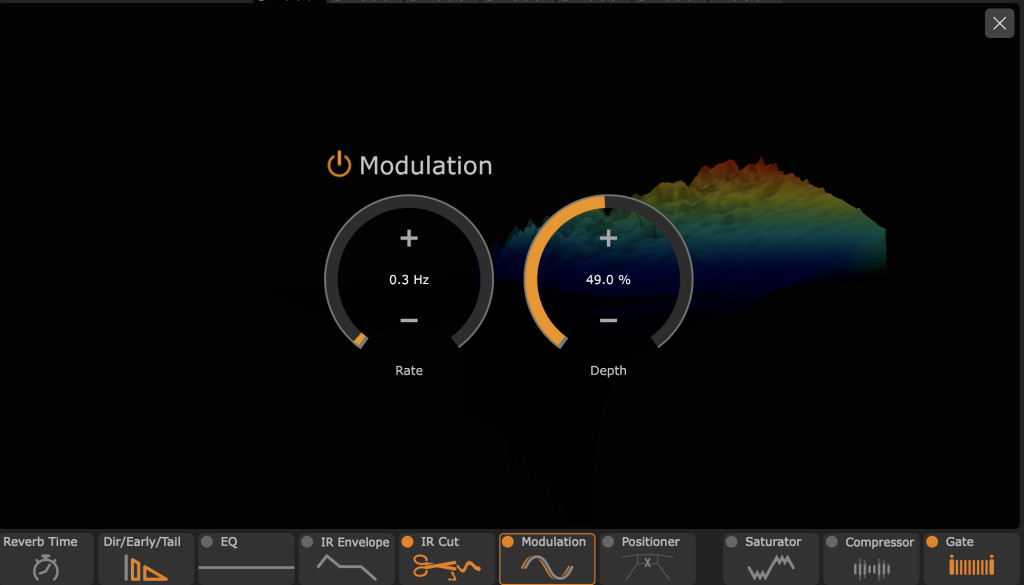
What reverb would be complete without a bit of movement? We all know that most impulse responses have a rather sterile feel. So why not breathe a little life in them. Controls are easy with Modulation. You’ve got a Rate and Depth. Adjust to taste.
Positioner
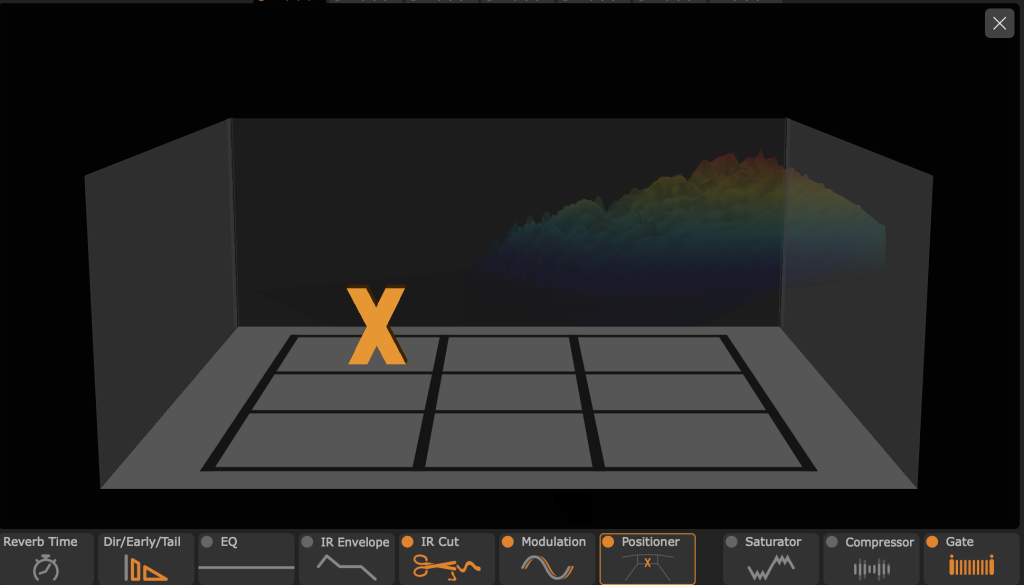
This tab was one of my favorite features of IQ-Series Reverb V1. You can place your source where you want in the stereo field without having to adjust volume, panning, and pre-delay. Positioner is most useful when placed as an insert to individual tracks and wouldn’t have the same impact on the stereo field on an auxiliary bus. ER Tip: Automate the Positioner on lead, pad, or vocals for subtle movement.
Saturator
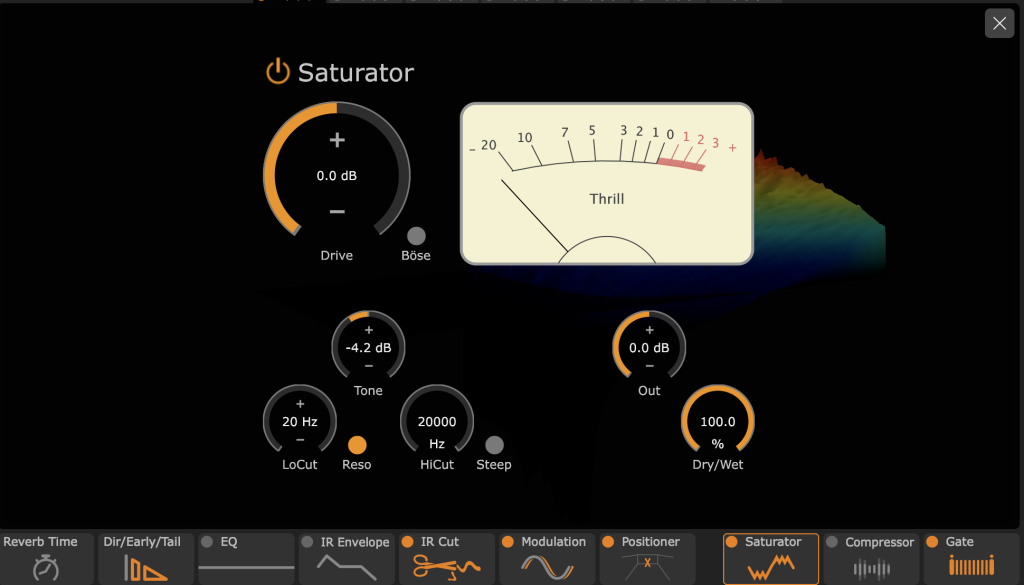
When you’ve made as many plugins as HOFA has, you can use parts from others in new plugins. From subtle to outright mayhem, Saturator can do it all. From Low and High Cut filters with varying slopes to a Tilt EQ with the Tone knob, your reverbs will never sound warmer. Find that perfect balance with the Dry/Wet control and if the Saturation isn’t heavy enough, click that Böse button. The Thrill indicator will be your guide.
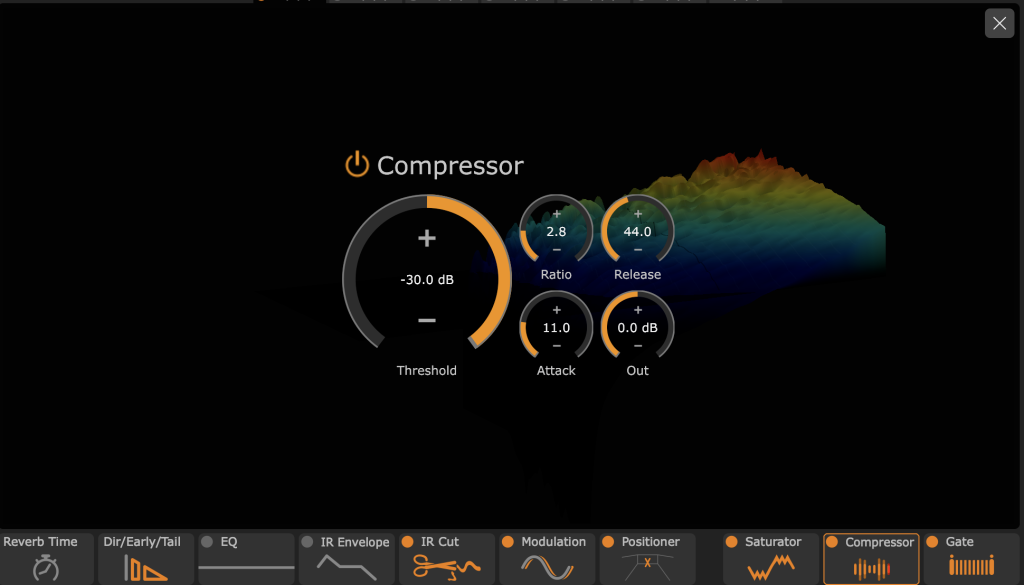
Compressor
What better way to round out the audio toolbox with some dynamics control? Add a little more movement to your ambiance by compressing the reverb. Sadly, I wish we had the same Beats button as the Gate so I could use time-release for some rhythmic pumping.
AlgoVerb
At this point, you’ve probably forgotten we have two more slots of algorithmic reverb. Don’t worry; we’ve got it covered. As an “inception style” twist, HOFA has the Reverb within a Reverb thing going on here. This highly customizable algorithmic reverb section hosts ten different types of reverb that you can either tack on to your IR or use standalone.
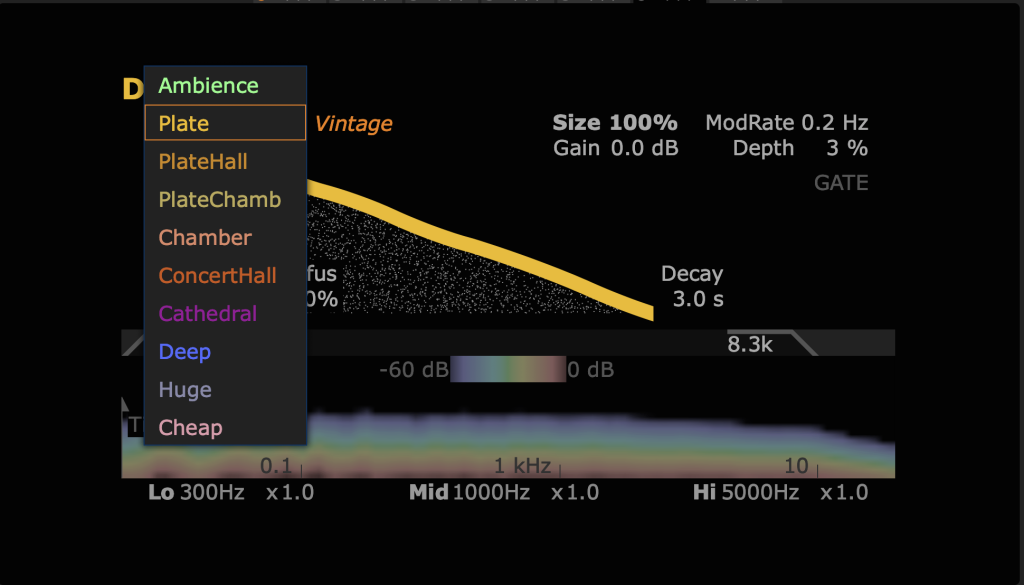
This section is undoubtedly no afterthought either. AlgoVerb features a version of the IR tabs modulation section and frequency-dependent decay time controls. It also has a few different tricks. The Vintage button next to the algorithm selector uses an entirely different sample rate, mainly used in the ’70s. The Vintage control takes the edge off, resulting in a buttery reverb tail. Finally, Valhalla’s Vintage Verb has a new contender.
So…
Sonically, IQ-Series Reverb V2 is perfection. I can imagine a space in my head and have it jumping out of the speakers in no time. Other reverbs may be able to get you close, but you have to squeeze the sound out of them. I can type flowery hype words all day, but this is one of those plugins you must see to believe. I’ve used actual Lexicon and Bricasti units that can’t do what IQ-Series Reverb can do. Using this plugin with its lush presets and “it just fits in the mix” quality, your mix will immediately jump up a level.
However…
There may be a catch. This plugin is pretty CPU intensive. I usually don’t have issues with CPU usage, but on some of my bigger mixes, IQ-Reverb caused some freezes and stops. I’m not sure what HOFA could do about this except maybe offer the “Full Monty” version, with the option of a single IR or AlgoVerb version for when you don’t need to layer. Although, I will say this; I use as many instances as I comfortably can.
In Closing
Besides a few tiny setbacks and “you give me an inch, I take a mile” requests, IQ-Series Reverb V2 is as close to perfection as a plugin could get. I could uninstall nearly every other reverb plugin I own and not miss them one bit. I can say with almost complete certainty, IQ-Series Reverb V2 is the last reverb plugin you’ll need.
- Everything you could possibly need to shape a reverb in one plugin
- Seamless interface. Masterfully designed


