The Ozone mastering suite has been through many iterations. This version may be the most ambitious.
Ozone is the premiere mastering software, with a bundle of plugins that can even venture into mixing applications. Like Neutron 2 (review here), Ozone 8 comes in several versions to cater to different price points and applications for artists and engineers.
Ozone Imager:
Similar to Neutron’s Neutrino plugin, the Ozone Imager is a free stereo enhancing plugin. Imager is based off of the very imaging built into Ozone 8 and loaded into a single plugin. Ozone Imager can take narrow sounding tracks and mixes and instantly widen them, all while avoiding the many artifacts that come with widening the stereo field. Imager features an easy to use interface with helpful spectral graphs to show how the plugin is handling the audio. And remember, it’s FREE.
Ozone Elements:
The entry level solution to mastering. Elements features the new Master Assistant which helps create a starting point for masters, Maximizer, Imager, 1 EQ Module, I/O Section, Audition Panel, Undo History, and plenty of great presets.
Ozone Standard:
Features everything included in Elements plus Dynamics, EQ with additional Multi-Band Dynamics, an additional post EQ Module, additional IRC’s and improvements in the Maximizer, Exciter, Vintage Limiter, and new Track Referencing. Standard can also be used as a standalone application with third party plugin hosting.
Ozone Advanced:
Of course, everything listed in the previous versions plus Vintage Tape, Vintage Compressor, Vintage EQ, Spectral Shaper, Coded Preview, and Tonal Balance Control. On top of giving more modules, each one can be used as a standalone plugin.
Since Ozone 7 has already been reviewed (Review Here), this review will concentrate on the new features that are packed in Ozone 8 Advanced.
OZONE RECAP
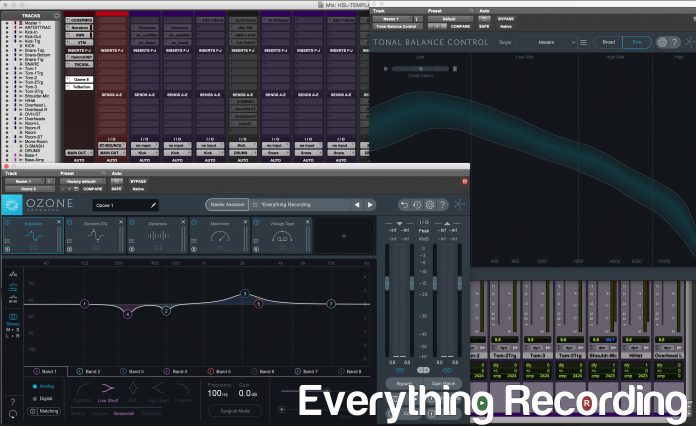
At its core, Ozone is a modular mastering application capable of running as a plugin in a DAW or as its own program. Across the top section, different processing “Modules” appear as blocks that can be rearranged, added, or deleted to create an ideal mastering signal chain. Ozone 8 Advanced comes with 6 slots with a choice of 12 modules: EQ, Vintage EQ, Vintage Tape, Exciter, Vintage Compressor, Dynamics, Dynamic EQ, Spectral Shaper, Imager, Post EQ, Vintage Limiter, and Maximizer. On the right-hand side of the interface is the I/O section complete with many tools to further enhance mixing and mastering. The standalone version functions in the same way, but allows for stereo audio tracks to be added into the interface and individually processed. On top of offering every mastering type tool imaginable, the standalone version can incorporate non-iZotope VST plugins installed on the computer as well. This gives ultimate control of mastering all inside of one window.
WHAT’S NEW
If those features weren’t enough, Ozone Advanced have added a slew of new features to bolster the almost $200 price increase. The interface has definitely been overhauled with some settings being rearranged and may take a little getting used to. I do miss the “Smooth” and “Transparent” markers on the Character of the Maximizer but overall the interfaces look much more uniform.
MODULES
Spectral Shaper:
This is a new module and standalone plugin exclusive to Advanced. Spectral Shaper uses technology of the same name to tame frequencies in a track or even a full mix. By using the “Action Region” across the top, frequency regions can be selected, moved, and soloed to find the problem area. The area can be honed further by dragging the corners of the Action Region to widen or narrow the region. Once the area is located, a Threshold can set and further fine-tuned by using the “Listen” feature to hear when processing will occur. Three choices of Light, Medium or Heavy processing can be selected along with Attack, Release, and a Tone slider, which works similar to a tilt EQ to enhance the Timbre of the processing. Positive will increase the highs while negative emphasizes the lows. The Action Region can then be used to visually monitor dynamics control by clicking the Gain Trace icon on the left side of the “Action Region”. The tool works great to tame harsh areas in a mix and is very easy to use. I do however wish there was a key modifier to adjust both sides of the Action Region at the same time and a mix or intensity slider would help blend in a little of the original if needed.
Vintage Modules:
Vintage Tape has added a new 7.5 IPS settings that will bring in non-linear saturation to add a big, low end to tracks. In operation, the new module really rounds out a mix in a way that’s not too intrusive.
The Vintage Compressor also has improved ballistics and sound quality. To test this, I placed audio on a loop and A/B’ed Ozone 7 Vintage Compressor against Version 8’s on the same preset with the same settings. The difference in sound quality wasn’t leaps and bounds but the initial snap of the transients were a little more present and focused.
Maximizer:
The Maximizer has a few additions and enhancements to make setting the perfect levels a cinch. A new LL (Low Latency) IRC mode has been added along with improved IRC IV and Transient Modes. I will say, the difference in between 7 and 8 is fairly distinguishable in IRC IV with Ozone 8 preserving the integrity of the transient’s initial pop.
A Learn Threshold has been added in which a Target LUFS value can be set, and Ozone will adapt the threshold to meet the value determined as the Target. Although this feature is called a “Learn” feature, it does not shut off after determining the proper threshold. It continuously is changing the values to constantly meet the target’s perceived volume. While this added control is great to maintain a constant volume, it is not made to meet loudness compliance standards.
The Stereo Unlink section in Ozone 7’s Maximizer has been upgraded to a “Stereo Independence” section. In version 7, the Transient and Sustain controls were one slider. But sometimes, when limiting stereo channels independent of each other, a better result can be achieved at a louder output by allowing for independent control of the Transient and Sustain controls. When set to values above zero, these controls allow for the handling of transients and sustain separately, thus allowing for a less Narrow result when used more aggressively.
Exciter:
Version 8 brings new flexibility by adding a new Analog Exciter option to the module and allowing each band its own selection of different types of saturation. Version 7 only allowed for one type across the whole spectrum. This gives all new opportunities in adding retro to the low end while using tube on the high end for creative results that cannot be replicated in the hardware world.
NEW ADDITIONS
Master Assistant:
Similar to Neutron’s Track Assistant, Ozone 8 incorporates a Mastering Assistant whereby machine learning is used to determine an ideal starting point for your master. This can be incorporated in both plugin and standalone versions. The inner workflow for the Assistant is extremely advanced and conditional upon a vast array of facets, but we will try to simplify it to core concepts.
It must be stated that unlike Neutron, Ozone’s Master Assistant requires 30 seconds of audio instead of Neutrons 4 to 10 seconds. iZotope also suggest using the loudest portion of the track when analyzing. If the portion desired is less than 30 seconds, looping a section is ok. Also, the Master Assistant will only determine the settings for EQ, Dynamics, Dynamic EQ, and Maximizer so don’t expect it to make creative choices like if Vintage Tape or Exciter should be used. I think this falls under the “Think for Yourself” category.
In order to begin, click “Master Assistant” in the top menu bar next to the Preset menu. Initially, Master Assistant will display three options for a Target master: Streaming, CD, and Reference.
Streaming:
The Streaming option will optimize the Maximizer Threshold to ensure the loudness is matching -14 LUFS, which is the standard for most streaming services.
CD:
The CD option determines the Maximizer Threshold setting for the best output level for the selected Intensity. Just below the Target section is the Intensity. The choice between Low, Medium, and High lets the Maximizer know how often the Limiter will be triggered by incoming audio.
Reference:
The Reference setting is very helpful in that it can use a selected reference track inside of Ozone’s Track Referencing panel to create a custom EQ curve and Target Loudness. This does require that a reference track be loaded into Ozone 8 prior to starting Master Assistant.
Once the Target is selected, Ozone 8 takes over. After audio begins playback in the host, Master Assistant will analyze audio for around five seconds and generate a unique EQ curve. This EQ curve is derived from ten predetermined core genre classes. A percentage of similarity is assigned to each of the ten genres and a custom EQ curve is created. Say for instance, your track is determined to be 50% country, 30% Rock, 20% EDM, and 10% Orchestral. First, congratulate yourself for taking on such an innovative song Ozone 8 will generate a Target EQ curve that is a mix of each of these genres based on percentage. (Note: if “Reference” was chosen at the beginning, this is all thrown out the window and the Target EQ curve is based off of the curve of the reference track).
After the custom Target Curve is created, an ideal combination of a signal chain based off of the genre with the highest percentage will be assigned. These are used as a starting point based on genre and not specifically the incoming audio. What will be based off of the incoming audio is how each of these modules in the signal chain is adjusted, or not adjusted.
The EQ setting is adjusted first by being compared against the Target Curve and modified to match as closely to the target as possible. After EQ is set, Dynamics is next. What sets the Master Assistant apart from any other analysis based processor is how dynamics are treated. On top of the full spectrum, the low end is also analyzed based on the Target curve and dynamics are applied in order to help the Maximizer to work more transparently. This is measure in “Crest Factor” which is a measurement of peak amplitude divided by the RMS. This indicates how extreme the peaks are in the waveform and determines them to be either too compressed or too dynamic. The Compressor’s threshold values are learned based on the average of the track to ensure the dynamics are affecting the audio properly. After setting Dynamics, the Maximizer is set based on the settings chosen at the beginning of the master assistant with either Streaming, CD, or Reference. After the Maximizer is set, the Master Assistant will compare the input signal with the output and use Dynamic EQ to reduce possible distortion from the Maximizer’s settings. At this point, the Assistant will ask if the custom preset should be accepted. Clicking Accept will keep the custom preset and allow for additional adjustments. From here, more modules like Vintage Tape, EQ, or Exciter can be added.
I actually found Mastering Assistant to be an extremely useful tool for sparking inspiration in a way that didn’t feel necessarily “canned”. In most cases, Mastering Assistant created more of a push in the right direction and not the final setting. Although I’m sure with some practice and choosing the right section of audio, the Assistant could in fact do this. Creating a custom starting point based on a reference proved to be invaluable especially when time is of the essence. The Assistant came very close most of the time is relatively matching the overall EQ curve of a track and pointed me in the right direction. I can see this being incorporated in my work flow from now on.
Track Referencing:
References are an integral part for both beginners and professionals alike. For beginners, a reference can be used as a comparison point for balanced frequencies and dynamics. It can also teach how to listen and adjust the song based on a professionally mixed and mastered track. For professionals, this is a perfect tool for artists to convey a feel or sound they are trying to achieve. Most DAWs do not cater to this approach and workarounds come in the form of constantly soloing back and forth stereo tracks or bringing another plugin into the mix that cater specifically to referencing.
Ozone 8 has a very clever solution tucked in the I/O panel. By clicking the “Reference” button, a panel will appear where up to 10 reference tracks can be loaded. Ozone supports wav, aif, mp3, AAC, and FLAC files as references. References can be added by pressing the + button in the reference panel, with each reference appearing in its own tab in the panel. On top of adding each reference, Loop Segments of each song are automatically determined and broken into sections. This makes selecting a part of a track extremely easy instead of trying to match parts up. Each section can also be renamed for quick recall. Toggling between the selected references is accomplished by clicking the tab of the reference wanted and referencing is as easy as clicking the Power button next to the Reference button. This can be done either from the reference panel or the Ozone I/O section.
On top of making referencing tracks easier, Ozone 8 will overlay the frequency spectrum of the reference inside of the spectrum graph is any of the module views that incorporate the frequency spectrum graph. This gives instant feedback on mastering or mix choices when dealing with dynamics or EQ.
Because of the referencing panel alone, Ozone 8 has showed up in a permanent spot on my Mix Bus as well. This takes the mastering plugin and turns it into an invaluable resource for mixing as well. The interface was extremely intuitive and functional, making a once workflow interrupting necessity into a second nature function. One added perk that would be nice regarding referencing would be an auto level match of the reference tracks but this can still be addressed with the individual gain sliders in the referencing panel.
Tonal Balance Control
The final plugin available in Ozone 8 Advanced is probably one of the more audacious. Tonal Balance Control takes reference mixes to a whole new level. Tonal Balance Control is a plugin that addresses reference tracks in a fresh new way. The plugin is designed to be the very last plugin on the Mix Bus. The interface is based around a frequency spectrum graph divided into section: Low, Low-Mid, High-Mid, and High. As the track is played in the DAW, lines appear in each section of the graph. The blue sections in each band represent an ideal range within each band corresponding to a style of music. When the lines show up in the blue, the track is balanced similar to the “Target”. If the line is over the graph, the frequency content in the mix is more than the Target. Anything under the section represents too little. The Crest Factor display is a left to right graph that determines if the low end of your mix is either too dynamic (left) or too compressed (right). Three built in Targets can be initially used: Bass Heavy, Modern, and Orchestra. If these are too generic, custom Targets can be created by importing an audio file using the menu next to the Target. Tonal Balance Control will import the file, analyze it, and create a custom Target. If the multi-band (Broad) version doesn’t display enough, the interface can be more detailed by clicking “Fine” on the right side of the interface. This will display a continuous section with more information.
To make balancing the EQ easier, any Ozone 8 or Neutron 2 plugin’s EQ can be adjusted inside of the TBC window by selecting the plugin in the drop-down menu located in the bottom left. It must be noted that single plugins’ controls do not function inside of Tonal Balance Control, only the Ozone 8 and Neutron 2 master plugin work. They can however display the frequency spectrum under the TBC window for reference. With Neutron 2 and Ozone EQs, all controls are in the bottom window of TBC and adjustments can be made from one spot in a snap.
THOUGHTS:
Overall Ozone 8 Advanced easily warrants the upgrade or purchase for pretty much anyone. While versions before teetered on being worth the extra money, Version 8 is a no brainer. The sheer number of useful extras alone would easily be worth the $200 difference from Ozone Standard alone. These aren’t just filler plugins. Each bring their own strengths to the table. As for how they may be laid out in the interface, that may be a slightly different story.
I felt that while Tonal Balance control is a huge help when determining balance decisions, it should be incorporated into Ozone’s frequency spectrum window. While I’m no coder and could not begin to know the workings of these advanced plugins, I really would like to see a way to incorporate TBC internally because, why have to switch between multiple windows in the first place? Isn’t that the direction iZotope has gone as of late by offering plugins that can easily adjust other plugins’ settings from one window? Granted I will still use TBC religiously in my mixes and it doesn’t take away from the innovative nature of the plugin.
Other than that, I feel Ozone 8 continues to push the envelope of mastering solutions and accomplishes what only the best companies in the world can do: make a product with features we didn’t even know we needed. It still amazes me how useful each of the individual plugins are not only on mastering but on mixing alike. I truly think Ozone 8 and Neutron 2 are two of the most revolutionary plugins to hit the market in some time.
For more information and to purchase, visit https://www.izotope.com/en/products/master-and-deliver/ozone.html
Introductory sale has Elements at $99, Standard at $199 and Advanced at $399 (until Oct31, 2017)


