It’s been quite a while since we’ve reviewed any type of DAW or sequencer. The reason behind this is pretty simple, new DAWs require re-learning, and when you are set in the patterns of your workstation, good or bad, you don’t necessarily like breaking from that comfort zone. So when Tracktion graciously gave me a copy to test, initially I wasn’t thrilled about having to start over with new software, but it quickly made me realize that I had been leaning on the system I knew for too long. That was lazy on my part especially if I claim to be a website that reviews “Everything Recording” Plus, for all I knew, the DAW that I had spent years using, was coasting on its former glory. So I took the challenge and got to work.
I had actually had a little experience with Tracktion many years ago when I bought a Mackie Spike interface. Mackie had bought Tracktion from the original owner Julian Storer in hopes that it would be the next big DAW, but unfortunately, Mackie didn’t really handle Tracktion in a manner that allowed it to grow; and without any notice, quit supporting the product. After many years of sitting on the shelf, Julian Storer bought the DAW back in hopes of reviving it as the people’s DAW.
Tracktion 5 comes in your standard 32 or 64-bit varieties of Windows and Mac, as well as a version for Linux, which I bet is probably the fastest most stable version. Tracktion’s install file clocks in at 10MB which made me do a double take upon looking in my downloads folder. Stock digi EQ plugins are bigger than this. I began to really get skeptical. I thought my download timed out but alas, the file installed and I was off to the races.
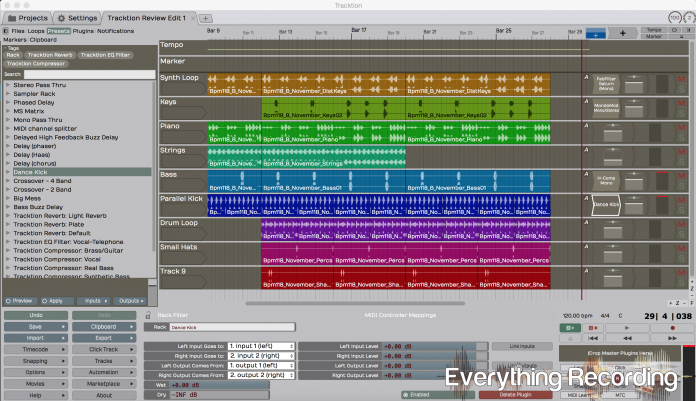
The user interface isn’t much to look at. Very primitive looking, like if Internet Explorer would let you record inside of it. I kept looking for a mix window, no such luck; but once I set my hardware and settings up with the extremely easy-to-use “Settings Tab,” things started coming together. The settings tab really is a one-stop-shop for everything that needs to be changed. Tracktion found all of my VST plugins with a simple click, set my buffer and hardware, and lastly set my “Colour Scheme” to “Nervus” to match my emotional state. After the soft grays washed away all my worries, I soldiered on back into the projects tab.
At this point, I was still bothered by no mix window but I had to let that go and start a project. After I created my project, everything started making sense. Tracktion has a feature called “Popup Help” that gives a thorough explanation of each feature as you hover over it. This takes a huge burden off and allows you to “read the manual” while actually playing with the software. Once I started becoming familiar with the interface, I started seeing a correlation between the user interface and the signal flow of audio. The audio comes in from the left side of the screen with the Input Selection. From there it shows up as a waveform in the clip screen, moving to the right to the Filters panel and passing right into the pan and faders from each channel. At the bottom right is audio’s last stop before the speakers in the Transport panel, where you can apply more filters and rack filters to your master mix. As I started adapting this concept into my learning, the heavens opened up and I started catching on quick. Switching between using the Popup Help and my newfound epiphany of the user interface, I started picking up on the more technical stuff more quickly. Don’t get me wrong, there is a little bit of a learning curve and having to overcome what you consider “the norm” with workstations but once you break through that barrier, the clouds open up a little. The interface does seem to cater to whatever task you are working on at hand. The bottom middle Properties panel will adapt to the function you are currently working with and display the information you need. If you’re editing the waveform, the Properties will accommodate your fades, pitch, and clip properties, if you’re working with a filter section, it will display bare bones parameters to get you dialed in quickly. Pretty soon I felt at home with Tracktion.
Upon getting the hang of Tracktion, I got a little braver. My eyes kept venturing up to the tabs across the top, namely the little plus sign at the top. This is where the DAW started standing out from all of the others. Tracktion considers sessions “edits” and for good reason at that. You are given the opportunity to create multiple “edits” of a session and leave them open in tabs. This opens up all new avenues to get creative by allowing you to take parts from other edits and make more edits. I don’t really know of any other DAW that allows you to have 2 projects open at once but companies should take note. The file structure in the projects tab is any neat freak’s dream. Everything is logically and clearly laid out. I quickly saved a few edits for testing’s sake and started working between them. The workflow was great. Tracktion’s clips inside of each track can individually have up to five effects (or “filters” as they call them) drug onto them separate from the track’s insert bus. I honestly ran out of patience trying to max out the tracks inserts with plugins. On top of that Tracktion offers “Rack Filters” which are chains of preset plugins that can be called up at the drop of a hat. Tracktion makes quite a few that are extremely useful, but you can also take your own plugins and make your own. This increases workflow immensely. The Rack Filters has a very intuitive and useful interface with some really advanced routing options. It was about this time I felt ready enough to peek under the hood and do some homework. I started digging and found a few astonishingly useful tools.
We all like to get heavy handed with the virtual instruments and effects from time to time. How would you like to know which parts of your tracks and using the most DSP? We all would… plus it makes for great quick comparisons for plugin reviews. Tracktion has a Resource Manager at the top right of the screen. Clicking on this will show you a list of plugins in descending order as to how much CPU they are using. Not will it display which plugins are bogging you down, it will tell you what track they’re on too. The Resource Manager will let you group filters by tracks, disable certain filters that are causing a lot of trouble and can show you what you select in the edit window. The visual is all well and good but Tracktion has your back and has put tools in your hands to mitigate these pesky plugins even further.
Ever been dialing in a sound and have another DSP laden track causing your system to stall out? Tracktion has a Freeze option, which will disable a nuisance track’s filters to give you a chance to tweak the filters in peace and enable it back without having to print the track if you’re not ready. There is even a setting in your plugins tab called “Freeze Point”. This will allow you to disable only parts of your signal chain by dragging the Freeze Point to the area you’d like to temporarily disable. Anything to the left of the freeze point is disabled; the rest on the right can go free. But what if you don’t want to disable any plugins at all and just want to hear your mix? Tracktion’s got that covered too with the Low Latency Monitoring option in the Resource Manager. Simply click this and Low Latency will temporarily render you session and drop it to the lowest latency for tracking or just for mixing.
After the dust settled, I was blown away. This 10MB program can hold its own against any of the DAWs out there. Where it lacks in appearance, it makes up in spades with performance, workflow, and functions. Tracktion is the real deal. I did however have some complaints. I wish the transport panel could accommodate more features. I kept looking for an option to click a point on the audio and be able to stop playback, and the audio start back at the selected point upon playing again. I also wanted to be able to just click a clip of audio and it automatically loop it as well. I felt the plugin section could use more organization even though there is a search bar. The Projects Tab was laid out so well that I assumed the plugins could be as well. Other than those few gripes, I found this to be the best possible experience learning I DAW I’ve come across yet. Even though Tracktion may not replace my go-to DAW, I do see myself creating ideas using multiple edits, then taking it over. This DAW would be absolutely perfect for a person new to recording. The learning curve might be a little tough at first, but with the training videos by Groove3 on Tracktion’s site, anyone can pick up in no time. I still haven’t even mentioned the price. File size isn’t the only thing small, Tracktion starts at $60 and the upgrade is only $30. There’s really no excuse not to try it. They even give you a trial. It eve comes with Melodyne Essentials! That’s almost worth the whole $60 there.
I can’t even stress how impressed I am with Tracktion. It may not look like much visually, but who’s looking at audio anyways! Go out there and get it and start making music.
For more information, visit www.Tracktion.com
Also right after this review was complete, Tracktion released version 6, which somehow has included even more features you didn’t know you needed but won’t be able to live without.


