I’ve played around with quite a bit of dynamics processing plug-ins in my day and my conclusion is always the same. Sure they accomplish the same basic overall goal that their outboard versions do, but there’s something lacking from it. Get a hold of an actual Urei 1176 and put it on one of two identical tracks. Then put the software version on the other. Now set the two at the exact same levels and A/B them; and for fun, go ahead and max out the settings on both. You’re going to hear a somewhat noticeable difference, even with the Waves Brand of the 1176 version and especially when maxing the two out. It’s just inherent in audio that, no matter how hard companies try, they’re not going to get it to sound like the analog version of the piece of hardware they’re trying to emulate…
or can they?
Elysia is a fairly new company to the scene but have already made some serious contributions to the recording studio industry. One of the founders of this company, Ruben Tilgner, previously worked for SPL and was the mastermind behind one of the most remarkable dynamics processors in the industry which I have featured on this site before, The Transient Designer. The fact that before they founded Elysia, they were behind the Transient Designer, the Mix Dream, and the Gain Station proves they’ve got some heavy firepower. If you don’t believe me, watch a few YouTube videos of those products in action.
Ruben and Dominik have a very specific goal in building studio gear. Instead of providing a different version of a product you already have, they want to provide you with a completely innovative, easy to use product that enhances the sound AND visual portion of the mixing experience. These guys truly care about every single facet of audio engineering and it shows. We’ve established that the hardware these guys make is phenomenal, but that’s not what this review is about.
Elysia has just released a software version of it’s mastering compressor, the Alpha Compressor. What gives me hope that these guys have a shot at truly getting the analog feel of a software compressor is the fact that they started out with the hardware first. The problem is, a great deal… make that almost ALL of the plug-in manufacturers do not offer hardware. They simply take a piece of hardware, spec it, then emulate it. I have to admit, it seems like extremely hard work but the end result usually winds up with a good piece of software, but not a great piece of software.
So this brings us here: The interface
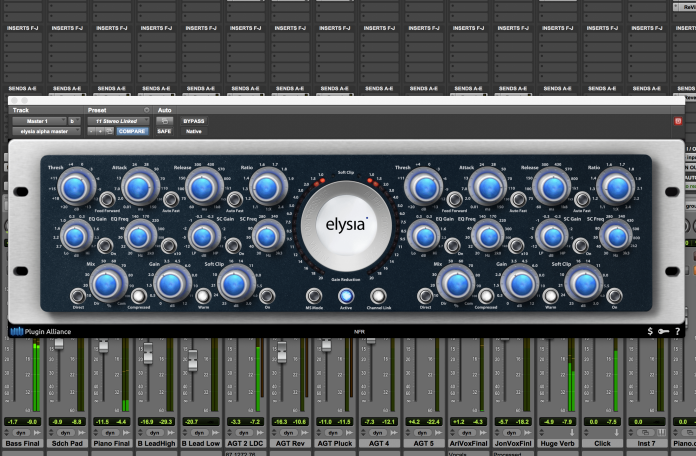
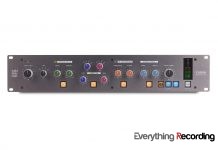
Just look at all of those knobs and buttons! To the beginner this may look like some sort of beautiful blue nightmare, but I assure you, it is a lot easier to operate than you would think. Lets break this down. This is a stereo master compressor, so each side has the exact same controls. See!! its already getting easier AND if you use this plug-in on a mono channel it becomes a scaled down version of the mastering plug-in. Even easier! So from left to right on top we have the basic compressor controls with the threshold, attack, release, and ratio. Now what sets these basic functions apart from all of the other compressors out here are those three buttons in between the knobs. The threshold has a feed forward button that acts a little edgier than when it is in normal or feed back mode. Feed forward sounds very similar to an API compressor.
Now the other two buttons… Remember when I said Ruben made the Transient Designer? Well this is him putting his signature touch to this compressor. This is an ingenious feature that allows the compression to breathe a little. It’s basically and auto-pilot that knows exactly when to react with attack or gain, depending on which you have enabled. These buttons are heaven-sent for drums because they do all of the work for you with attack, sustain, or even both at the same time. It’s also great to make the mix breathe a little easier when you start digging into the threshold.
Now below the top knobs is where it can get fun. Here we have a slant range EQ. Using this is easy too. Simply press the “On” button and you’re ready to go. The gain works as either a shelf boost or a shelf cut of the frequency selected. Picture the gain knob as a control for one of those scales that they used way back in history… you know… the ones that you put something on each side and the heavier thing goes lower… ok ok or a see saw and the frequency you selected is the middle point. If you turn the gain knob right, this is raising the highs, therefore the low frequencies go down and if you turn it left, the low frequencies go up but the highs go down. All of this is done in a linear fashion so for how much you boost, you will lose the same amount of the opposite side of the spectrum of frequencies. Oh did I mention the choice of frequencies is HUGE. You can go from 20Hz to 2kHz with the 10x switch off, and from 2kHz to 20kHz when the 10x switch is on. The possibilities are endless with the tilt EQ. Now when I’m using this feature, I do suggest subscribing to the “use in moderation” theory and normally stay around .75 – 1.5 in the gain tilt, but you can go nuts with this thing and it still sounds great. Even just by simply enabling this tilt eq you get a slight active EQ.
Next to that is the side chain. The side chain allows you to grab specific frequencies and let others go through. Perfect for taming just the bass or pulling some of the highs out to soften the mix.
To top this immensely hot rodded compressor, we have the bottom row which has knobs to control your mix between the dry and compressed signal, the gain compensation which is standard for all compressors, and a soft clip limiter which beefs up transients that usually would get drowned out in loud mixes. The dry / compressed mix knob is a rarity and is ideal for blending your dry with the processed signal to get that perfect balance. The buttons on both sides of the mix can either solo out or mute your direct or compressed signal. This makes mixing immensely easier by allowing you to A/B the two signals. This works especially well when you’re in MS Mode, which we’ll talk about here shortly.
In between the gain and soft clip, we have a warm button which emulates the hardware version of this compressor’s transformer and softens the signal to give it that warm thick tone, perfect for giving the mix that little extra push it needs.
In the middle of this unit we have the buttons on the bottom which enable MS mode, Make the compressor active, and link the two sets of controls on either side. MS mode is the fun part. This is where the compressor flexes it’s muscles and really starts to show off. MS stands for Mid-Side mode and what this does is separate the middle signal from the stereo field. This is how you make your stereo field sound a great deal wider and fill the mix up. When enabled, the left side controls your middle compression so you can tighten up those vocals and make them sound more forward in the mix. Then the right side controls your sides of your mix. I use this a lot with the tilt EQ to put most of the bass in the stereo field and take some out of the center to widen up and make the mix sound broader.
Now you can use those solo buttons I talked about earlier to their full potential. Go nuts!! Solo the side signal, tweak it till your hearts content. Then move over and solo the center and set it just right… Then… make sure you’re braced because if you turned those knobs just right, the sound coming out will be too much to take. You’ll laugh, you’ll cry, you might even lose control of you bodily functions… I’m just warning you so it doesn’t happen to you too!! Oh did I mention when you buy this, you get a more scaled down mono version of this plug-in for individual tracks? Oh I already did? Well you do and what it basically does is take one side of the compressor, eliminates the tilt EQ and the knobs you don’t need and allows you to use it on just about anything.
Operation:
With so many features at your disposal, its tough to even say where to begin. The interface looks great, almost exact to it’s hardware version. The guys teamed up with Brainworx to make this and they did a spectacular job. I do have to say the physical rack mount version of this is a lot prettier with it’s glowing knobs and sleek, clean surface but if they went too far on the look of this, you would wake up at night with the sounds of your computer weeping from being pushed too hard. So they had to balance. However, this plug-in can bog a system down if you don’t watch out, but doesn’t necessarily do anymore than any of the other mastering plug-ins, plus it has more features so that’s even more impressive. One of my favorite parts about it is that you can use the mouse scroll to adjust the knobs. Its great!! You just mouse over the one you want and wheel away. I think this feature is spoiling me a bit because I’m starting to do it with all of my other plug-ins so umm… other companies… you might want to take note of this.
You would think with so many knobs and buttons that it would be very easy to screw up a mix… Think again. I let a buddy of mine try to make a crappy sounding compression and he really tried hard, but other than him cranking every knob to 10, he couldn’t really destroy the mix too bad. So that’s a feather in their cap for usability.
Lets Put This Thing To Use Shall We?
I know this has been a lengthy bit of text to read so I’m going to make it up to you by accepting a challenge they put out there when describing this plug-in. They said it was so good that you will want to put it on every track you have. So I, being a daring young man with stars in his eyes, set out to accept that challenge, and give you sound comparable samples of everything including a final version of the song. Lets see if this software compressor can give an analog piece of hardware a run for it’s money in character and sound quality; or see if it won’t add any noticeable difference at all. The results might surprise you.
I took a session I did a while back with a buddy of mine named John Garrett. He wrote the song and I just played the instruments, while he did the vocals. If you want to hear more of his stuff, you can find him on Facebook or Twitter. Yay Plugs! Now on to the mix.
Everything was tracked using a Focusrite ISA one, Rode NTK, and Audio Technica 3035 into a Pro Tools 003 console.
Drums:
First lets play with the drums. I know they sound OK on their own but I’m a drummer at heart so I want an aggressive kit… almost to point where it even clips a little. So I take all of the drum tracks, bus them over to a stereo track and add the stereo version of the Alpha Mix. I leave the channels linked because I’ll use MS mode on the master track. So I start turning knobs. Like I said before, I want this track to be very in your face and aggressive so I enable feed forward mode, crank the threshold and enable the auto fast release. I even put some soft clip into the mix, but not a lot.
Here’s the before sample of the drums.
ATC Drums Before Alpha by Everything Recorded
They’re not bad right? But I still wanted more edge out of them so here’s the result after the Alpha
ATC Drums After Alpha by Everything Recorded
Now I know there’s a little bit of clipping going on with the kick but the master compressor will smooth that out in the end. Pretty Noticeable difference if you ask me. My only real issue is that it took a second for the compressor to kick in and it missed that first shot of the kick.
Bass:
You always want the bass to cut through the mix but not to the point where it makes everything muddy. So you want the compressor to give it just a little boost and smooth it out. What I did here was engage feed forward, leave the threshold and attack around 12 o’clock and set the release on auto fast and set it at 300. Now with the ratio set at 1.8 and warm mode enabled for added depth, we’re good to go. You might need headphones to hear the difference on this one especially if you’re using small computer speakers.
Here’s the before sample:
ATC Bass Before Alpha by Everything Recorded
The before sample sounds good, but I know this compressor can get more out of the track.
ATC Bass After Alpha by Everything Recorded
Depending on your speakers that might have distorted a little, I proofed all of these mixes on a bunch of speakers and some distorted a little, but the end will determine the means on this one, trust me.
Acoustic Guitar:
This track just needed to be a little more pronounced so I used the compressor to boost the body of the track and used a little bit of side-chain EQ.
The before track:
ATC AGT Before Alpha by Everything Recorded
With the slight boost:
ATC AGT After Alpha by Everything Recorded
Now there’s a little more punch to the track to bring out more emphasis on the strumming but not so much that it squashes the rest.
Electric Guitars:
Same concept as the acoustic guitars, but this time I want a little more sustain and a wider feel to them so I bus the electric tracks into one stereo bus and play in MS mode to make them sound further on the sides.
Before track:
ATC EGT Before Alpha by Everything Recorded
Now with the Alpha Compressor
ATC EGT After Alpha by Everything Recorded
Notice the way it jumps out just a little bit more and sounds spaced out a bit?
Piano:
Piano didn’t do too much of a difference with the compressor. It was pretty much at the point it needed to be but here’s the samples anyway. I didn’t do much compression but I did add the warm button. See if you can hear it.
Before:
ATC Piano Before Alpha by Everything Recorded
And the after:
ATC Piano After Alpha by Everything Recorded
That warm button is pretty impressive huh?
Vocals:
I wanted a the main vocal dead center of the mix and the backgrounds thrown as far to the sides as I could so I bussed the vocals and tried MS mode just for fun.
Before: ATC Vox Before Alpha 1 by Everything Recorded
And the after:
ATC Vox After Alpha 1 by Everything Recorded
Something unexpected happened. Obviously, it did the job great on spreading the vocals, but it also did something very hard for a piece of software to do. If you listen carefully to the second track, it almost created the same effect that the “silk” knob does on a Neve preamp. It gives you this saturated distortion that is hard to characterize. I call it a burning sound in the track but I don’t know what the technical term is for it. I did this to show you that when this compressor is pushed, it doesn’t give you that horrible crackling sound most software compressors give. It saturates the tone instead of destroying it. Elysia just might have accomplished the challenge at hand for making a software compressor that has an analog soul to it.
Now for the grand finale.
Here is the result of putting the alpha on every single track in the mix and using it as a mastering compressor at the same time.
Before the Alpha was applied:
ATC Complete Before Alpha by Everything Recorded
And finally the complete song with the Alpha applied to all tracks and master bus.
ATC Complete After Alpha by Everything Recorded
I don’t even need to summarize this review. The audio files speak for themselves here. Did this plug-in accomplish the task at hand in acting like it’s analog brother? Well in my opinion it definitely did, but what are your thoughts on this? Go get a trial version of this, apply it to your own tracks and find out personally.
Rating: 5 out of 5
Interface: 5
Ease of use: 5
Features: 5
Value for money: 5
For more info on Elysia and to buy this incredible plug-in, click HERE
Be the first to leave a review.


