78.2 F
Houston
Saturday, September 21, 2024
AffiliateMusic Software Bundles from Pluginboutique.com
Home Blog Page 24

Waldorf KYRA FPGA Synth

Waldorf, in an attempt to be a first has announced KYRA, an FPGA (Field-Programmable Gate Array) synth. They teased an image of a beautiful wood and stainless keyboard with claims of 32x oversampled hardware with dual wavetables, 4000 wave shapes, and 10 oscillators.
REMAGEN, GERMANY: hot on the heels of having turned heads and opened ears with its innovative flagship, Quantum, a high-class hybrid synthesizer showcased to widespread critical acclaim at The 2018 NAMM Show in Anaheim, California earlier this year, high-quality synthesizer developer Waldorf Music is proud to announce a full production launch and general availability of Kyra — the world’s first fully FPGA (Field-Programmable Gate Array) powered synthesizer featuring 128 voices (regardless of settings and effects), each with 10 oscillators per voice, and eight-part multitimbrality (with each part having its own dedicated nine-module effects unit) — at The 2019 NAMM Show, January 24-27, in Anaheim, California…
As an extremely powerful VA (Virtual Analogue) synthesizer literally like nothing else out there — thanks to leveraging the latest FPGA technology to significantly outperform legacy DSP (Digital Signal Processing) powered competition, Kyra’s crowning glory comes courtesy of its state-of-the-art audio quality: think 32x oversampled hardware with dual wavetables providing over 4,000 waveshapes! With 10 oscillators — that can be doubled to 20 by using two voices — each offering a wide range of features, including true stereo operation, hard sync, FM (Frequency Modulation), and ring modulation, Kyra starts shaping up as a serious sonic force to be reckoned with… without even factoring filtering into an already seriously impressive-sounding instrument! Indeed, Kyra’s resonant filters are accurate oversampled emulations of classic analogue ladder filters with 2- and 4-pole configurations (offering -12dB/oct and -24dB/oct of magnitude decrease, respectively). Saying that, two linked or independent filters can be used in Dual Voice mode, making for even more creative options. On top of that, there are three envelope generators, three stereo LFOs (Low Frequency Oscillators) with 64 shapes and MIDI (Musical Instrument Digital Interface) clock sync, an arpeggiator, full keyboard microtuning, and true polyphonic portamento, as well as a comprehensive 18-channel modulation matrix to Kyra’s notable name.
Notably, Kyra comes highly specified for effects, each of its eight parts featuring a three-band EQ with sweepable mid, dual tube limiters, formant filter, distortion, six-stage phaser, stereo digital delay, comb/flanger/chorus/doubler unit, and a programmable reverb. All effects units on all parts can be used simultaneously and run at Kyra’s native 96kHz sample rate.
Kyra clearly delivers when it comes to connectivity by boasting four assignable, balanced 32-bit/96kHz stereo outputs, a headphone output, low-latency DIN MIDI, a fully class-compliant USB2 implementation for MIDI, and a stereo 24-bit/96kHz audio stream for each of its eight parts. Production-wise, there is also a USB (Universal Serial Bus) audio return feature, so Kyra can render final DAW (Digital Audio Workstation) audio under ASIO (Audio Stream Input/Output). An ASIO driver is provided for Windows users while Mac support is out of the box.
But if any aspects of this impressive instrument already have a ring of familiarity about them then Musikmesse 2018 in Frankfurt am Main may have played its part. Put it this way: Waldorf Music CEO Joachim Flor found himself transfixed there. “It was more of a coincidence to have discovered Valkyrie during a tour of this year’s Frankfurt Music Fair, but I was immediately aware of the fact that this was probably one of the most exciting synthesizers of recent years,” he admirably admits. “I got into conversation with its independent UK developer, Manuel Caballero, and I’m now looking forward to working with this talented, innovative individual, who is also a great guy! Under the direction of Waldorf Music, Valkyrie flies forth into a joint production project called Kyra, which will be shown and delivered at NAMM in 2019.”
Fortunately for Manuel Caballero, the feeling was clearly mutual — Musikmesse mission accomplished. “After nearly four years in the making, I went to Musikmesse with the intention of finding an established partner for Valkyrie,” he reveals. “There’s little doubt that Valkyrie’s reveal at Musikmesse caused quite a stir in the synthesizer world and I had set the bar high for potential partners to bring the instrument to market. As a result of this, I’m pleased to announce a partnership with Waldorf Music. Few companies can match their track record of innovation and delivery spanning several decades. Working with Joachim Flor and his technical and design team to achieve this is an exciting and efficient partnership as we work together to launch the instrument at NAMM in 2019. Waldorf’s proven heritage in product design, manufacturing, and distribution leaves me to do what I do best, which is applying the most advanced technologies to the art of music, and I look forward to a continued deep working relationship with the Waldorf team.”
Kyra is initially scheduled for full production launch at The 2019 NAMM Show, January 24-27, in Anaheim, California, competitively priced at €1,899.00 EUR as a desktop/rackmount model (with a keyboard version to follow later in 2019).

Slate VMS ML-2 Modeling Microphone

Slate was one of the first to release the large diaphragm condenser microphone that can mimic many of the classic mics most of us can’t afford. Now the ML-2 has been released that caters to the small diaphragm classics like the 421, SM57, and RE20.

We’re proud to announce the release of the VMS ML-2 modeling microphone. The ML-2 offers a locker full of the industry’s top instrument mics including dynamics like the 57 and 421, cardioid models of classic ribbons like the 121, small diaphragm mics like the 451 and 222, and even large diaphragm mics like the 414 and tube 67.

And now we’re introducing a way for you to experience the Slate Virtual Recording Studio including our microphone models.

Click below to go to the VRS Experience page where you can download all the Slate plugins including demos of our VMS microphone plugins, as well as a multitrack session recorded with VMS mics through our upcoming VRS8 interface.


Price: $149

For more information visit Here

Review: Unfiltered Audio Zip from Plugin Alliance

Unfiltered Audio Zip Rundown
5 / 5 Reviewer
Pros
- Can work as simple or complex as needed.
- Any type of control is at your fingertips.
- Multiple modes make this compressor as versatile as they come.
Cons
- None. Only suggestions for more improvements
- Would like more detection filters
- Could use an input level knob to drive compression harder.
Summary
What appeared to be a niche' compression plugin becomes one of Everything Recording's "desert island plugins". This is the end-all-be-all dynamics tool. From subtle vintage style compression to all out digital havoc, Zip has it all.
Rating

More and more, the term “Compress for Tone” is popping up in training videos and forums. This is the practice where a dynamics tool is used for more than just a control to tame a transient track. Many vintage compressors have a tonal quality that will “color” the sound while treating audio. In EDM tracks, compression has been used for movement by sidechaining synths to a rhythmic element instead of the intended track. With all of the innovations in digital workstations, it almost seems like trailblazing unique uses of compression has run its course and there are no more worlds to conquer. Unfiltered Audio’s newest plugin Zip, takes on this very challenge.

Unfiltered Audio is a company part of the Plugin Alliance that takes normal tools and pushes them to limits unheard of. Their plugin lineup is a broad swath of tools from delays, distortion, to insane pitch bending effects. Everything Recording reviewed the latter of the 3 – Unfiltered Audio Fault (Review Here).

Zip’s interface follows the same design as other Unfiltered Audio plugins: both a dark and light skin of the GUI, resizable window, and a sleek minimalist look. If at first, controls seem daunting, simply hover over each control for tool tips. Each tip goes into user manual-like detail for specific controls, giving you an instant idea of how and why to turn the knobs. The settings menu enables / disables tool tips, as well as offers controls for changing the skin color and even allow for enabling a soft clip limiter to the output signal. This comes in handy when pushing the dynamics far beyond the limits of basic dynamics processing. The aforementioned sizing is also available in this menu in case the interface is too small.

Zip’s overall theme is all about handing control over to the user. On top of your standard functions like Threshold, Ratio, Attack, Release, Gain and Mix; Zip features deeper control of each of these experiences. While most compressors leave the minutiae tucked away under the hood, Zip places it right on the dashboard.

Sitting on the left-hand side of the interface is the heart of Zip. Herein lies Zip’s Analyzer section. A single graph conveniently displays incoming, compressed, and outgoing signal. The input displays in blue, output in pink, and dynamics in both white and red. Intensity of the input can be roughly monitored via the two dots in the Input box. This box also serves to change exactly where the audio for the analysis section comes from. This is set as default to the track, but can be easily set to another source. The RMS / PEAK control can change between a more easy-going response with RMS, or a faster response with PEAK.

Just to the right of the compression display is the Filter and Lookahead controls. The Filter at the 12 o’ clock position represents the audio coming into the analyzer as is. By turning counter-clockwise, a low pass filter is gradually added; turned clockwise, a high pass filter is applied. Values in the center of the knob display just what frequency is beginning the high or low passing. Unlike standard compressors, this filter can go as far as you want.  To get a better picture of what is being sent to the Analysis section of the compressor, the Audition button will allow for an audible example. Combine this with the amplitude modes, and a whole world of possibilities open up.

The Lookahead does just what the name implies by delaying the audio and giving the Analysis section a sneak peek of what’s coming ahead of time. This ensures the fastest response for surgical transient control.

The “Amplitude” section is where zip starts separating from the pack. Instead of limiting the detector circuit down to basic choices, the doors get blown off. There are a total of six different modes, each with very unique tendencies. If you need the run of the mill compressor, amplitude mode analyzes the loudness of the signal, but that’s no fun – there are hundreds of plugins that accomplish this. Zip starts by going into the “upside down” with “Quietness”. This feature treats the quietest parts of the signal as the loudest. The compressor is then triggered more by quieter audio. The following two sections address frequency with either “Brightness” or “Darkness”. On Brightness, higher frequency content will trigger the compressor more and vice-versa with Darkness. The last two get a little more complex. “Noisiness” will measure frequency response and audio with faster changing frequencies will appear louder to analysis. Conversely, “Tonalness” responds more to stable or even frequency response. These modes open possibilities for compression in ways never even considered or even attainable in the analog world.

The right side of the GUI hosts the dynamics section, which contains both standard and unorthodox controls for handling audio. While the features of Threshold are pretty much unchangeable, Zip does add an Auto Threshold button which averages the incoming audio’s amplitude and nudges the value over the last few seconds of signal. This tailors the audio to a swath instead of just the “here and now” that a standard compressor uses. When the Auto Threshold button is active, the inner workings can be seen in the graphical section by the way of a dotted horizontal line. If the standard Threshold is used, this is represented by a solid horizontal line.

While the Expand, Ratio, Knee, Attack, and Release all work like other compressors, there are other functions in this section that can change how these stock controls behave and sound. The Envelope mode sits just under the attack and contains different reactionary circuits based on the compressor’s controls. Classic behaves like most, Goopy acts slowly and more vintage, Quick handles fast transients, and Extreme is… well quicker than Quick. Each of these modes offer a unique take on dynamics and give Zip an edge over most dynamics plugins on utility alone. No more digging through the stacks of plugins to get the characteristics needed for specific audio. This plugin can handle it all.

Zip even goes as far as incorporating what it calls Color Modes. These controls are at the very end of the signal chain and imparts different tonal effects to the already compressed signal. The perfect amount can be dialed in with the “Color” knob. From saturation and distortion (most likely borrowed from elements of their plugins Dent and Indent) to different filters, Zip can add subtle or outright sonic characteristics to the output. My personal favorite has become the Bitcrush, which adds a digital degrading effect to the audio. Used subtly and this adds an undertone of grit, pushed all the way and it will rip tracks apart like a chainsaw.

At the very end of the signal chain is the Mix knob, in-house Bypass button, Gain, and the AGC (Automatic Gain Compensation). AGC takes the Threshold, Ratio, and Analysis modes into consideration and applies a fixed amount of gain.

But that’s not all folks. Unfiltered audio applies their unique modulation system to Zip, giving the tool already able to produce movement, MORE movement. Dropping down the Modulation section gives a patch bay-like system where controls can be linked to different controls or even the actual control itself. While this can seem very intimidating at first, a little effort and reading the manual go a long way. The best way to learn is just to dive in and start patching controls. With functions like Input Followers, LFOs, Step Sequencers, there literally are infinite possibilities for creative effects inside Zip. The Modulator can even be connected to the ROLI Lightpad controller for live performance modes.

OK… With so many avenues of exploration let’s start with the impression of Zip just as a basic compressor. Honestly, when I first saw the tool, I thought of it more as a niche effect, a novelty, something that would work in unique creative circumstances. Sure, it’s very cool to be able to compress something utilizing quietness as loudness but in everyday situations, I wasn’t sure it would hold up. I could not have been more wrong. This Compressor redefines or maybe even surpasses being called a “Swiss Army Knife” tool. Zip can be used in almost any imaginable situation from transparent to transportive. The controls are as straight-forward as they come and results are easy to obtain. As a creative tool, none get better. If the modulation section intimidates, simply browse through their extremely comprehensive preset library. Something will catch your ear… guaranteed. If you want to dip your toe a little further, try to “Randomize Parameters” preset. Controls will go from “I never thought of that” to “That’s enough!”. Either way, creativity will flow.

While it is nearly impossible to critique a plugin like this or have any outright dislikes, I do have a few features I felt were missing. I mean, if we’re talking creative plugin, why not throw in the kitchen sink as well. Firstly, I would have liked to see an input gain control. If I’m already going to mangle audio, let me ream or “anti-ream” the Analysis section. Let me throw a modulator on the input and make it move harder using the AGC at the end to keep it level. I also would like to see color modes either pre or post compression. If I’m continuing deeper into the creative rabbit hole, let me have a controllable bandpass filter on the Analysis and Color mode. I want to dial in the exact section of frequencies I want triggering or give the audio a distorted megaphone sound. Lastly, I found myself using the “Color” section on its own without compression on tracks. I’d love to see a compact, one-knob style plugin of this one control with a mix knob, similarly to what they did with Dent and InDent.

Aside from the extra features this plugin inspired me to think up, Zip is the most impressive and creative tool I think I’ve seen yet. Zip is even to blame for how long this review took to publish. I kept recalling it in sessions to check features while writing and never came back to the review. The rabbit hole is deep with this one. If you are looking to eliminate the lists of plugins in your DAW, just get this one. You could take every other compressor out of my stash and even though I would miss a few, I could easily survive on Zip. Standing ovation, Unfiltered Audio. I don’t see how you possibly could keep pushing plugins further, but I am excited to see what’s next.

Sonarworks Establishes a new Studio Reference Sound Standard “Sonarworks SR” for Speakers and Headphones

What began is a project for allowing the use of headphones as valid mixing references, Sonarworks has evolved into a powerhouse software system for correcting many modern mixing problems. This technology has progressed to the point whereby a whole digital standard has been established for sound translation.

Riga, Latvia — Pioneering European audio software developer Sonarworks has established a groundbreaking new digital sound standard, to be included with the latest update of company’s revolutionary Reference 4  sound calibration software launching in early June. The standardization technology, called Sonarworks SR, promises to resolve the age-old industry problem of disparate sonic reference points for audio professionals — delivering the same accurate studio reference sound on speakers and headphones.

By using patented, research-driven digital technologies,  Sonarworks SR sets the frequency response to be like completely neutral speakers in a treated room. The calibration of headphones is done using a calibration profile pre-measured in Sonarworks lab, while speaker calibration profile is produced by a user on-the-spot using  Sonarworks measurement software.

Solving an age-old problem for a new generation
“The entire professional audio community is acutely aware of the fact that every room and every headphone invariably has the effect of coloring sound. This has had an enormous negative impact on both costs and productivity — not to mention creative workflow. We estimate that at least one-fifth of the effort in the music industry is spent dealing with translation issues,” said Martins Popelis, VP and co-Founder of Sonarworks.

“By establishing Sonarworks SR, we have an opportunity to align the entire audio industry on a common audio reference that works with unprecedented accuracy across different locations, devices and operators. We want to liberate music creators from monitoring translation issues so they can focus on musical decisions rather than working around the physical limitations of their room and gear,” he added.

Starting with the latest update to Reference 4, Sonarworks SR will be included in all of Sonarworks software products, effectively reducing the need for professionals to check their mixes on different listening systems while dramatically improving workflow and production times.

“With the launch of Sonarworks SR, Sonarworks brings us a much needed new standard on headphone calibration and compatibility,” comments Rafa Sardina, a twelve time Grammy award winning producer and audio engineer. With many more nominations in his pocket, Rafa is one of many studio professionals worldwide who feel that a new standard would greatly improve music production.

A new standard with professional ingredients
The Sonarworks SR standard is comprised of patented sound measurement technology and professional grade signal processing. The result is unprecedented accuracy (+/- 0.9 dB) among different locations, playback devices and users. The standard works equally well on both loudspeakers and headphones and is simple to set up.

Sonarworks SR also employs an innovative speaker measurement methodology that captures sound from 37 data-source points — which was determined by Sonarworks researchers to be the optimal point count providing superb accuracy and measurement repeatability.

For more information about Sonarworks SR, please visit https://www.sonarworks.com/standard

Eventine and Newfangled Audio Release Elevate Bundle 1.5

Newfangled Audio and Eventide have joined forces to make the Elevate Bundle even better by adding two more plugins to the bundle. These new tools go beyond mastering, even functioning as mix tools.

LITTLE FERRY, NJ, USA: recording technology trailblazer Eventide and advanced audio tools creator Newfangled Audio are proud to announce availability of Elevate Bundle 1.5 — adding value to an already valuable bundle with the addition of two new plug-ins, Saturate and Punctuate, as well as feature improvements to EQuivocate and Elevate itself — as of July 5…
Saturate is a spectral clipper plug-in, useful for mixing or mastering. As such, it adds up to 24dB of drive with a variable CLIPPER SHAPE parameter that moves from a pleasant soft curve to full hard clipping. Unique spectral processing maintains the tonal balance of the distorted signal, no matter how hard it is pushed. Saturate automatically compensates output level based on the DRIVE control or, alternatively, allows this to be controlled manually.
Meanwhile, as a transient emphasis plug-in, Punctuate is also useful for mixing or mastering. Musically speaking, it offers up to 26 auditory bands of TRANSIENT EMPHASIS or suppression while its unique ADAPTIVE TRANSIENT and ADAPTIVE LENGTH controls allow algorithms to tailor each band’s transient shaper to what the listener’s ear wants to hear. Helpfully, customizable parameters for each band also allow users to tweak the result, if needed.
The Elevate Bundle 1.5 update also brings several feature improvements to the original pairing of EQuivocate, an Auditory Graphic EQ based on the critical bands of the human ear, and its Elevate namesake, a unique multi-band limiter, human ear EQ, and powerful audio maximizer first released late last year as the most advanced mastering plug-in ever created.
EQuivocate benefits from a new RANGE feature, allowing users to scale or invert the total dB range for the EQ in order to change the total amount of EQ applied after setting the individual bands. This also allows users to scale the range of the MATCH EQ before and after it has been set. Additionally, each band benefits from enable buttons to easily turn bands on and off for better workflow with improvements implemented elsewhere also assisting.
Essentially, Elevate adds true peak limiting, preventing final masters from clipping during reproduction and ensuring compatibility with all broadcast standards.
Elevate Bundle 1.5 (comprising the Elevate, EQuivocate, Punctuate, and Saturate AAX/AU/VST plug-ins for Mac OS X 10.7+ and Windows 7+) is available through Eventide and authorised dealers at a promo price of $139.00 USD through to September 5, 2018 (rising thereafter to a regular price of $199.00 USD). Owners of EQuivocate can upgrade to Elevate Bundle 1.5 for $99.00 USD through to September 5, 2018 (rising thereafter to a regular price of $149.00 USD). Owners of Elevate can upgrade to Elevate Bundle 1.5 for free at anytime.
For more in-depth information, please visit the dedicated product webpage here: http://www.eventideaudio.com/elevate

Tone2 Releases Electric Universe Soundset for Electra2

Tone2’s Soft Synths are a mainstay in a lot of projects over here at Everything Recording HQ. The textures and vibe that Electra brings to the table is second to none. Since we mainly use presets and build upon them, this new Electric Universe Soundset is very enticing. In case you’re interested, here are some reviews on some of our favorites.

Electra2 Review

Saurus Review

Nemesis Review

Tone2 releases the Electric Universe soundset for Electra2

This set contains 155 high quality presets for Electra and is suitable for contemporary electronic and ambient music genres.

Highlights

  • Includes 155 Presets
  • All patches are volume-normalized. They won’t clip and have equal volume levels when scanning between presets.
  • Complex modwheel destinations for all patches.
  • Many patches are velocity-sensitive.
  • Nearly all patches are multi-layered. Roughly a third contain new multi-samples.
  • Easy-to-use installer
  • Comfortable integration to the user interface

Genres

Electronic Dance Music, Ambient, Trance, Goa Trance, Psybient,Trance, Melbourne, Cinematic, Electro House, Future Bass, Psy Trance, Tech House, Chillout, Lounge, Eletronic, Sound Track

Free bonus content

Includes over 100MB multisamples, wavetables, and attacks in wav-format.
Includes 24 midi-files with over 70 merged patterns from most of the audio demos. They are named identically to the corresponding preset.
Includes two FL-Studio project-templates using only stock plugins and presets of Electric Universe for analysis. One uplfiting trance kit and one ambience composition.


Patch Breakdown

  • Leads:26
  • Pads:19
  • Basses: 25
  • Plucks/Keys: 16
  • Atmospheres: 8
  • Arps/Sequences/Gate: 15
  • Drums/FX: 7
  • Instruments/Synth Choir: 4


Price: €29 / $39

MP3 demo:  https://www.tone2.com/mp3download/Tone2_Electra2_Universe.mp3
Video: https://www.tone2.com/video/Tone2_Electra2_Universe.mp4

For more info please visit the  product page: https://www.tone2.com/universe.html

Avantone CLA-10 Monitors

Avantone have already released their version of the ubiquitous Auratone speakers. Now they’ve teamed up with Chris Lord-Alge to create probably the most used studio monitor of all time: the Yamaha NS-10.

TALLMAN, NY, USA: affordable high-quality audio products producer Avantone Pro is proud to announce availability of its CLA-10TM classic studio reference monitor — manufactured as a full-range, two-way passive pair for fixed or remote locations while also accurately recreating an iconic studio monitoring mainstay, much loved in the music industry among pop and rock recording engineers to this day as a valuable mixing tool with which to reveal shortcomings in recordings — as of June 22…
Times change, as does technology. That being said, today’s newly developing age of high-definition audio does not necessarily negate recording shortcomings. Studios still primarily use two- or three-way large monitors designed to represent a wide range reference viewpoint at higher listening levels and there is still a need to hear what a mix will sound like when played back over small systems, such as car stereos, clock radios, computer speakers, and televisions. Indeed, it is important to make mixing judgements based on listening to reference monitors that will not impart tonal anomalies caused by crossovers or inferior full-range drivers. Paying particular attention to the critical midrange vocal/guitar/keyboard areas is always advised.
As such, over a year of R&D (Research & Development), comparative listening, and tweaking went into voicing Avantone Pro’s CLA-10TM while working in close collaboration with five-time GRAMMY® Award-winning mix engineer Chris Lord-Alge — hence having his signature grace the finished, familiar-looking cabinet. The result is a very accurate recreation of an iconic studio monitoring mainstay, much loved in the music industry among pop and rock recording engineers to this day (despite discontinuation of the original product in question back in 2001). Much more recently, listening tests in studios show that recording engineers accept the CLA-10TM as a transparent replacement — just ask Chris Lord-Alge, an assuredly talented and incontrovertibly impressed individual, as evidenced by his following flattery: “I put my mixing reputation on these great speakers… I am mixing on them as I write this.”
The CLA-10TM clearly meets its engineering and performance objectives, attributed, in part, to a 10.4-litre sealed design cabinet constructed of non-layered, high-rigidity MDF (Medium-Density Fibreboard) — chosen for its natural low-resonance characteristics — finished with an outer layer of real wood veneer. Visually and tonally fusing the past with the present, Avantone Pro utilised the latest in FEA (Fine Element Analysis) modelling to achieve its custom-designed 180mm AV10-MLF low-frequency driver based on paper cone construction with ‘old-school’ speaker design artistry, thanks to the finest pulp material that performs as closely as possible to the original by being press formed rather than die cut for tonal consistency. Cloth surround material is made in Japan for added authenticity and has unique damping characteristics, enabling a predictable compliance over the lifespan of the driver. Avantone Pro’s custom-tooled frame supports the driver/cone combo to minimise mechanical transfers while the 35mm AV10-MHF high frequency silk dome-based tweeter is as close a match to the original as can be made, making for both a frequency (60Hz – 20kHz) and voicing match to the classic sound so admired by the likes of Chris Lord-Alge — hardly surprising since those aforesaid AV10-MLF and V10-MHF critical components have been extensively field-tested in top LA and NY studios to universal acclaim as drop-in replacements for both Avantone Pro’s own CLA-10TM and also the iconic studio monitoring mainstay it recreates so accurately.
Anyone seeking a transparent replacement for their much-loved nearfield studio monitoring mainstay as a valuable mixing tool with which to reveal shortcomings in recordings should seriously consider investing in Avantone Pro’s CLA-10TM. Clearly its sound should be as familiar as the distinctive looks it also accurately recreates. Indeed, its (381.5mm x 215mm x 197.5mm) cabinet dimensions and (6.3kg) weight will make transitioning to the carefully crafted CLA-10TM when waving goodbye to the ‘dearly departed’ seem seamless. Some studio visitors may even do a double take when told that the same speaker stands or console bridge boast new classic studio reference monitors!
The CLA-10TM arrives at Avantone Pro’s US Dealers (http://www.avantonepro.com/us-dealers.php) in August 2018, priced at $699.00 USD per pair. (Worldwide Distributors are listed by country here: http://www.avantonepro.com/worldwide.php)
For more in-depth information, please visit the dedicated CLA-10TM webpage here: http://www.avantonepro.com/cla-10.php
Watch five-time GRAMMY® Award-winning mix engineer Chris Lord-Alge’s compelling CLA-10TM introductory video here: https://youtu.be/ZFLmP9XWyhg

ERA Bundle by Accusonus

Plugin developer Accusonus have the right idea. While most plugins used to correct problematic audio are highly involved and take some time to use, the ERA bundle contains easy-to-use one knob solutions to your audio woes.

​Accusonus Inc​, developers of music software tools based on artificial intelligence technology, makers of critically-acclaimed software and plug-ins such asdrumatom​, ​Regroover ​and Beatformer announce the immediate release of the ERA-Bundle. The ​Enhancement and ​Repair of ​Audio (ERA) Bundle ​is a collection of multi-patented audio repair plugins that offer both ​fast and ​high-quality processing. With this release, accusonus update their critically-acclaimed ​ERA Noise Remover (former ERA-N) and ​Reverb Remover(former ERA-R) plugins. The updated ERA Product Line introduces various user experience improvements, including an auto-gain function for ERA Reverb Remover and a vector-based and Retina-ready UI with 3 zoom levels. In addition, accusonus release (1) the ​ERA De-Esser that automatically detects and reduces excessive sibilance with the turn of a simple dial and (2) the ​ERA Plosive Remover ​the single-knob tool that instantly fixes unnatural plosive thumps (such as “p”, “t” and “b”). ​ERA-D​, the joint de-noise and de-reverberation plugin for post-production professionals is also updated, offering unique features such as the dual microphone workflow and the spectral band processing.

“The importance of audio content is increasing and we are committed to make our audio repair tools fast, simple and accessible to everyone” says Alex Tsilfidis, CEO of accusonus. “With this new release, we are harnessing the power of modern algorithms to create products that can achieve exceptional results in a fraction of the time”.

The ​ERA Bundle Standard​ includes the following products:

  • ●  ERA Noise Remover (formerly ERA-N – Updated)
  • ●  ERA Reverb Remover (formerly ERA-R – Updated)
  • ●  ERA De-Esser (New)
  • ●  ERA Plosive Remover (New)

The ​ERA Bundle Pro​ includes the following products:

  • ●  ERA Noise Remover (formerly ERA-N – Updated)
  • ●  ERA Reverb Remover (formerly ERA-R – Updated)
  • ●  ERA De-Esser (New)
  • ●  ERA Plosive Remover (New)

Pricing:

ERA Bundle Standard: Intro price: $99 (​Reg: $236)​ -until July 31st

ERA Bundle Pro: Intro price: $299 (​Reg: $535)​ -until July 31st

Each plugin can also be bought for $59.99 with the exception of ERA-D, which is $299

For more information and to purchase, visit https://accusonus.com/products/audio-repair

Review: Pro Tools 2018.4

Pro Tools 2018.4 Rundown
4 / 5 Reviewer
Pros
- Improved playlist section
- Track Presets
- Visual improvements that display where automation is present and which sends are in "pre" or "post"
- MIDI section overhaul
- Cloud-based iLok support
Cons
- MIDI improvements could have pushed a little further
- If Avid Update Plan is expired and new OS is released, the version of Pro Tools installed is no longer compatible, forcing you to stay on the older operating system.
Summary
The newly named Pro Tools 2018 sheds the old numbers for the year model and brings more new tools for the bag. With Retrospective MIDI Recording, Enhanced playlisting, and Track Presets, the update definitely speeds up workflow.
Rating

Pro Tools 12 was a major turning point for Avid in their innovation of the flagship DAW. Before version 12, it seemed the company had been resting on their laurels and many DAWs had started surpassing the established brand. Around this time last year, we featured an extensive five-part review, showcasing all of the new tricks version 12 of Pro Tools had up its sleeve. This year we’re back with a newly named Pro Tools with a few new tricks of its own.

I must admit, it’s good to see Avid continually updating Pro Tools. For a while, it seemed the only updates that were released in between major versions were to accommodate new operating systems. Now, it isn’t uncommon for Avid to sporadically add new features throughout the year. I have to concede that this is due in part to the subscription-based system. Although the subscription wasn’t a hit right off the bat, it is clear that whether we like it or not, most software companies are going this route. What this does accomplish is to create accountability between the user and company – if the company doesn’t continually push the envelope, people will not want to continue their subscription. Stagnation is not an option with yearly subscribers wanting the best bang for their buck. My only gripe is still the same as it was before. One piece of software should not stifle upgrading the OS on your computer. Compatibility updates should be included for a reasonable amount of time or at least offered for a small fee.

To get things started for 2018, Avid has ditched the sequential numbering system (just in time to avoid the dreaded “13”) and have switched to a more logical approach of simply using the current year as the version. This convention is across the board with all Avid products, making keeping up with versions of each software much easier. To make things even more simplified, updates are indicated with the month the update was released appended to the end of the name. The version being reviewed currently is Pro Tools 2018.4.

On top of dropping the version numbers, the HD line is no more and to be honest, I could not be happier. As a reviewer, using the terms “Standard, Non-HD, and HD” were wreaking havoc on the writing. I’m happy to announce that the old Pro Tools Standard is now just “Pro Tools” and HD has become “Pro Tools Ultimate”. This is in part due to the uncoupling of the HD Hardware with Pro Tools HD and allowing use of HD’s features with third-party hardware.

*It must be noted that Pro Tools Ultimate still requires the $299 Digilink License but check the fine print before buying. There are some situations where this license is included already. Speaking of being already included, the Machine Control License is now included with Pro Tools Ultimate 2018. This license enabled enhanced functionality and integration with hardware controllers.

Since the world is moving more “cloud-based” with newer laptops ditching traditional USB ports, Pro Tools 2018 now supports iLok Cloud Authorization. As more companies make this switch, hopefully, the USB dongle will be a thing of the past. To verify Cloud Authorization compatibility, ensure the latest iLok license manager is installed and the cloud icon is next to the deposited license.

With the administrative updates out of the way, we move into the fun stuff – enhancements.

For the Eucon compatible devices, new preferences have been added to further enhance efficiency with hardware like the S3. In Preferences > Mixing, options have been added to specify slots for default plugins as well as EQ / Dynamics cycling. When selecting default EQ and Dynamics, an additional drop-down allows for specific slot letters to be the primary choice for Pro Tools user-default EQ and Dynamics plugins. If the slot is occupied, Pro Tools will apply the plugin to the next available. Enabling the “Specify Slot for EQ / Dyn Cycling works similarly by letting the Eucon device know which two slots trigger the cycling between the EQ and Dynamics plugins.

As far as visual enhancements, Pro Tools 2018 has you covered. While some are subtler than others, don’t discount them as any less impactful as the bigger features. Before Pro Tools 2018, it was tough to see certain things at a glance, like whether automation was present or if the sends were pre or post fader. With the update, specific lanes in which automation is applied will display in orange. This can be accessed by dropping the arrow from the default “Waveform” view of a track and checking the list. Anything highlighted with orange has automation.

Similarly, if a send is pre-fader, the slot will be highlighted in blue. If in post, the slot will appear the normal gray.

On top of the subtle visual enhancements, Pro Tools 2018 comes with a nice companion to the Gain Reduction Meter in the Mix Window. A visual representation of the EQ applied can now be viewed in the mix window by enabling “EQ Curves” from the “View > Mix Window View” menu. Once enabled, the EQ Curve will display above the Mix Window’s I/O Section. It must be stated that the plugin has to be compatible for this to work. At the time of this review, many plugins are not yet compatible, even some of the EQ models from Avid’s own Ultimate Plugin Bundle. If a plugin is compatible, it will cause the EQ curve and indicator light to display green. If an incompatible EQ plugin is present on the track the small indicator light will display orange, even if a compatible plugin is also present. If no EQ is present, the EQ curve will display gray. Below are examples of how of each mode the EQ curve window will display depending on compatible or incompatible plugins.

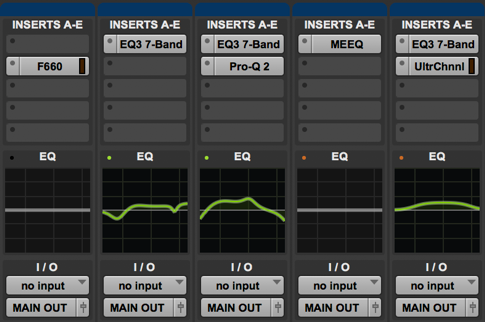
Where this tool does excel is in combining the sum of all compatible EQ curves in the display. Surround channels display independent color-coded lines for each channel. Let’s hope plugin manufacturers get on the ball about incorporating this. I know FabFilter ProQ-2 jumped on the bandwagon quickly (Review HERE)

Avid has not just stopped at the visual improvements. Pro Tools 2018 has several noteworthy workflow enhancements to keep the creativity flowing.

Mix templates are a great way to keep plugin chains and presets readily available, but not all mixes need the same treatment. In the past, it has been a common practice of creating a “. ptx” file with every possible track, send, and bus routing already placed in the session. Even though this covers all bases, the session quickly can become a behemoth when sometimes only a small percentage of tracks are needed. Track Presets help speed up workflow by allowing recallable states of inserts, presets, sends, and many other criteria to be recalled in a pinch. This gives the session multiple options for processing instruments all while keeping the screen clear of unnecessary bulk.

Once a track has been created with the routing and plugin chain desired, simply right click on the track name to “Save Track Preset”. From this menu, categories, custom names, and tags can be applied to the preset. Tags can additionally be auto-populated with Avid suggested types. Not only does Track Presets organize each saved preset, it also allows for only certain track data to be recalled. This includes data similar to what “Import Session Data” menu allows.

Track Presets are a very useful tool that goes deep in giving minute detail to be saved and recalled, even down to including certain audio and MIDI clips that existed in the track before it was saved. By default, the Track Presets are saved in “Documents\ Pro Tools\ Track Presets for easy backup and further organization can be maintained from Pro Tools’ Workspace section.

Recalling of Track Presets comes in a variety of options, spanning from right-clicking on an existing track, selecting “Track Presets” when creating a new track, and even from the Workspace. What makes the Workspace so valuable is that multiple Track presets can be recalled, by control (Win) or command (Mac) selecting multiple tracks, right-clicking and selecting “Import Track Preset”. Folders can be created with different full templates of track presets, giving the possibility for genre-specific templates to be created. Each Track Preset only works with the original track width (i.e. a mono track preset cannot be used with a stereo track).

With the addition of the Track Preset option, the Track Data to Import in the Session Data Import has been upgraded for better ease of use. Instead of having to scroll through and check what track data is needed, Pro Tools 2018 has an expanded window that pops up when clicking Track Data to Import > Choose. This window contains all of the settings as well as presets to determine just what is needed. Presets can be saved identical to Plugin presets and five of the most used presets can be stored along the top. No more sifting through track data every time you just need a bus or plugin chain added to the session.

Speaking of sifting through things, before Pro Tools 2018, comping multiple takes of a track was a chore. Each playlist had to be selected for each take, copied, then pasted to whatever playlist was determined as the final. Finally, Avid have come up with a solution that makes the often-arduous task almost pleasant.

The Playlist section has been completely overhauled. Settings have been added to preferences (Preferences > Editing > Tracks) that allow for bypassing the irritating “specify new playlist name” prompt. With the Suppress Name Dialog box checked, the automatically generated name (which most people use anyways) will auto-populate in the next playlist. Another option deals with the Target Playlist. With the Show Target Playlist box checked, as takes are cycled and audio is sent to the Target Playlist, Pro Tools will automatically snap to the Target Playlist instead of having to cycle back.

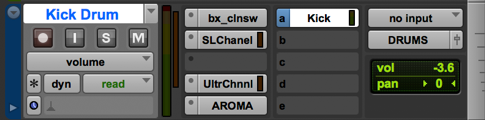
Before comping tracks, a Target Playlist must be selected. This can either be the default Main Playlist (the first playlist created) or can be selected by dropping down the playlist arrow and selecting the track desired to be the Target. All takes from playlists will be sent to the selected Target Playlist by default.

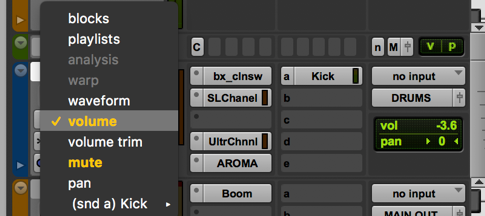
A new Playlist View has been created in the edit window. Simply drop down the “Waveform” box below the mute and solo buttons in the edit window and select “Playlist”. Each take will appear in a different color and can be independently soloed for quick reference.

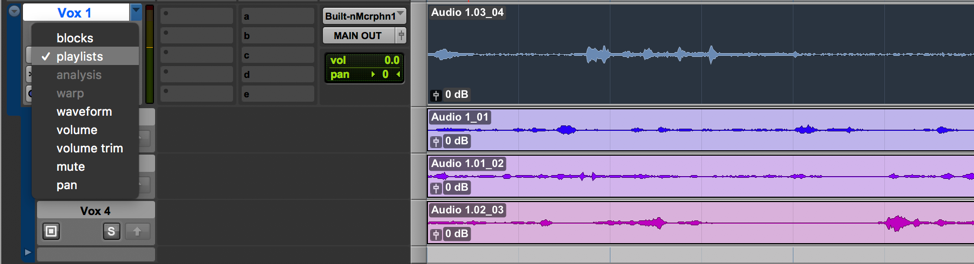
What makes these color-coded playlists even more useful is that the color of each specific take stays with the audio, making it easier to recall which take was used on the final comped take. Although the choice of having all playlists visible is useful, enhancements have been added to the Waveform view as well. Each playlist can be cycled through using the Command (Mac) / Control (Win) Shift Up or Down Arrow. Once all playlists are cycled through, a home icon will appear in the view to show that all playlists have been viewed. To send audio to the Target, select the region of audio and use the shortcut key “Option (Mac) Alt (Win) Shift Up Arrow”. If the preferences have been set to Show Target Playlist, the Target Playlist will display showing the newly moved selection.

Lastly, we come to the MIDI Enhancements. For a long time, Pro Tools has not been considered a “Sequencer’s DAW” due to the lack of functionality for virtual instruments. Avid have addressed this with many tools to take the hassle out of composing. Pro Tools 2018 now comes with Chord Analysis, whereby a track (or tracks) of MIDI can be selected and the chords will be displayed in the Chord Symbol ruler just below the tempo bar. After selecting the MIDI tracks, select “Event > Extract Chords from Selection” and let Avid to the charting. Since many songs begin in the MIDI phase, this makes extracting chords for charts a breeze.

While on the subject of creating songs, Retrospective Recording is another feature that will come in handy during a song’s birth. Ever been noodling with a part in MIDI and hit the perfect take only to realize that Pro Tools wasn’t Recording? Retrospective recording is enabled by default as long as the MIDI track has an input device selected and the track is record enabled. Even when the session isn’t recording, Pro Tools will listen and record MIDI performances to a buffer in case recorder’s remorse sets in. If a part is determined to be the perfect take even when not recording, simply press “Shift+C” to keep the performance. The MIDI will write to the track in the exact spot in which it was played. If playing over an existing part, Retrospective Record will merge with existing MIDI and can be removed by a simple undo command.

If the mouse is preferred instead of a USB Controller, several key command shortcuts have been added to make chord composition a little easier. Shortcuts have been added to transpose and even create new notes to quickly construct chords. If the song key is set properly in the Key Signature ruler bar, a shortcut even exists to move or add more notes following the song’s key structure. Notes can be widened and shortened incrementally to the grid. It must be mentioned that the “control” shortcuts will not work if the Mission Control Keyboard Shortcuts are set to default in Mac OS Preferences. The only drawback to widening the notes is that there isn’t a command to snap each side of the note to its closest grid. This would make editing live MIDI performances immensely less painstaking. This can still be accomplished with the “note on” and “note off” feature in the Quantize section but a key shortcut would quicken workflow.

On top of editing the key of notes, Velocities have a new set of shortcuts as well. Using the different combinations, velocities can be changed in either increments of 5 or 15. Sadly there is no option for changing by an increment of 1, making fine tuning velocities still rely on the mouse. Tab to Transients has been added to MIDI as well. For a list of all of the new shortcuts, consult the “What’s New in Pro Tools 2018.1.pdf”.

All in all, the new additions to Pro Tools are definitely enough to warrant an upgrade. Avid have carefully examined different aspects of the DAW and are chipping away at the list of requests by users. It seems Pro Tools 2018 is sincerely taking everyone’s needs into account when adding features. No one user type has been singled out on this update. Everyone from the composer, editor, and mix engineer all have new ammo to attack audio. While all of the upgrades are a huge step in the right direction, there were a couple of enhancements that seemed to stop a little short.

The MIDI Improvements are a step in the right direction. Having keyboard shortcuts to move, add, and expand notes are invaluable but I felt they stopped short. Not having the ability to fine tune velocity by less than 5 still forces the mouse to be used. In a lot of cases, fine-tuned movements are needed especially with virtual drums. Even though the Quantize feature can snap both sides of the note to a grid, I’d still like to see a quick shortcut that would send each side of MIDI notes to the nearest grid. I feel having this feature would further enhance the note widening feature.

Retrospective Record for MIDI is invaluable, but having this with audio would be even better. This one may be chalked up to DSP usage though. That one might be a bit of a reach. Hopefully, as time goes on these things will be built upon, but the effort to innovate is definitely present in Pro Tools 2018.

Although my thoughts on new features may seem petty and complaining, it shouldn’t be taken as ungrateful. Actually, having new ideas is a testament to Avid’s ingenuity. Pro Tools 2018 have given features that are inspiring new thought to how a DAW should be. Users are feeding off of the creativity of Pro Tools and thinking of improvements, which will create a back and forth cycle where the developers feed off of these improvements. I truly think the wheels are still steadily in motion at Avid HQ, and I continue to have a positive outlook for the future of an already great workstation.

Michael Britt Kemper Grab n Go Rig Pack

Michael Britt is by far one of the most prolific proponents of the Kemper Profiler. Taking that love a step further and combining it with his access to countless prized amplifiers, he is one of the top guys when it comes to Profiling the amps as well. His new Grab n Go Rig Pack is sure to be another staple in your collection of rigs.

What do you get the guitar player who has everything? And by everything… I mean a Kemper. Because he/she already has access to thousands of free rigs on the Kemper Rig Exchange in addition to all of the free Kemper Rig Packs available and probably has some commercial profiles already. I know I have more profiles than I’ll ever need. But that doesn’t stop me from trying to “beat” some of my best ones, so I keep profiling and learning and getting new tools/toys to help me in my quest for the best guitar tone of my life.

Since I last posted here I have profiled lots more amps, not really thinking about trying to make a new pack, rather just stumbling upon amps that I wanted for my own arsenal. Around that same time I realized that when I’m playing around the house, checking guitars (I tend to work on my guitars a lot, changing pickups, etc.) and just plugging in to noodle, I usually just plug straight into a small combo. I like having reverb built in so that I don’t have to hook up a pedalboard. I have a lot of bigger amps, most of them too loud for my little office, so over the last couple of years I’ve been on the hunt for the perfect small combo to keep at home. I’ve gone through quite a few of them in that time. I had the 65 DRRI for a while and it was ok, but I preferred the normal channel tone-wise but it didn’t have reverb. I swapped that for a 68 Custom Deluxe RI and it worked for a while. I had my 3P Extra Spanky and it was nice too but wanted something that sounded bigger than it was. I’m super picky and probably too critical of my own tone. There. I said it. There are days when I think nothing I have sounds good. I’m not sure if it’s ear fatigue or if I just spend too many hours critically listening to guitar tone that my ears pick out everything that annoys me.

So, these two things were happening at once. I was looking for a small combo and I was just kinda profiling and collecting stuff to use in our live shows and stuff. About a month and a half ago I started trying to figure out what to do with all of these new profiles because some of them were just too good not to share, and the idea that came out was The Grab n Go Pack. Although I use the Kemper for all of my live gigs, I go see bands around Nashville and have my little dreams of playing in a little cover band around town for fun. Sometimes, when you have only minutes to set up, the grab n go combo amp looks really appealing in its finite simplicity. So I thought it might be fun to just compile a bunch of profiles of mostly-smaller combo amps (and a couple small heads) for those players who are accustomed to just grabbing a small pedalboard and a small amp.

Thus The Grab n Go Pack was born. I think the amp profiles that really cemented the pack for me is “Stinky.” Stinky is my nickname for a Fender Princeton Recording Amp that I picked up in a local store a few months ago. I’ve always liked Princetons and am always on the lookout for a good one. The Princeton Recording amp was only made for a few years and has some features that you won’t find in most other Princetons. At its core, it’s just a blackface Princeton circuit, although pc-board construction for cost. But it also has a built-in attenuator, compressor, and overdrive circuits. While those are kinda cool for my home office playing, they weren’t that valuable in the profiling process. But lo and behold, Stinky was a world-class champion at profiling. The cleans sounded just as you’d expect a Princeton to sound and the tone was so even that I think it ranks right up there with my all time favorite clean tones and I’ve been incorporating them into our live show for the past month or so.

The real surprise (although it really shouldn’t be) is how well Stinky took gain pedals. Every pedal I threw at him sounded fantastic, not too boomy, not too bright, not too harsh, etc. He was the mama bear of small combos. They turned out so well that profiles of my homemade Nobels clone-boosted Stinky have replaced one of my Marshall tones in my big rock ballad solo in our live show. Who woulda thunk little Stinky had it in him? It just goes to show that there is always more to learn.

So with Stinky as the anchor of my new Grab n Go pack, I started filling in with some other amps that one would expect to grab and run out the door to a local gig: Fender Blues Deluxe, Peavey Classic 30, and 68 Deluxe Reverb. Then I started upping the ante with some boutique entries into the small amp rodeo: Carr Lincoln, Dr Z Maz 18 Jr, Matchless Spitfire, Red Plate Tweedy Verb, and ÷13 EDT. The TownCar (Lincoln of course) was a big surprise. Based on a vintage Vox AC10, it covers a lot of ground and the gain channel is super fun. The ÷13 EDT has a great blend of American amp tones with the high end chime of a HiWatt or early JTM45. The Spitfire profiles are spooky in their dynamic realism. I don’t know how anyone can play on the Spitfire profiles and believe that it’s some sort of digital recreation. I am still finding new favorites as I go along trying them out in place of my tried-and-true rigs in our live show.

Granted, these amps probably aren’t for all types of music, especially metal or really high gain stuff, but for everything from great pedal-platform clean tones to classic rock, there’s something in here that should cover most any gig.

So, speaking of gigs. Since I began making profiles, the Kemper has added a ton of features. When I began with my Kemper, there was no Remote, therefore the Performance mode didn’t make a lot of sense to me. After the Remote came out, it made perfect sense. And there was no Morphing back then. So, as I’ve incorporated all of these new aspects of the Kemper technology, I’ve finally decided to include those into this new pack. What does that mean?

It means I’m making sure that Remote pedal button assignments are already programmed for ease of use. You can always add your own effects but I include my stock “pedalboard” of basic stomps and fx. I’m also including a few of banks of Performance slots for an even easier plug-n-play experience. Based on lots of reading and conversations with folks about how they use their performance slots, I’ve created some basic, extremely usable performance slots to cover a gig as well as some song-specific presets to either use or to use as guides on how to program some fx. Most of these rigs also utilize the morph function on the Remote for solo boosts, etc. It’s basically catching up to how I’ve been using my Remote and Performances live over the past year or two. I know that tone is subjective and everyone has their own way of tweaking rigs, but I just thought I’d share my personal taste in how I lay things out in case it helps anyone else.

The new Grab n Go Pack has over 90 individual amp profiles of 13 different amps, 3 banks of Plug-n-Play Performance Slots and 3 banks of song-specific Performance Slots, covering everything from Country to Classic Rock, with a nod to my hometown of Nashville’s live music home, Broadway. I know it’s hard to justify spending money on more rigs when you already have thousands at your fingertips but there is hopefully something for everyone in this pack. Buy it for Stinky if nothing else. Or the Spitfire. Or the EDT. And I didn’t even mention the 100w Super Sonic Twin.

Thanks for reading and thanks for the support!

Price: (Reg) $39.99 (Until July 1, 2018) $29.99

For more information visit https://mbritt.com/product/grab-n-go-pack/

Most Recent Reviews