We all love the fact that we can record audio straight into our computers, mold the sound with all sorts of different tools, and put out a near big-studio-quality track. It truly is the age for the “everyman” to record. Some of the things we left behind though are very fundamental principles that (albeit weren’t the easiest to understand and sometimes best avenues to record) are essential to creating a mix that is pleasing to the human ear. Our ears work very similar to analog gear and having something that behaves like our ears at the source helps us to translate it better. Digital technology is best described as looking through a big window outside; everything is very crisp and transparent. This may be very well and good but sometimes throwing some window tinting on there can tame some of the overbearing light and glare. This is where tape saturation works its magic. It can be thought of as an overall rounding off of an already great view. Push that even farther and you can use this to alter the sound completely and change certain colors of the view and give a whole new perspective. This is where Satin comes in.
The name alone already implies smooth connotations of very buttery, rich audio. We all know the adjectives surrounding analog so I will try my hardest not to use them for the rest of the interview… This is going to be really tough. When I initially saw the press release for Satin, I was very hopeful. Hopeful because even though I already own plugins like Slate Virtual Tape Machines, Reel Tape Suite and both iterations of Nomad Factory’s Magnetic, I was looking for something a little different. Don’t get me wrong, what Slate has done for mixes with his version of a tape machine is astonishing, but I was looking for was something that was a veritable “Swiss Army Knife” of tape. There are so many things good about all of the individual Tape emulation suites I mentioned before, but Satin combines each of these great features and even adds the kitchen sink. So what all do you get that the others can’t provide? Well… you get a tape delay, tape flanger, as well as tape saturation all in one plugin. Satin even has a “groups” setting so you can meld all of your tracks together with the same setting just like if you were working on a real reel-to-reel machine (try saying that one 5 times fast).
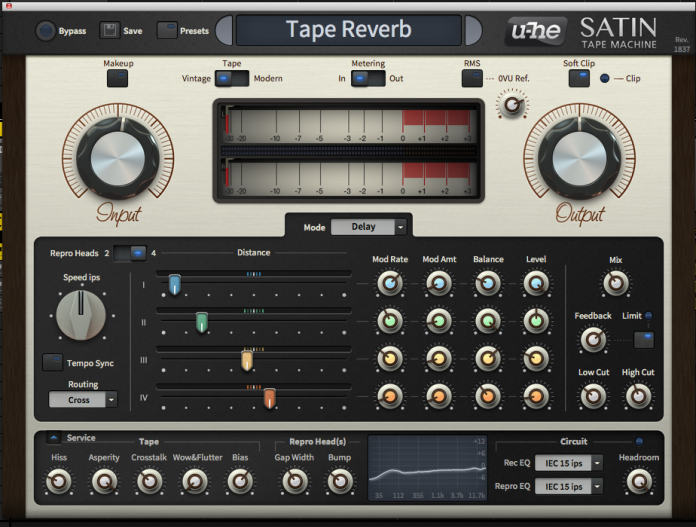
The interface has a very cool classic vibe but modern features and functions that I really wish other plugin manufacturers would take note of. The window can be resized to several different sizes with a simple right click of any part of the background. Just be wary of clicking close to those areas by switches of knobs or the “Midi Learn” will pop up. This is one of the few plugins in my toolbox that I do not have to inch ever so close to the screen to tweak settings. Size will be your friend with Satin due to some of the smaller controls across the bottom “Service” panel. The knobs can either be controlled by scroll wheel or clicking and dragging. The shift click will give you finer controls but unfortunately it doesn’t work with the scroll. Luckily, if you overshoot your setting or go too far with it, a quick double click will default you back to the knobs standard setting. These are all pretty standard of most plugins nowadays but Satin once again adds more features. Say you’ve placed Satin on a track and want to preview other presets but feel your input drive is just where you want it for the track. All you have to do is right click on the knob or switch and select “Lock”. This will hold the setting you currently have so you can browse other presets with settings you’ve already dialed in… Genius right? That’s also perfect for browsing settings when you have a delay set on and aux buss and want to keep the mix 100% wet. You can still change the controls but Satin’s presets will not. It will take your last change and hold it for you.
The guys at u-he have also realized something about presets. They’ve realized that just because they put a preset in the plugin, that doesn’t mean it’s always useful for everyone so they have offered a very familiar concept to organize your folder. If you do not like a preset, you can add it to your “junk” folder just as you would those emails you get for certain enhancing medications and offers of riches from deposed Nigerian Princes. On the other hand, if u-he has made an earth-shattering preset (like the Tape Reverb or TAS Potato Skin), you can set it as a “favorite” as well. Each different mode has different presets very quickly accessible from the preset button on top and covers a large range of uses. You can even assign presets to MIDI Channels with the MIDI Programs Folder, even going as far as allowing Satin’s effects to be incorporated into live performances with Zebra 2 or Diva… or any other lesser synth. Now lets get into each mode to see just what Satin can do.
Satin allows you to build a “Frankenstein” tape machine based on every little detail of a tape machine from popular encoders, decoders, recording circuits, repro circuits, record head gap width, and more. You’re also not limited to a set of choices… you can mix and match any of these to create both popular tape machines or even go beyond that and make one that engineers in the old days only dreamed of! (Yes I just used an exclamation point in a review. You don’t see that often.) Having all of the features also goes beyond just the application and can teach some of the newer kids in the recording game how old tape machines worked. The manual is very well written and even goes into the inner workings of reel-to-reel machines and how they functioned. This all coupled with any parameter changes popping up in the top menu bar keep everything as simple as it can be with such a complex plugin. It’s nice to be able to turn any knob and see its numeric value show up in one common area instead of displays for each control flooding the interface.
Satin has also retained ease of use in the areas that matter most. I like how they’ve made the more important buttons bigger and more prominent on the interface while other secondary extra controls are out of the way. The input knob also has a great little feature above it called the “make up” button, which automatically adjusts Satin’s output volume when activated. It will compensate for any applied positive or negative input gain; the output knob can then be used for additional fine-tuning of the compensated output volume. Perfect for driving the input further into saturation without having to use the output knob to balance it out. Satin does it for you. Speaking of the output, the knob also has its own button labeled “Soft Clip” that gently rounds off transients, leaving you room to push the output while being more forgiving. No tape emulation plugin would be complete without a choice of Modern or Vintage tape. The Modern tape has a more balanced and transparent sound, while the Vintage switch loses top end and distorts quicker. Vintage is a little more prominent in mixes than Modern but if you want more top end and better transient response, I’d use Modern.
Studio Mode:
As you drop the button right under the upper panel, the three main options show up for your tapey enjoyment. You have Studio, Delay, and Flange. The first choice is Studio, which opens up the area with tape based controls. The tape reel speed is a continuously variable knob that can go anywhere from 7.5ips to 30ips and anywhere in between. It features a Pre Emphasis knob as well that can add quite a bit of top end into the “input stage” of the deck and is used to account for lost high frequencies during the magnetization of the tape. In the center of this window we have a group window that allows you to create different combinations of instances of Satin in your DAW. When a group is selected, all of the plugins that have that group clicked will link and the settings will work across the tracks. Any of the plugin windows can change the controls and it helps to meld your project as a whole without opening every single instance of Satin and tweaking. Something I’ve found that isn’t in the manual that I’ve been told is an “Easter Egg Feature in the plugin” in the Delay and Flange can sort of work with groups but it seems each of the parameters inside the flange or delay won’t control them all. Its a feature not intended but very nice if you want to throw the same preset on a big group you’ve created. Having a link button to decide if you wanted all delays to behave the same would be a nice addition. All groups can be named whatever you want or bypassed easily.
If you look above the groups window you will see an interesting button labeled “Bypass Tape.” Now WHY would you want to bypass the tape circuit in a tape based emulator? Easy… Satin is much more than just the emulation and has broken the entire tape machine down into each of its respective parts. Now you can use the machine as a whole or just pieces you want. This is where the encoder can come in handy. Back in the old days tape machines needed noise reduction to cut down on all of the hiss and after effects of recording to tape. u-he added these for coloration effects but also for some of the old school engineers. Say you have some old reels of tape but you don’t have the machine you used originally BUT you had a different compatible machine with different noise reduction or compander. If you have these ingredients you can record the tape directly to a track on your DAW, arm Satin, and decode and correct equalization with the compander controls. You also have record and repro EQ settings in the service panel but we’ll talk more on that later. Another great use of the encoder feature is to do what many called the “Dolby” trick. This will enhance the presence of vocals and it’s very easily recreated by assigning the encoder to “A-type Mod” and leaving the decoder off. Bam… instant air. The mix of the encoder can be blended as well using the compander knob.
Are those enough knobs for you to tweak? Of course not! We can always use more and if you click the arrow next to “Service” on the bottom even MORE knobs show up. These knobs control the character of how the tape machine behaves. You even get a frequency analyzer to see exactly what impact you’re having on the signal. So now we can add hiss, asperity (which is a form of noise introduced from flaws in the tape), crosstalk, wow, flutter and bias just like a real machine. If that’s not enough Satin has allowed you to do something that was next to impossible back in the old days. Now you can change the gap of the record head as well as low frequency attributes of the record head or “head bump.” Lastly we have the record and repro circuits of different standards of corrective EQs the tape machines used as well as a headroom knob, which can be lowered or raised to induce juuuust the right amount of saturation. These circuits can really allow you to dial in the exact coloration you’re looking for and are also fun to mix and match for different effects.
So all of that in itself could be one plugin but the guys at u-he were feeling generous. They knew tape machines could be used in ways to induce effects so they’ve incorporated some of the staples of tape-based effects for you to perform effortlessly.
Delay Mode:
Back in the old days, people couldn’t just slap a delay on a track and be done with it. It took one person pushing the envelope and realizing that using the gap between recorded and replayed audio in the heads meant a repeat in the track; and changing the speed between to gaps would allow the sound to repeat longer or shorter. Thus tape delay was born and Satin incorporates this by giving us a choice of 2 to 4 repro heads that can be tempo synced, ping ponged left and right, and modulated for a more organic feel. The sliders control your gap and can be programmed all the way up to 8 inches. You get your standard features such as balance, mix, feedback, low and hi cut filters as well as one feature that I absolutely love. There is a limit switch you can add to the delay that will give it a nice pumping sound and meld the delay in with the audio. It works great to avoid your delay overpowering your original sound. The modulation is another great feature that introduces a sine wave to give movement to your delay to really make your track stand apart from others. You also get the choice of how the delay comes out, you can either set them multi mono, cross, or ping-pong. This comes in handy especially when you pan each repro head at different settings and add some space.
Flange Mode:
I’m not sure exactly how this was invented but the concept is that if you had the same track of audio on two machines and very carefully changed the pitch in one, it will alter the phase relationship and cause it to flange. We all know it as that whooshing sound you hear when a jet passes by or when Van Halen starts out the solo in Eruption. This effect can add build and catch the listener’s ear and is used by tons of engineers in very unique ways. In real life, it is a VERY hard effect to create but once again Satin has your back and has taken the whole function and placed it on one switch you can move around to get the perfect flange. This effect can be midi triggered or just dragged using the bar in the center of the display. Most of today’s flangers leave out quite a bit of these controls but Satin has a fade selector, as well as a multiply feature for dialing in just the right build. You can even set the shape of the flange and even go as far as setting the maximum delay time of the machines with the range knob. Depending on how extreme you want the flange, you can even set the phase how you want it for more drastic or dialed down effects.
In use:
I found myself initially over stimulated and slightly overwhelmed by all of the bells and whistles but with one read of the very detailed manual, I was off to the races. The sheer range of tone you can get from the tape emulation alone is staggering and the presets work as a great jumping point for tweaking. Once you learn what to listen for and what knobs do what, it gets even easier. The group setting is great to set across all tracks and will really help glue tracks together. I would like to see an option to link delay parameters on groups as well a way to link the flange menu in the delay i.e.: using the modulation knobs. This would allow you to combine the tape, delay, and flange to create “flanged tape reverb” which would sound epic. It may also prove to use DSP but we can’t worry about that when tone is at stake!! Also, even though u-he state that most Flangers aren’t true to the sense of the word by offering you an auto sweeping function, it would be nice to have that option especially if your DAW or sequencer won’t allow midi learn. I know in Maschine, I pretty much couldn’t use the flange at all and would’ve really loved it.
Other than those additions, I would say this is the most advanced, versatile tape based plugin on the market. No other manufacturer comes close to offering the sheer amount of options you get with Satin. I could throw away all of the others and not miss them given the overall quality and tone that oozes from ever inch of interface that this plugin has. Right now they have an AU and VST and I hear an AAX version is in the works, which would add Pro Tools 10 & 11 to the mix. Combine that with the Uhbiks bundle that u-he offers and you have everything you need to mix full projects. In the age of pristine, transparent, sharp digital, it’s good to add some color and depth to the overall sound. And at just $129.00, almost anyone can relive the golden age of music. When the guys at u-he called this a “Tape Construction Kit” they weren’t lying.
For more information on Satin, visit http://www.u-he.com/cms/satin


