The landscape of reverb plugins is getting more densely populated by the day. It seems every virtual synth designer has ported the reverb module from their virtual instruments into a plugin form. With impulse response libraries, algorithmic models, and digital creations of vintage hardware units, it seems there’s really no more ground to cover. Not so fast. FabFilter is throwing their hat in the ring with Pro-R.
What sets FabFilter apart from other plugin designers is simple: this company takes intricate controls and unique features and places them in an easy-to-use, brand distinct minimalist interface. Pro-R follows this formula along with both old and new tricks only FabFilter can put together. The result is a reverb plugin that plays by its own rules. FabFilter Pro-R is an algorithmic reverb that caters to creating the exact space desired. While algorithmic versions are mainly created to make natural sounding spaces, this plugin has some features that look appealing enough to create both natural and other-worldly effects. This is perfect given that I still haven’t found a plugin that can create the ideal room reverb setting I have in my head. Fingers crossed this one works.
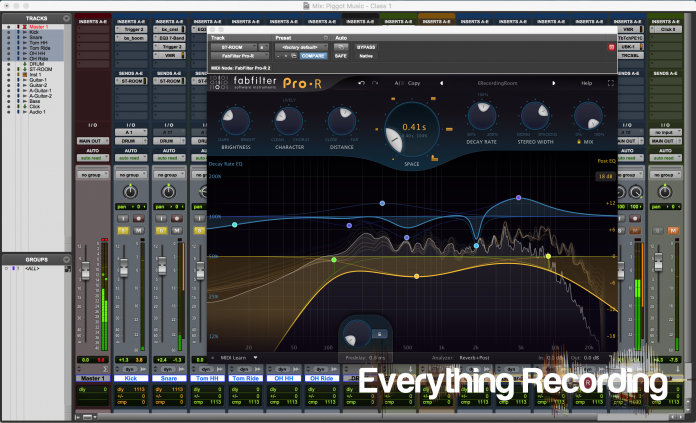
The interface is very familiar for any FabFilter user. Like all other plugins, Pro-R exists in a resizable Retina interface complete with easy to read metering, controls, packed neatly into the GUI. Most of the normal features exist in the same position as other plugins, making adapting to new controls easy. Even the reverb specific controls and meters are laid out in a manner than almost any person familiar to working inside of a DAW can start tweaking controls fast and effectively. Instead of relying on only a number system, each control uses descriptions primarily with number controls being secondary. Visual feedback is a must with any reverb plugin and all settings that need feedback are displayed prominently. FabFilter really take the intimidation factor out of the reverb experience.
Yes, this plugin has your typical Pre-delay, Mix, input and output controls, but right in the top middle, a knob bigger than the rest prominently rests. The Space Control knob is a stepless knob that relates the room model (displayed by shapes in yellow) with the ideal decay time (from 200ms to 10second decays). Unlike other reverbs that switch solely between a types of environments, the lines are blurred between spaces to give you the best of both worlds to create the exact space you desire. These decay times are perfectly matched to the room models and cannot be unlinked (although I bet it would be fun to have an option to unlink the two for less natural sounding reverbs). Once the space is determined, the Decay Rate can be used to trim the percentage of decay within the model. This control in combination with the Space control make up the final decay time that is calculated and displayed in the center of the Space control. This value changes as you alter Decay Rate and Space control respectively.
Distance from the source can also be adjusted with the Distance control and like all reverbs, mix is controlled with the Mix knob that can be locked from preset to preset to maintain the exact mix setting needed for the track. While we’re on the basic controls, the pre-delay is either time or tempo selectable which makes adjusting pre-delay to the rhythm of the song simple. Once the rhythm based setting is selected, the precise rhythm can be altered with the pre-delay knob. This makes adding just the perfect amount of rush or drag to the pre-delay setting. I just wish the pre-delay “lock” button would lock settings from preset to preset. Once these foundational settings are configured the fun begins.
The Stereo Width can span from pure mono, stereo, and even more. Starting at 0% mono, the cross channel feedback is introduced into each side until at 100% the signal behaves like multi-mono. Brightness works slightly different from other reverbs by allowing for boosting of the high frequencies as well as changing the decay of the high end. Character induces modulation to give the reverb extra dimension and movement. This can also be used for an ethereal chorus effect in the reverb tail. All of these features alone make this reverb extremely powerful but like everything FabFilter releases, the envelope has to be pushed. This is where the EQ features come in.
Placing an EQ after a reverb is a must in most mixing situations and most reverbs come with basic EQ settings for high pass, low pass, and a sweepable band or two. Pro-R borrows pages from their award winning Pro-Q2 (review HERE) and contains up to six bands of post EQ, each with a choice of filter type and slope. To make matters easier, Pro-R will compensate for gain changes so extreme boosts or cut will not affect your mix setting. Bands are created by double clicking the yellow line in the analyzer and many shortcut clicks (command, control, alt, and shift) assist in making fine-tuned adjustments a breeze. Although the post EQ is pretty standard in reverb plugins, FabFilter can’t just leave you with the norm. This is where Decay Rate EQ comes in.
It’s great that post EQ can tame resonance or boost a particular frequency in the spectrum but this usually causes the actual reverb tail to suffer. Decay Rate EQ works similarly to the post EQ to allow for increasing how much of a particular frequency’s reverb tail is heard. By clicking the blue line in the top area of the analyzer, up to six more bands can be added that control reverb tails using the very same type of controls as an EQ. Shelves, Bell Filters, and even Notch filters are incorporated into the Decay Rate EQ to allow for limitless possibilities. The world is your oyster.
All of these controls are useful in their own right but wouldn’t it be useful to see a graphical representation of your reverb in one window? The very same section that hosts the Post and Decay Rate EQ contains a very unique analyzer. On top of the analyzer displaying post-EQ’ed audio, a ghostly looking yellow haze will appear behind the output meter, giving instant feedback on how the reverb is responding to the audio. Clicking the square in the top right of the plugin window activates full screen mode which allows for full use of the analyzer’s power. From this window, precise reverb tails can be easily adjusted and analyzed, bridging the gap between ease of use and technical precision needed in this industry.
In operation I found Pro-R to be absolutely brilliant. The controls are extremely familiar, the interface sleek and efficient, and presets were a great starting point for getting the exact sound I wanted. Being able to seamlessly pick the size of the space without switching through predetermined models gave off the feeling of complete control. There really wasn’t a setting that even sounded remotely bad in any way. The plugin allows reverb to be as transparent of effected as needed. Although I don’t have one complaint about Pro-R, I did find myself wanting a few tweaks and features. Since chorus is already added with Character, EQ is added using Pro-C2 controls, I REALLY wanted to see the option to add in a variation of FabFilter’s Saturn distortion plugin. Subtle saturation in reverbs have been a trick of many pros and I’ve adapted it almost exclusively. That option with some of the same dynamics controls in Saturn would make this reverb a completely autonomous space processing tool. That being said, just go buy Saturn too (Review HERE) and be done with it! Pro-R is easily one of the most flexible, easiest to use plugins on the market and easily Everything Recording’s official “Reverb Plugin of 2017”.
For more information, and to purchase, visit http://www.fabfilter.com/products/pro-r-reverb-plug-in


