The Mackie D8B was THE all in one DAW / Control Station to have quite a few years ago. This was one of the premier studio bundles for high-end home and even professional studios. Then Pro Tools HD came along and gave it a run for its money. Although the sun has set on the D8B, there were still some very useful tools built into the DAW that went down with it – one of them being the Acuma Labs Final Mix. This was a plugin designed especially for Mackie’s UFX card that came with the D8B and was a favorite of quite a few people. This plugin was a mix and master engineer’s dream, giving you multi stage compression and EQ, along with expansion capabilities, soft clip limiter, and noise gate. It was a shame to see one of the first plugins of this type go… until now.
Due to Tracktion’s creator Julian Storer’s affiliation with Mackie, he saw the great potential in Final Mix and created his own version of the plugin. This plugin comes in VST and AU varieties and is available in the Tracktion Marketplace. The Master Mix comes with all of the functionality of Final Mix, but offers a few enhancements as well. The end result is an old school classic reborn for a new generation of digital audio workstations.
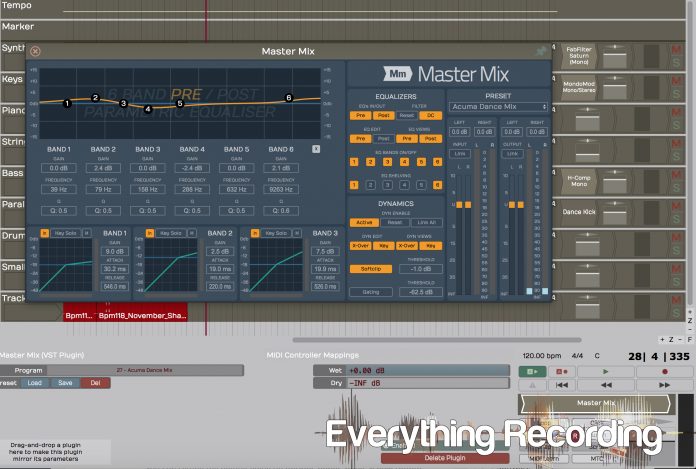
Master Mix is almost an exact replica of the old Final Mix plugin. The layout and interface are pretty much the same, but with the Master Mix having a less “dated” look. I have to be honest, part of me would’ve liked to see that late 90’s interface for nostalgia, but Tracktion have given it the modern matte look that’s much easier on the eyes. The top portion of the window displays your EQ and the bottom displays your dynamics. But much like everything Tracktion, the display will also change to accommodate the task at hand.
You are given 6 bands of EQ plus a newly added high pass and low pass filters. There are actually two stages at which you can EQ your track, both pre and post dynamics. This allows for tweaking your tone after adding compression. You can also drive bands into compression hard and compensate on the back end. This is very useful for sculpting your exact tone and works in so many uses. The text background of the window provides a quick look at which stage you are EQing.
At first glance you may get slightly confused by the lack of knobs, but double clicking on the EQ graph will display all of the controls you desire. The left click and drag will raise or lower the volume on the graph and the scroll knob adjusts the Q for the bands and the slope for the high and low pass filters. Clicking the EQ Bands on/off button for each band enables each band. Clicking the EQ Shelving below each band controls shelving for all bands.
Just below the EQ window is the Crossover window. This window provides 3 bands of dynamics, each tailored to the frequency range you select with the blue vertical lines. You are also given three orange sections which work as keys to each of the 3 bands. This determines what frequency range triggers the dynamics of your crossover’s compression. Enabling and disabling these features are accomplished by clicking the buttons to the right in the Dynamics window.
The Master Mix gets very creative with the bottom row of 3 bands that control the compression of each crossover. If traditional controls are what you want, each window has a gain compensation, attack, and release. Threshold is controlled by the blue line inside the graph and muting, auto gain, and soloing the side-chain is controlled with the buttons above the compression curve / threshold box. As your compressor works, you get a visual representation at the bottom of each compression band.
Now if you want to more options, simply double clicking in the threshold / compression curve box and the EQ and crossover window transform into a compression contour edit toolbox. From here, you can right click on the compression contour line and create up to 4 nodes that work as a custom knee to each band’s compression. The possibilities are limitless in this window. With this window, ratio pops up in case you were wondering where it went as well. To exit this window, either click the X at the top right of the Contour Edit window, or click on the band’s compression contour display box.
Now if all of this isn’t enough, the Dynamics section hosts a soft clip limiter as well as gating and to the far right is an intuitive gain section that displays the input and output gain of your content. Presets are also available via the dropdown box above the meters. They’ve even thrown in a lot of the old Acuma presets as well as their own that are extremely useful.
In operation this plugin works fantastic. The workflow is great and controls morph into exactly what you need for what you are doing. The interface can either be as informative or scaled back as you need given the way the windows transform at a simple click. The sound quality of the plugin is great as well and with the right knobs turned at the right time, can be as transparent or colored as you want. This really is a swiss-army tool for your subgroups or master fader. It really is incredible how much functionality they’ve been able to stuff in one window. I never once found myself wishing I could resize the window or feeling like I lacked any visual feedback. The only gripe I have is the installation. If you install via the Tracktion DAW’s Marketplace tab, installation is a breeze; but if you are using a different DAW, the only means of installation is by manually placing the file in the correct folder. It would be nice if you were given an install file, but that small headache definitely doesn’t affect the operation of this stellar plugin.
The days of the Final Mix may be gone, but its spirit definitely lives on in Tracktion’s Final Mix.


