- Track Assistant and Master Meter make mixing simplified
- Just about any plugin needed to mix full tracks
- Masking meter could use more visual tools to find collisions in a mix.
- Individual iZotope plugins should be visible in Tonal Balance Control
Might want to grab a snack, this in-depth review of Neutron 2, covers just about ever feature of Neutron. We felt this was necessary since we’ve never reviewed this plugin before. For a Review of Ozone 8 Advanced, click HERE
While other plugin manufacturers have been busy making glossy, aesthetically pleasing replicas of gear from the days of yore, iZotope has been soldiering on, taking their tried and true approach of plugins that focus on quality and user-friendliness, to the next level. Neutron 2 packs tools every mix and mastering engineer instantly reaches for and more into one customizable interface.
Neutron is a quasi-spinoff / continuation of the Alloy series plugin, whereby the plugin window contains modules of different tools needed to enhance and correct tracks and mixes. Neutron’s modules consist of different EQ, dynamics and spectral tools that can be used in countless configurations. Now iZotope have added even more features with Neutron 2. To cater to different needs and wants for today’s artist or engineer, Neutron 2 comes in several versions.
Neutrino: a free tool that uses iZotope’s version of spectral shaping to enhance selected tracks based on 4 types of instruments’ profiles: Voice, Instrument, Bass, and Drums. Controls are limited to an “Amount” control and a “Detail” control. This is the perfect tool for beginners or artists who want quickly and easily polish their mixes. Plus, its FREE.
Neutron Elements: a plugin that features Neutrino, four modules, Track Assistant, Static EQ, Compressor, Single-Band Exciter, Single Band Transient Shaper and 200 presets
Neutron Standard: a module style channel strip plugin that features Neutrino, five modules, Masking Meter, Static and Dynamic EQ, Compressor, Multi-Band Exciter, Multi-Band Transient Shaper, Limiter, Sidechain Features for Dynamic Nodes, and 500 Presets. Version 2 brings a new multi-band Gate, Visual Mixer, Improved Track Assistant,
Neutron Advanced: features everything Standard has plus the capability to use each component as a single plugin and support for 7.1 Surround Sound. In version 2, Advanced also comes with the Tonal Balance Control and Mix Tap plugins.
Since this review is on the Advanced version, we will be going into all of the features that come with Advanced. Using the list above, different versions can be compared to see which versions come standard with what.
With the philosophy of “addressing the issues of refinement, subtlety, and balance that are so crucial to achieving a good mix”, Neutron 2’s immense features at its core can be a little intimidating; but a little time and familiarity will have you on the road in no time. Using other iZotope products will also give a great advantage due to the interface being similar across different products. While they may not be the flashiest GUIs, iZotope makes up for shiny knobs with intuitive controls and visual feedback in spades. If you need to control something or see how audio is interacting with said control, you are definitely covered.
The interface packs a lot of information in a single window but is laid out logically. At the top is the menu bar which hosts the Track Assistant, preset functions, help and settings. To the right under the iZotope logo is the I/O panel that features Zero Latency, Bypass, input, output feedback and control, Limiter, and Neutrino Mode. Finally, sitting prominently in the middle left hand side is the window that houses the modules.
OVERVIEW
At its core, Neutron features your standard variety modules of EQ, Compression, Transient Designer, Exciter, Limiter, and now with version 2, Gating. Each of these modules are present across the top in gray and can be turned on and off by clicking the circular button at the top left of each as well as rearranged by dragging each module to its desired area in the signal chain. Note: signal chain goes from left to right.
Upon clicking each module, the screen below will change to suit the controls of each type of processor. Each of these modules can operate in multi-band mode, whereby three bands are present, giving the ability to compress, excite, enhance transients, and gate based on a particular range. Enabling multiple bands is as easy as clicking the small circular button next to the bypass and solo controls of each band just under the frequency spectrum. The frequency spectrum will display a new crossover, color coded to each band being used. It must be mentioned at this time that enabling “tooltips” from the settings menu can help navigate the interface easier by giving a description of each control by hovering. When using each of these plugins in multi-band mode, the “Learn” feature at the top right of the module window can help by setting custom crossovers settings per each module independently. The function requires audio to be playing to analyze crossover points. I do wish that this feature could also set more than just crossover points for each individual module but this is handled globally with the “Track Assistant”.
Before delving deeper into each module type, a few terms must be clarified. The module control section is the area in black and is separated into three main areas. The top of this window hosts the global controls. The features in this area affect the whole module, not per-band. The middle section is the spectrum graph where audio and crossover information is represented in the frequency graph. While there are some modules that have controls in this area, they mainly pertain to how incoming audio is controlled via filters or detectors. The bottom section holds the specific controls for each band of the module.
GATE:
The newest addition to Neutron 2 is the gate. This module was built from the ground up with a best-of-both-worlds approach regarding digital and analog. This gate has all of the trappings of standard gating with Threshold, Ratio, Hold, Attack and Release, but also incorporates Hysteresis, which is a facet of older analog gates. The Hysteresis functions as second threshold that allows the user to fine tune just when the gate closes. Simply set the threshold to gate unwanted audio, then set the “Hyst” to avoid unwanted gating. As was stated before, multiple bands can be gated as well as used as triggers for other bands. The possibilities are limitless.
EQ
While other channel strips offer several bands with the normal filters and controls, Neutron offers 12 adjustable bands with different filter types based on the band selected. With the high pass and low pass filters, there is a choice between 6-48 dB-per-octave slopes or a resonant filter that adds a slight bump just before the cutoff frequency. With the low and high shelf band, there are Analog, Baxandall and Vintage shelves to pick from. The Analog shelf performs like the typical EQ shelf whereas the Baxandall has a very gentle slope. This is the very same type incorporated into many hifi and car stereo systems with the only difference in Neutron’s being that this version’s frequency response is fully adjustable. The Vintage shelf is probably the most interesting in that it functions very similar to the Pultec EQs by adding a complimentary dip in the adjacent frequency when boosting either the highs or the lows. This creates a very musical boost that both enhances and cleans up audio tracks. The middle 8 bands utilize either a Proportion Q (where the Q adjusts based on the amount of boost given) or standard Band Shelf mode.
On top of all of the choices of filters and bands, the Analog, Baxandall, Band Shelf, and Proportional filters can operate in Dynamic mode, with the option of either compressing each band Downward or Upward. Combining this with the myriad of sidechain options, each band can be ducked based off of just about any frequency or source in the DAW. Particular nodes can even be used to trigger compression in other band nodes of the plugin itself. This gives endless versatility by using the low-end node as a trigger to compress the mid-range node in the same plugin window. The only setback in the dynamic EQ portion is the lack of ratio, attack, and release per each band. At this point, all trust has to be placed in iZotope that the compression settings on each band are optimal but since Neutron gives so much control over features, why not this?
If all of this wasn’t enough, Neutron’s EQ section still has more features up its sleeve. The EQ section has a mix slider that can allow parallel processing right inside of the plugin. This helps avoid setting up countless aux busses to blend in heavy processing from dynamic EQ. The EQ features a “Learn” button at the top that borrows from the track assistant to find points of interest along the frequency spectrum. This is a great tool to get started quickly or inspire different thinking in equalization. Version 2 brings a Soft Saturation button in the global controls to bring a little British inspired saturation into the EQ.
COMPRESSOR
Just as versatile as the EQ, the Compressor operates in standard, multiband, and everything in between. The Advanced version offers two banks of EQ, totaling 6 possible different bands of compression. Of course, Neutron includes the run of the mill compressor with standard threshold, attack, release, ratio, knee, and gain; but somehow carefully tucked into the interface are countless useful features for all of your dynamic needs. Starting from the top of the compression module are the Global Settings which affect the compressor module as a whole. The top left hosts the Vintage mode which takes the compressor from a clean compressor to one with more tonal impact, similar to some of the great analog compressors. This mode is much less surgical; than standard mode and reacts on a more non-linear fashion. One difference in controls is that the knee is not available to tweak in vintage mode because this is scaled in relation to the threshold. Next to the Vintage mode selector is the global gain that affects the volume of the module after processing. This gain serves more to stage the gain as it leaves the module into the next and is especially handy when using two compressors in series. On the right side of the global controls, Level Detection mode gives three distinct ways to detect incoming audio for compression.
Peak mode looks at the peaks of incoming signal and is best used for shaving transients.
RMS looks for the average level for the incoming signal. This mode works best when attempting to get more level from audio without affecting the overall character of the sound.
True Mode works similar to RMS mode but produces an even level across all frequencies.
Auto Gain and Release function as the name suggests by compensating and adjusting the released based on the analysis of the signal. Just like the EQ, the compressor module has a learn feature whereby it will analyze the audio and determine compression settings and crossover points as well for the multiple bands that can be selected in the controls below. One caveat to using the learn feature is that it only functions for multiband applications. Unfortunately, this feature cannot just work with a single band of compression.
Multi-band mode can also be accessed by clicking the number next to the threshold of each compressor section at the bottom. Each section has the exact same controls and feedback for each band is color coded and accessed by selecting the band. Each band even employs a mix knob where multiple parallel compression chains can be incorporated on a per-band basis.
As far as visual feedback goes, Neutron again has you covered. The Gain Reduction Trace is the scrolling meter across the top that works as a very keen visual display of how the compression is affecting the signal. This too can be viewed based on the selected band and color-coded accordingly. If in Vintage Mode, this trace becomes a VU meter to better serve the method in which Vintage mode compresses audio. On top of all of these features and the same impressive sidechain controls as the EQ, the detector circuit can even be tweaked to control even further how audio is tamed. When enabled, an EQ curve displays in the spectrum graph and controlled similar to controlling the EQ. Cutoff frequencies can be set for the lows and highs and points can even be boosted to cause to detector to react more aggressively at a particular frequency. What more could you honestly ask for in a compressor?
EXCITER
Distortion and harmonics have made a big comeback since digital came along and changed the way audio is interpreted. Very quickly, engineers went from loving the transparent sound of 1s and 0s going into a computer to missing the qualities of analog that were once deemed problematic. Many companies have devoted countless resources into digitally replicating these characteristics and iZotope is no different.
To add more vibe to tracks, the Exciter module incorporates the same multiband capability found in the compressor and applies it in ways analog equipment only dreamed of. Using the same graphic flow as the compressor, the global section along the top features Pre-emphasis modes to weigh saturation at different points on the frequency spectrum. Three descriptors that affect how audio is processed. Full places more enhancement on the lows and low mids, defined enhances the mids and mid highs, and Clear actually does the inverse of Full and Defined and attenuates the low and low mid to bring out the high frequencies. Like the Compressor, the Learn feature only works in multiband mode and selects crossover points for enhancement. The last of the global controls rests in the spectrum graph where a post filter high shelf will attenuate the highs up to 1kHz at -12dB. This allows you to drive into the highs with forms of saturation then tame the excess with the post filter to round out audio.
As far as different types of excitation, iZotope offers four types that can be combined in just about any conceivable combination by using an X/Y controller. Different harmonic profiles can be combined by adjusting the XY control to favor certain profiles more or less. The four profiles are Tube, Warm, Tape, and Retro. Tube emphasizes transients without sounding too harsh. Warm works like Tube but softens the response a little more. Tape is brighter and simulates magnetic tape saturation without the artifacts, and Retro is the edgiest and inspired by transistors to add bite to signal. Each of these can be blended with the XY controller and the amount of impact can be adjusted with the Drive control. Each band can be blended between dry and processed and like the other modules, can be globally mixed as well.
TRANSIENT SHAPER
These dynamics processors have become all the rage in recent years with just about every company releasing their take. Neutron has one as well with all of the bells and whistles expected. In the global controls at the top are the three envelope modes whereby response and recovery is adjusted. Precise caters more to the attack of the signal, Balance is a middle ground between more control of attack and sustain, and Loose handles the sustain portion optimally.
The Transient Shaper features the same multiband Learn feature as the rest and will set optimal crossover points. Just under the global controls is the Adjustment Trace which is a scrolling visual aid to display how the transient is being altered with changes to settings. The spectrum graph displays audio signal and multiband crossover points. What sets this Transient Shaper apart from others is the flexibility in multiband control. Each band contains controls for Attack, Sustain, and Contour. The Contour alters the response of the respective band and features modes that can be changed independently of the global envelope modes. Sharp works best on faster transient material like drums, Medium gives a more transparent release and is an overall middle of the road setting for most audio, and Smooth is the slowest envelope built for handling sustain. This module is the only one that does not offer a per band blend. Mix is controlled with the Global Module’s Mix slider.
If all of this wasn’t enough, Neutron 2 pulls out a few tricks unlike any plugin.
TRACK ASSISTANT
One of iZotope’s philosophies is that a preset is not just the end product to a track, but the vehicle to get to where you want sonically. This is evident in the advent of the Track Assistant, which made its debut in Neutron 1. Version 2 has expanded on Track Assistant, giving it a new interface and enhancing the internals to better serve the track.
Track Assistant analyzes audio for a period between four to ten seconds and creates what would be likened to a custom preset using machine learning. This is somewhat similar to programs like Sonible’s Smart:EQ+ (Review Here) but much more expanded across all aspects of the mix and not just EQ. Simply click the Track Assistant button prominently displayed across the top bar of the plugin GUI. Unlike the slightly ambiguous manner Neutron 1, operated, Neutron 2 displays a configuration popup that gives options to cater to the type of processing desired. The instrument window gives the option to allow Neutron to detect the type of instrument or select the instrument manually. Version 2 has also added a new Piano selection to cater to the sometimes-complicated instrument to mix. Just below the instrument selector is the Style selector. Three choices (Balanced, Warm, and Upfront) will determine the overall “feel” intended for the track. Finally, the Intensity control gives three different levels of processing, with Low being the least and High being aggressive. This will affect facets like compression, EQ, and amount of processing is applied.
Once these settings are selected, simply press the “Next” and away we go. Neutron will analyze the audio, determine what type of instrument is being played using Neutrino, and determine what it thinks is the optimal signal flow, EQ, Compression, and enhancement characteristics is. Sadly, the Transient Shaper and Gate cannot be incorporated by Track Assistant at this time but is easy enough to add manually once Track Assistant has settled on what it feels is the best custom preset. It must be stated that Track Assistant is not just analyzing audio and picking from existing presets. It is actually calculating based on each pass of audio. Different areas analyzed will change the result even if slightly. In the end, you are left with a custom signal chain, complete with tailored modules for your audio needs.
PRESET MANAGER
The Track Assistant can be a useful tool but don’t forget about the presets. iZotope isn’t a slouch when it comes to great starting points. This is evident in the Preset Manager which houses hundreds of presets made by the team and other professionals. The window stays open separate from the interface and presets can be applied instantly by clicking. If at any point the preset isn’t getting results better than manual tweaking, simply click the “Working Settings” to revert the state of the plugin before the preset was applied. Speaking of reverting, Neutron incorporates a detailed “Undo History” that displays all changes made while adjusting settings. Instead of undoing based on a series of last moves, specific moves can be changed. This is a huge game changer and plugin manufacturers need to take note on this one. On top of the Undo History is an A, B, C, and D comparison, thus upping the ante from 2 comparison points to 4.
MASKING METER
This is one of the more complicated features to explain. The Masking Meter is a display that overlays on top of the frequency spectrum and can correlate frequency information between two instances of Neutron sessions. By analyzing the frequencies of each track, areas with frequency buildup between the two tracks can be displayed. These “collisions” aren’t always a bad thing so this tool should mainly be used as an indicator and not as a tool for hardline correction for every situation. To use the masking meter, select the Masking button on the top section of the EQ module. To the right of the Masking button is a drop down displaying other instances of Neutron across other tracks. This links the source track (the plugin window that is physically opened) with a target track’s Neutron plugin instance. This will compare audio across the frequency spectrum of both tracks and display areas of the spectrum where significant masking can occur.
Once masking is detected, it is displayed in the EQ spectrum display as vertical white lines iZotope refer to as “The Northern Lights”. As possible areas of masking occur, the area in which masking is taking place with light up white on the particular frequency. Just above the frequency spectrum, areas where the masking reaches a predetermined threshold will display as “collisions” in a histogram bar. Collisions will show up in pink blocks, with the height of the block corresponding to how many collisions have occurred within a particular time frame. This can be used to detect areas between two tracks where impact can be lost due to frequency buildup and corrections can be made.
The display is all well and good but what good would having this feedback be without a way to easily handle problematic cases of masking? iZotope have covered this by morphing the bottom area of the interface to incorporate the EQ module of the other track being compared. Of course, this is all contingent on the other plugin having an EQ module. From one window, both EQs can be adjusted while monitoring the masking from the display. Each change to the EQ of the remote plugin will apply to the settings of the other plugin without having to switch between the two instances. To further enhance EQ between the two, Neutron have added an “Inverse Link” whereby changes on the source EQ will apply the opposite change to the remote plugin. This makes carving out space much easier when dealing with problematic masking. The “Sensitivity” setting will lower the threshold for detecting problematic collisions and the “Bypass EQ” will disable both EQ curves to check that the adjustments are helping and not harming.
I/O PANEL
On the right-hand side of the interface is the I/O Panel. Though this panel is far more than just for displaying input and output levels, the majority of the window deals with just that. As with nearly all iZotope products, level feedback is very comprehensively laid out with all important feedback front and center. Above the level meters for in and out is the global Zero Latency and Bypass buttons which work within the plugin itself to assist in compensating for latency due to processing and bypassing the signal. Using this bypass button allows for the Auto Gain feature to level correct the bypassed signal for closer level matched comparisons. It must be noted that using the Zero Latency will disable Neutrino as well as IRC Limiter modes and Transparent (Hybrid) crossover types.
Just below the input and output level sliders and meters are the spectral controls new in version 2. These only apply to stereo plug-in instances. The Width slider control goes from -100 (essentially mono) to +100 (Widened Stereo). Next to the Width is an internal Pan slider to shift audio left and right. The Mono button will sum the stereo signal to mono, the Phase switches polarity, and Swap will flip the left and right sides, perfect for giving a new perspective to tracks or a mix buss. I feel personally that iZotope have been listening to UBKHappyFuntimeHour podcast and were inspired to add this.
Sandwiched between the stereo spectral controls is the limiter. Controls are carefully integrated into the I/O section and turning is on is as easy as clicking “Limiter”. Feedback for the limiter will show up in orange, indicating controls and meters specific to limiting. The limiter uses 3 algorithms, IRC II, IRC LL, and Hard, each having their application.
IRC II is a limiter that trades higher latency for maximum transparency even during aggressive use. This limiter is kindest to the low end, which is really tough for a limiter to do.
IRC LL offers the lowest latency but still delivers high quality limiting. The harder you push this one, the more it will be apparent in the low end, which may be to your liking as a sonic effect.
Hard is the most CPU and Latency efficient limiter clocking in at almost no latency whatsoever. This limiter works more as a Brick wall but is not True Peak complaint due to the difficulty in making a limiter that operates as expected with no latency.
On top of the three different types of limiters, Neutron offers three characteristic modes that can be applied to each algorithm. Mode 1 is cleaner limiting used on quicker transient material. Mode 2 is a smooth middle of the road limiter best used for a broad spectrum of tracks. Mode 3 is a thick, limiter used on material with slower, gradual transients.
At the very bottom of the I/O Panel is Neutrino. This is iZotope’s spectral shaping tool that is available in a free stand-alone plugin. What Neutrino does is incorporate an algorithm to make subtle changes of a track based on 6 distinct categories: Clean, Vocals / Dialogue, Guitar / Instrument, Bass Mode, Drums / Percussion Mode, and Piano. This is accomplished by utilizing a tool similar to a multiband compressor or dynamic EQ. Neutrino uses dozens of custom spaced bands that compress each band based on the audio’s RMS. Instead of compressing different bands with a set threshold, Neutrino constantly adapts its threshold of each band based on the audio coming in.
For a free tool, it honestly has a lot going on technically. The great part is that the user only has to select the type of track closest to one of the four modes and tell Neutrino how much of the processing wanted and the detail, which adjusts the overall scale of processing across the spectrum. The tool is not intended to be used as an analog summing plugin would, but more of a dynamic mix cleanup tool as it is transparent in operation and not meant to add non-linear distortion.
ADVANCED TOOLS:
Initially the only difference between Neutron Standard and Advanced was Surround capability and Stand-Alone Plugins for each module. This didn’t really give much of an incentive to upgrade for most people. Version 2, however, has come packed with plenty of extras that will definitely make the decision a little harder. These extras come in the form of standalone plugins that are capable of interlinking Neutron and Ozone instances on a track for faster workflows.
MIX TAP
This plugin can be instantiated to any track on a mix to “tap” into certain features within Neutron 2 and Ozone 8 to tracks that do not necessarily need the complete processing of Neutron or Ozone. The plugin opens in the form of Neutron’s I/O section and contains some basic features of a channel strip. Controls such as Level Output, Metering, Phase, and High Pass Filter cater to mono tracks while Width, Panning, Sum to Mono, Flip Stereo, and Time Delay work to enhance stereo tracks, while time delay can be helpful on a stereo tracked instrument with two mics, if you have the patience to go manual, multiple mono tracks like mic’ed drums. This would take a pretty surgical approach but could still be accomplished. Note: if you’re looking for Time Delay in the Neutron plugin, it was moved to the Settings menu in the plugin menu and named “Channel Delay”. It makes access to the plugin a little tough but honestly, with other time aligning options out there that auto detect, you probably won’t be using it much.
Despite Neutron lacking in Time Delay functionality, Mix Tap serves as a great beginning to any non-iZotope plugin chain with its basic features that are not present in the I/O section of some DAWs.
As always, basic is not enough with iZotope, and Mix Tap serves to enhance mixing by incorporating tracks that do not have Neutron or Ozone with tracks that do. At the top of the plugin, specific names can be added to the track to make managing inner-connected features easier. Mix Tap allows non-iZotope channels to be included as “maskers” in Neutron, interfaced with the Visual Mixer plugin; incorporates non iZotope tracks into the new Visual Mixer; and allows inner-connectivity to the Tonal Balance Control plugin.
VISUAL MIXER
Since inner-connectivity is a big theme with iZotope in their latest plugin lines, the Visual Mixer plays right into the company’s vision… literally. Visual Mixer sits on the Mix Bus and serves as a one stop area where all Mix Tap and Neutron 2 plugin can be handled. Volume, Panning, and Stereo Widening can be performed on any track with Neutron or Mix Tap. Each track is represented with a node that can be interacted with by dragging up and down for volume, side to side for panning, and stretching the node for stereo widening. These controls are sent back to each plugin instance and immediately updated. The inside of each node shows track level and clipping can be seen when the node is red. The one fallback of the Visual Mixer isn’t necessarily its fault. Panning left and right cannot be performed on mono tracks. In order to use panning on mono tracks in Visual Mixer, the tracks have to be converted to multiple mono tracks using a Mono to Stereo Mix Tap plugin. This plugin is a great way to reassess mixes on a primal level and give a new visual perspective on audio.
TONAL BALANCE CONTROL
The final plugin available in Neutron 2 Advanced is probably one of the more audacious. Tonal Balance Control takes reference mixes to a whole new level. Reference mixes have become an integral part in both beginner and professional mix engineers’ workflow. For the beginner, a reference can teach proper overall EQ and compression for various styles of music. For the professional, a reference dials in a client’s wants and needs for a final product.
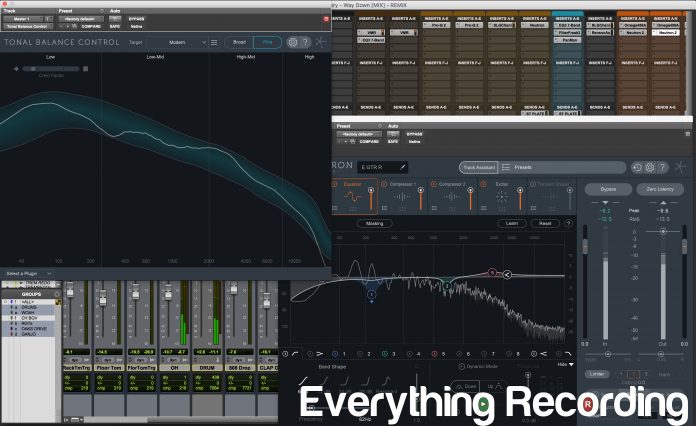
Tonal Balance Control is a plugin that addresses reference tracks in a fresh new way. The plugin is designed to be the very last plugin on the Mix Bus. The interface is based around a frequency spectrum graph divided into section: Low, Low-Mid, High-Mid, and High. As the mix is played in the DAW, lines appear in each section of the graph. The blue sections in each band represent an ideal range within each band corresponding to a style of music. When the lines show up in the blue, the track is balanced similar to the “Target”. If the line is over the graph, the frequency content in the mix is more than the Target. Anything under the section represents too little. The Crest Factor display is a left to right graph that determines if the low end of your mix is either too dynamic (left) or too compressed (right). Three built in Targets can be initially used: Bass Heavy, Modern, and Orchestra. If these are too generic, custom Targets can be created by importing an audio file using the menu next to the Target. Tonal Balance Control will import the file, analyze it, and create a custom Target. If the multi-band (Broad) version doesn’t display enough, the interface can be more detailed by clicking “Fine” on the right side of the interface. This will display a continuous section with more information.
To make balancing the EQ easier, any Neutron 2 or Ozone 8 plugin’s EQ can be adjusted inside of the TBC window by selecting the plugin in the drop-down menu located in the bottom left. For some reason, the Mix Tap plugins are available but no control can be performed in this window, even if a standalone Neutron 2 or Ozone EQ is present. This is slightly confusing but might just be a bi-product of the inner-linking functions. With Neutron 2 and Ozone EQs, all controls are in the bottom window and adjustments can be made from one window.
IN OPERATION
Down to brass tacks, this plugin is almost an entire ecosphere in itself. Just the sheer amount of text needed before this section of the review shows that Neutron somehow has offered just about every feature ever requested in one interface. The big question at this point would be, is it functional? Surprisingly yes. Despite taking over 3600 words to describe, Neutron’s operation is extremely straight-forward and easy to use. By incorporating Tooltips in the interface, iZotope have found a way to make complete sense of a plugin that very easily could have ended up a jumbled mess of controls and features. All visual feedback is perfectly placed in sections and easy to read. The interface encourages interaction without feeling like you’ve lost the plot.
While some plugins go for the glitz and glamour of shiny interfaces, Neutron sticks to what’s important, the control and the information. The enhanced features like Track Assistant and Masking Meter are present but not in your face and are not intimidating. However, once they are discovered and the mystery of how they operate has faded, they slowly creep into work flow.
Not only is the interface masterfully built, the modules impact audio in just about every perceivable way. While some plugins are one trick ponies and have certain features that work better than others, Neutron fires on all cylinders. Each processor handles audio in ways both desired and in ways beyond. This plugin has cut countless plugins out of my signal chain. It is very rare that a plugin comes along that can both treat and enhance quality in the way Neutron does. But where does Neutron fall short?
While it does most things brilliantly, there were a few things that I felt could be improved. The dynamic EQ section lacked individual controls for ratio, attack, and release which seem like obvious misses. While having a module inside of an EQ is handy, plugins like HOFA’s IQ-EQ (Review Here) give far more features in the way of dynamics per band. Also, while the Track Assistant on the surface is an impressive feat in creating custom presets, I would have liked to see a feature similar to Sonible’s Smart EQ where an overall EQ curve would be created with a global “Impact” knob that would increase the intensity of the custom EQ curve.
Also, the Masking Meter was a great indicator between two tracks but I would have liked to see a standalone meter that links all instances to the mix buss and color codes which tracks are masking in relation to the whole mix. I understand this tool is simply an indicator but a broader display of collisions in an entire mix would take this feature to the next level.
There were also things that confused me. The moving of Time Delay to “Channel Delay” in the Neutron settings made using the feature cumbersome but was also pretty lacking in giving options for fixing multi-mic sources. I really would have liked to see a tool more similar to Sound Radix Auto Align that could align multiple mono tracks like drums. I also don’t quite understand why the Mix Tap shows up in Tonal Balance Control when there’s nothing that can be done within the window, not even with a Neutron 2 standalone EQ in front of Mix Tap. I also wish individual plugin instances of the modules would show up in the Tonal Balance Control.
While some of these things are confusing, most are not lacking. Think of it more as a wish list than complaints. What I will say is that what it does get right, it gets right masterfully. The addition of the Gate just adds more to its usefulness. This gate is no slouch either. I’ve actually replaced my favorite gate plugin with Neutron 2 due to how it leaves transients in place. I can also gate based on a dominant frequency to tailor just how it opens and closes. This is more than a gate, it is a creative tool. Even though the Mix Tap has a few shortcomings in how it deals with mono files, I have incorporated it at the front of almost every stereo channel due to the bonus tools that almost no other plugin offers. I even like the concept of the Visual Mixer, but like the Mix Tap, the ability not to pan in mono without changing the track width to multiple mono, makes it more of an afterthought. Panning mono inside of the Visual Mixer and Mix Tap would be a massive improvement and would change the way I mix inside of my DAW. The Tonal Balance Control is a game-changer for everyone. Being able to visually see a reference track’s EQ curve overlay on top of the mix, makes frequency decisions miles easier. I understand we’re not supposed to mix with our eyes, but having a tool to look to at times helps move in the right direction.
Overall, Neutron 2 Advanced is a HUGE jump from the first Neutron Advanced. Initially with just surround sound and standalone plugins weren’t really worth the price jump. Now with all of the new plugins and inner-connectivity with Ozone, I would almost exclusively suggest forking over the extra money for Advanced. However, iZotope does see that different styles and levels of involvement from the engineer or artist demand different tools. Each version of Neutron keeps that in mind and will take any artist or mix engineers tracks to the next level. Bravo iZotope. I never could have imagined an ecosphere inside of a DAW functioning as easily and seamlessly as Neutron does.
For more information, visit https://www.izotope.com/en/products/mix/neutron/neutron-advanced.html
Introductory sale has Elements at $99, Standard at $199 and Advanced at $399 (until Oct31, 2017)


