- New Mix Assistant creates a starting point for balancing the mix.
- Improved Track Assistant over Neutron 2 means better analysis with less post analysis adjustments
- Sculptor plugin sweetens tracks on a per-instrument basis
- Visual Mixer needs overhaul with Solo, Mute, and Zoom functions
- Masking Meter needs a function to compare how individual track frequencies collide with a mix
Version Comparison:
Neutron Elements (v3) has:
- Track Assistant (EQ Learn only) / Sculptor / Compressor / Transient Shaper / Exciter / 150 Presets
Neutron Standard has:
- Everything above plus:
- Track Assistant (full access) / 2 Compressors, Gate, Sculptor, Dynamic EQ, / Improved output section / Peak Limiter
Neutron 3 Advanced has:
- Everything above plus:
- Each component as a plugin / Mix Assistant / Visual Mixer / Relay / Tonal Balance Control / 7.1 Surround Support
Today, iZotope released version 3 of their groundbreaking mix plugin. To coincide with the release, iZotope sent over an advance copy of… well, Neutron 3 Advanced so we could get a first look. Let’s dig in and see what’s changed.
Since we’ve reviewed Neutron 2 extensively on all features, we will focus on just what’s new with Neutron 3 Advanced.
To recap, Neutron is the counterpart to Ozone, iZotope’s mastering program. Where Ozone deals with the big picture of the mix, Neutron deals with the individual details, offering specific tools to ensure each track is processed in a way that enhances the song as a whole. To do this, Neutron 3 packs 8 individual plugins and a few other unique tricks into one entire inter-communicative ecosystem. This cohesive unit can make complex mix decisions based on other tracks armed with Neutron or Ozone.
It’s really quite genius and takes full advantage of machine learning technologies. Neutron 3 builds on its predecessor offering new tools and enhancements the community has asked for, a few tricks we didn’t even know we wanted, as well as a completely overhauled engine. The result is more power even faster than before. Let’s go over some of the specific new additions and enhancements version 3 has.
Interface:
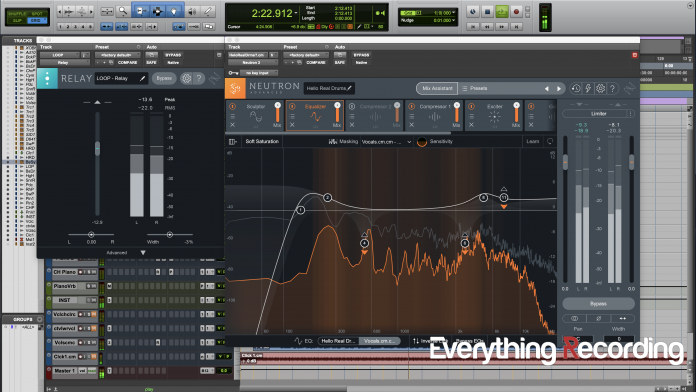
The interface has been spruced up with controls conveniently tucked into the interface to save room for the meters. It may take a few minutes for users familiar with version 1 and 2 to get accustomed, but in the end, the new interactive “open concept” interface makes more sense. It’s much cleaner for sure and has a slight resemblance to the FabFilter interface. To change values for multi-band processing, click the color-coded area corresponding to the range you want to process – the controls will pop up color-coded for that area. The same goes for EQ, simply click the EQ node you want to edit, and the controls will appear.
The max number of processors that can be used simultaneously has increased from six to seven. This is due in part to the new Sculptor module’s arrival and the performance upgrade. Also, instead of having all processors constantly displayed along the top, only the processors you add are displayed. What is confusing, however, is that even after the seven processor are added, the “+” symbol still remains; but you can’t add anymore modules because they’ve been greyed out with each instantiation. After reaching out to the developers, I was told that this was a UI bug that will be fixed but I don’t really agree with putting limits on how many times one can use a processor. If you want several Transient Shapers inside of Neutron, why not allow it? It could possibly end up being exactly what the mix needed. If that extreme scenario appeals to you, the Advanced version allows for each component to be used as a plugin and you can load the track with as many as you like. In a slightly less dramatic fashion though, why not at least let the user put an EQ both before and after compression inside of Neutron? Afterall, that’s a pretty common mixing technique.
In addition to the visual updates, the Masking Meter has been overhauled to better point out areas where frequency collisions appear between two tracks. I ran a side-by-side comparison between Neutron 2’s masking meter and was surprised at the difference in the feedback between the two. Neutron 3’s response was a slightly faster and held on problem features a little longer, which made decision making a little easier. While this feature is immensely useful, I hope to see it expanded to work on a “mix to individual track” basis. I do use the masking meter quite often between tracks but wish it was able to, for example, compare all other tracks in a mix to the vocal and see where the music steps on the vocal.
A New Module:
Taking full advantage of the engine overhaul, Sculptor is the latest component added to Neutron. This module is the next iteration of the Neutrino module. Instead of building it into the Mothership plugin, Neutrino was overhauled with more profiles and placed as a component inside of Neutron 3. This “one-knob” style plugin that works on a “per instrument” basis, combining multiple processing techniques on multiple bands, all in one component. This utilizes what iZotope dubs as “never-before-seen signal processing” that pinpoints particular bands of interest in different types of audio. While this may seem complicated, all of the hard work is done behind the scenes – just use the drop-down menu inside of Sculptor, select the type of track you are working with and adjust the three controls until you like the sound. The big knob controls how much spectral shaping is desired, the tone knob works like a tilt EQ, and the Speed knob adjust the attack and release of the ballistics processing (dynamics).
I’m not completely sure what all is entailed in Sculptor’s processing but from my experience playing with it, it seems somewhat similar toProcess.Audio’s Sugar, whereby dynamics, saturation, EQ, and harmonic processing are performed on a per band basis. While similar, it seems to have taken this concept a few steps further. Instead of giving four bands to control, iZotope have set multiple fixed points according to what is usually accomplished by several plugins, to enhance the sound of a particular instrument.
It is definitely a very interesting component. Sculptor can go from very subtle to outright in-your-face. Utilizing different instrument profiles on different tracks yields fun results as well. What sets Sculptor apart from the other modules in the bundle is that multiple bands cannot be created. I suspect this is because the spectral shaping has already done the work for you, but iZotope did add the ability to hone in on a specific frequency range. This is accomplished via the nodes on the left and right side of the analyzer. Drag the sliders to taste to only utilize Sculptor on particular areas. This is where it really shines. For instance, on vocals, I select the appropriate profile and drag the sliders to enhance only the low and low-mids and dial in the amount I want to hear. To monitor exactly what I’m doing to the signal, I hit the solo button. From there, I can fine tune exactly what I want, where I want it.
I will admit, at first you may seem perplexed by Sculptor and not exactly get the full picture; but keep messing with it, push it to its limits, and even use the wrong profile. This plugin will find a place in your mix. My only gripe is that once you set a range to be processed, you can’t sweep the frequency range. To make any changes, each side has to be moved individually.
A New Assistant:
On top of an improved Track Assistant, a new assistant has been created for Neutron 3 Advanced. The Mix Assistant is a tool that will set an initial balance between all instruments in a mix, thus saving time manually moving faders. This works by either utilizing an instance of Neutron 3 or the Relay plugin (formerly the Mix Tap plugin in Neutron 2). The Mix Assistant is meant to be used before any processing or fader movement inside of the DAW. There are several ways in which the Mix Assistant can be setup – either by using the Visual Mixer or via the Neutron Advanced Mothership plugin (which is just the Neutron plugin with all components housed).
There are many suggested tips and tricks to using Mix Assistant and it is recommended that you consult the manual or watch the tutorial before diving in head first. Some explicit rules include the following:
- Do not place Relay or Neutron plugin on both busses and tracks at the same time (use it on one or the other)
- Do not place more than one Relay or Neutron plugin per track (pick one or the other)
- Do not place either Relay or Neutron plugin on auxiliary busses like delays and reverbs.
- Depending on how you intend to use the Mix Assistant, properly place the plugins in the correct spot on your inserts (first or last insert).
Although this seems like a lot of work, once you determine the manner in which you want to use Mix Assistant, it’s actually very simple. The gist is this:
- Place Relay on each individual track or bus (but not both at the same time) and on one track place either a Neutron plugin or Visual Mixer.
- Open either the Neutron plugin or Visual Mixer and select “Mix Assistant”
- Choose a focal point for your mix by clicking the star next to the track(s). This is the element in the mix you want to take the forefront. This can be multiple elements.
- Click “Begin Listening” and play the entire song so each track gets analyzed (e. you don’t want that rad clarinet solo shred session at the end to get left out in the analyzing). While you’re waiting, you can click the “Mix Tips” button to browse popular iZotope how-to’s. How thoughtful!
- Once at the end of the song stop playback. Several groups of faders based on Neutron’s classification of instruments will appear. These can be changed if incorrect at this point with the Edit Classification button.
- Tweak the initial groups of faders if needed. The option to bypass the assistant to compare is below the groups.
- Once the mix is dialed appropriately, click “Accept”
- After accepting:
- Keep relay on the insert or the balance of that track will be lost
- Instances of Neutron 3 can be added on busses with Relay
- Continue mixing as you usually would
A few things to note after the mix is dialed in – Once accept is clicked, the group faders disappear which is a little disappointing and afterwards you have to keep Relay armed on the tracks that have used Mix Assistant. Where this can get hairy is if after a mix is accepted, Neutron is added to those tracks and you possibly want to rebalance the mix. Because of how Neutron has to set the topology for inter-plugin communication, Mix Assistant will see every instance of either Neutron 3, Relay, or Visual Mixer as its own track. To re-balance, all of the extra instances have to either be removed or rendered inactive. This limitation isn’t necessarily iZotope’s fault – they are having to work inside of an existing DAW’s rules. Hopefully in the future there will be a method where instances can be ID’ed as master and slave and bypassed during Mix Assistant.
Onto my qualms with the Mix Assistant. While the tool does a great job of balancing a mix, I’m having to get used to the concept of having faders at both the beginning and end. Because Mix Assistant requires faders at unity in the DAW, I found myself forgetting about Relay and wondering why I’m having to crank the faders in the DAW to get volume. I’m not sure how iZotope could get around this but I wish there were a way to automatically send what Relay’s final fader position is to the DAW’s. This is a huge task seeing as different DAWs have different coding and the interfacing for iZotope would be a nightmare. After contacting iZotope about solutions to this issue, I was however, told that the Relay faders are the same scale as most of the popular DAWs. If Relay gets in your way, you can just copy the value to your DAW’s fader manually. That’s totally doable. Sometimes the most obvious fix is right in front of your face!
The way I trained my brain to handle this is to simply consider Relay a Trim plugin at the beginning of the track chain. I also wish the group faders would stay available in some capacity, maybe in the Visual Mixer as a subgroup node. Having the ability to control groups in post would be helpful.
To assist with the multiple faders in different places issue, iZotope also recommend utilizing the Visual Mixer once the Mix Assistant is complete. Although the Mix Assistant is an interesting tool, I still find version 3’s interface lacking. First off, the interface is way too cramped. If you have more than 10 tracks, each node in the Visual Mixer is jammed on top of each other. To select the track, one has to select it from a list, which takes you out of the interactive headspace and into hunting through a list. A zoom feature would be very helpful. Also, I can’t mute or solo in the Visual Mixer, something I use constantly when mixing. On top of all of this, if I pan something, I end up closing Visual Mixer and forgetting. I then reach for the DAW pan and things get crazy. The concept is awesome. I truly wish iZotope would take all of this technology and create a DAW. Honestly, it may pull me away from Pro Tools but in the meantime, multiple mixers in a DAW is a bit chaotic for me.
Thoughts:
Overall, I really like the new additions to Neutron. Whether you are a musician who doesn’t want to deal with the technical or a professional wanting more control, Neutron has something for you in each of the new features. The way they somehow made room for more visuals while adding more features is no small feat. The Mothership plugin takes the place of entire chains of inserts in the DAW and takes on processing like it’s nothing.
While one could write the Mix Assistant off as a beginner’s tool, I wouldn’t do that so quickly. I ran several mixes through it and the results opened up new possibilities in directions I could take. I started saving a new session labeled “Mix Assistant” set the faders to zero and see what it would do. In some cases, the balances were completely different than mine and others very similar. I would then take facets of the Mix Assistant back to my mix or start from where it left off in that session. It does help to have another set of ears in the room!
Here’s another scenario where Mix Assistant comes through in a pinch – it’s 3:00 AM, you’re exhausted, the band has just finished tracking and is high on adrenaline. Of course, they want a rough mix to take with them right then. The last thing you want to do at that point is rough mix a song. Why not let Mix Assistant? Setup is fairly quick and within the length of the song, a balance is ready to print.
The same could be said about the Sculptor’s ease of use. Even though it’s another tool that handles all of the heavy lifting, the results can render new tonal possibilities. At 100%, the overdrive it places on a track can be just what it needs, at 25%, a little sweetening could be that special something you were missing all along. I’m sure in some cases it can and will be overused but that’s with any plugin of this type.
The performance boost is definitely noticed. During test sessions, I was placing Neutron 3 all over the mix without much hassle from the processor. I opened some of my older test sessions of Neutron 1 and 2 and noticed the system respond in more usage. Because of this, more tracks have ended up on my sessions with Neutron armed.
I also have noticed the Track Assistant produces better suggestions. Version 2 was good, but I found myself having to adjust a lot more once complete. Besides a few little creative tweaks, I have actually left what the Track Assistant produced on a lot more tracks. I still however wish the Transient Shaper could be incorporated into the Assistant.
Overall, what we have is another evolution in the right step for iZotope. While many others are following suit, no one is going quite as big and bold as the Neutron Ecosystem. Mixing music has never been more accessible to the public.
More Everything Recording reviews for iZotope:


