- Comes with a vast array of effects.
- Easy to use with instructions on routing built into the GUI.
- Pitch Correction should allow for heavier use (T-Pain effect). - Needs a feature to aid when pencil drawing notes, giving audio feedback.
We all can probably agree the vocal track is the lifeblood of a song, but what if that lifeblood just doesn’t get the body moving like it’s supposed to? Sometimes you need a little jolt to get it going. This is where VocalSynth comes in. This tool is the audio equivalent to a defibrillator, injecting life into vocal tracks with both familiar and new sounds.
This is iZotope’s second rendition of the popular Vocal shaping tool and boy, what an update. For those who do not know VocalSynth, this plugin combines all of the great facets of vocal synthesis and effects to push vocals into new territory. The VocalSynth 1 plugin was an already established powerhouse, complete with pitch correction, harmony capabilities, four vocal engines and five effects modules. Version 2 builds onto that reputation with a new vocal engine, 2 more effects modules, gate, width control, and iZotope’s new inter-plugin connectivity.
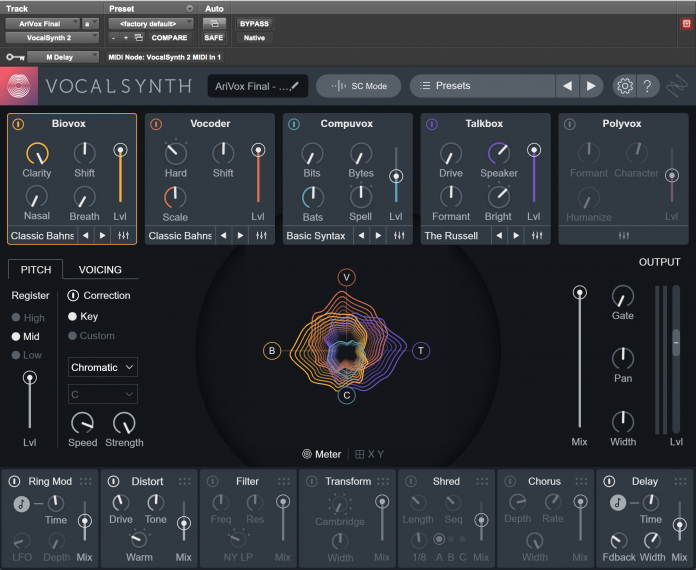
To kick things off, we look at the interface. The entire GUI has had a complete overhaul, following suit with the new versions of Ozone 8 and Neutron 2. This further solidifies iZotope’s vision of a common feel among their updated plugin line, and for good reason. VocalSynth 2 now integrates into the very same ecosystem that Ozone and Neutron now occupy. VocalSynth 2 now incorporates Tonal Balance Control, Masking Meter, and Visual Mixer. It really almost seems iZotope could be gearing up for their own DAW given this new all-inclusive environment. Either way, it does increase efficiency once some time is invested into learning how to use these new mixing tools in your DAW.
Another great addition to the interface is the new Anemone Visualization engine that prominently sits in center of the GUI. Impact of each of the vocal engines can be clearly be seen and even controlled from this window. As volumes are changed, they can be seen at a glance, with each color-coded engine increasing in size and morphing as different parameters are applied. I did find myself slightly disappointed that pan direction visuals and control were not present in the visualizer as well. Since VocalSynth allows overall level control in the visualizer, why not be able to move each engine left and right from the visualizer window?
Additionally, this visualizer’s space has been conveniently configured to serve as control for the new added advanced synthesis settings for each vocal engine. An XY pad is also available to change many settings with the exception of, again, panning. The lack of panning control immediately at your fingertips wouldn’t be as much of a problem if the controls for panning weren’t tucked away in the advanced section of each engine.
Overall the layout is masterful considering how complex of a tool this is. Never once did I find myself having to pause to think of where something is. Almost everything is displayed either in the main window or one click away. In the past, this has been a huge turn-off for me even trying to learn other plugins of this type, but a couple of hours with VocalSynth 2, and it’s already old hat.
Even though a good interface is necessary, it would all be for naught if the plugin didn’t deliver on sound. The entire brain of VocalSynth 2 has been renovated to include better CPU efficiency, overall sound quality, and internal signal flow. In past versions, users had complained that the routing would cause the main vocal to get overpowered but version 2 really has improved in that field.
Control is also easier than ever with VocalSynth now offering easier-to-use routing in your DAW. The plugin now comes compatible with over seven different flavors of DAW and even recognizes what software is being used. By default, VocalSynth opens in “Auto Mode”, where effects are modulated by the audio within the track itself. However, clicking on the Auto Mode button just next to the presets will open advanced routing options.
Once the Mode button is selected, two more options appear: MIDI Mode and Sidechain Mode. What sets VocalSynth apart from other plugins is that when either of these other modes are activated, instructions for the DAW you are using will appear in the window, giving detailed picture instructions on how to set up. This is vital given that routing plugins of this type may not be common practice for everyone.
While all processing and synthesis in Auto Mode is handled internally, MIDI and Sidechain modes utilize outside sources in many creative ways. With MIDI Mode, notes can be played on a USB controller or penciled in within the DAW. These notes trigger the Vocal Engines and allow the source track to be played like an instrument. The choice of poly or mono synth is available with an added glide option for mono operations. While this mode works great during playback, I found it a little cumbersome to use when drawing notes within the DAW. Since notes will only be triggered if audio is being played through VocalSynth, it can be tough to know if the right chords are being played. I wish the program would give an audible tone as feedback when a note is played if playback is not engaged.
With Sidechain mode, the audio from another track can be run through VocalSynth to make the sidechained instrument “talk”. With VocalSynth 2 armed on a vocal track, guitars, drums, keyboards and any other instrument can be sent though the vocal for that classic Vocoder sound. This mode disables the internal synth engine and allows the chords of the sidechained input to take over. It must be noted that the PolyVox engine is disabled in this mode as it relies solely on VocalSynth’s internal processing.
Each of the five vocal engines bring their own flavor to the table.
Biovox:The newest engine, Biovox is modeled after the human vocal tract and along with synthesis can add tonality associated with the human voice. Facets like vowels, tonality, breathiness, and formants can be applied to vocals for interesting effects.
Vocoder:Even though this section behaves like the traditional vocoder, three different modes within impact the vocoder in ways familiar to early analog versions, classic designs, and even a modern take.
Compuvox:This is your 90’s Speak n’ Spell module. Many of the modules in VocalSynth 2 came out of the need to conserve bandwidth while still producing intelligible speech in early electronics. As music was pushed to more synthetic realms, this technology made its way in due to its unique sound.
Talkbox:This tool has been infamously incorporated into many rock acts and has for Peter Frampton, defined him in popular culture. While this module doesn’t incorporate the tube to insert in the user’s mouth, the results are still similar.
Polyvox:This is the classic harmony engine whereby the key of a song can be set in Vocalsynth, and harmonies produced based on intervals like thirds, fifths, and sevenths. Formants and character can be controlled additionally to make harmonies appear either more human or otherworldly.
To improve on VocalSynth 1, each of these modules now contain an advanced section, giving far more control than the previous version. This opens up all new possibilities where each module can have its own high or low pass filtering, pan direction and synthesis presets. The filtering is especially useful to sculpt the individual frequency range of each module to fit with the others. Custom presets can additionally be created for quick access.
While the Vocal Engines provide endless fun and unique combinations, VocalSynth 2 brings over the original five effects modules and adds two new ones to the mix (Chorus and Ring Mod). Modules can now be moved in any order to alter how each effect impacts the next. Users can choose between Distortion, Various Filters, Chorus, Delay, Ring Modulators, Impulse Responses, and even a Shred effect that borrows from iZotope’s Stutter plugin.
With all of these options, the sky literally is the limit. Controls are laid out perfectly and the DAW-specific instructions take the guesswork out of how to use each mode. With the instructions right at your fingertips, confidence is gained quickly and new areas can be more easily explored.
The presets are a must at first and really help get a sense of what VocalSynth 2 can do. Presets are even divided up into the different modes as well as overall “feel”. While the ease of use and versatility can’t be beat, I did find some areas a little lacking.
Even with the correct key selected in the interface, the Polyvox engine didn’t seem like it was snapping to correct notes. This does sort of hinder the use of auto harmonies in most cases. I wish scales could be incorporated to snap certain notes based on different types. I also didn’t find myself using Pitch Correction for the same reason. While all of this can be avoided using the extremely powerful MIDI and Sidechain mode, I still wish the Auto Mode were a little more intuitive with scales and harmony.
The biggest gripe I have with VocalSynth 2 actually has nothing to do with the plugin. It’s actually a testament to how great it is. Like Ozone Advanced, I want access to each of the effects modules as plugins. I LOVE the way they sound both separate and chained together. So PLEASE, iZotope, either give us all of the effects in its own plugin or each as a separate effect. They would be infinitely useful on other tracks that do not need synthesis as well. Although a workaround is to disable the engines and turn up each level slider, it is nice to have individual plugins like Ozone offers.
The rest of my critiques are mere improvements that mainly involve panning. I’m not sure if this is an internal routing roadblock but I’d like to be able to pan each effect differently (i.e. chorus on left side, delay on right side). If we can already pan the Vocal Engines, why not allow the effects as well? Part of the greatness of this plugin is the stereo field and how each module can interact, and I’d like to be able to gain access to that tool a little easier. The Anemone Visualizer would be the one-stop-shop if I could pan each module within it.
Overall, I’m hooked on VocalSynth 2. I went into this review a little intimidated but iZotope took extra care in ensuring the process is as easy to use as possible. With its advanced routing options, combinations of Vocal Engines and incredible effects, this plugin will most definitely end up a mainstay in your collection. Utilizing the Visual Mixer, Tonal Balance Control, and Masking Meter have become more of a regular occurrence due to the amount of iZotope plugins now adapting the technology. Now that I’ve learned how to use it, I wouldn’t want to make music without it.


