


- Rigs can be added quickly
- Incredibly life-like sound that I never thought I would hear in a digital modeling amp.
- Would like to see a few niche effects
Humble Beginnings
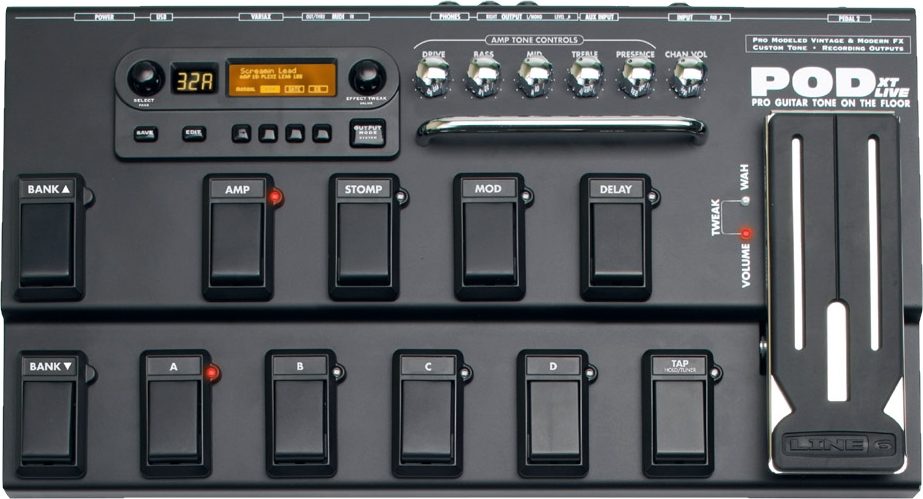
My first venture away from analog amplifiers started of necessity. I was a broke teenager who wanted to step away from either borrowing amps from friends or using my hand-me-down Peavey Blazer amp. Finally, I bought my friend’s half functional Digitech RP-6 and felt like I was on top of the world. I could release all of my 90’s grunge angst from the comfort of my headphones in my bedroom. After graduating high school and moving into an apartment, I upgraded to a Behringer V-Amp. Then, later on, I hit the jackpot when someone bought me a POD-XT Live. The Line 6 black box with pedals was one of the first digital guitar processors I could get a decent sound out of, thus starting my intro to recording directly to a Digidesign Mbox1.
Eventually, I began a career where I could make enough money to buy a house and afford some decent gear. I dove headfirst into mid to high-end amplifiers, buying Bogner, Orange, Vox, and finally settling on an extremely rare two-channel Matchless Avalon and a handful of guitar pedals. Since my amp was now in the analog domain, I needed mics and preamps. This sparked another costly journey into achieving the tone my amp was creating in a room, into a DAW.
My history probably aligns with most readers of this review, as each of us went through what we possibly jokingly refer to as when we went “all digital.” I’ll admit, I do prefer analog tube amps but understand the utility of digital. Even though digital technology had come a long way, I never thought I would see a digital company crack the code on analog. Then one day, I get a press release.
Then Came Kemper
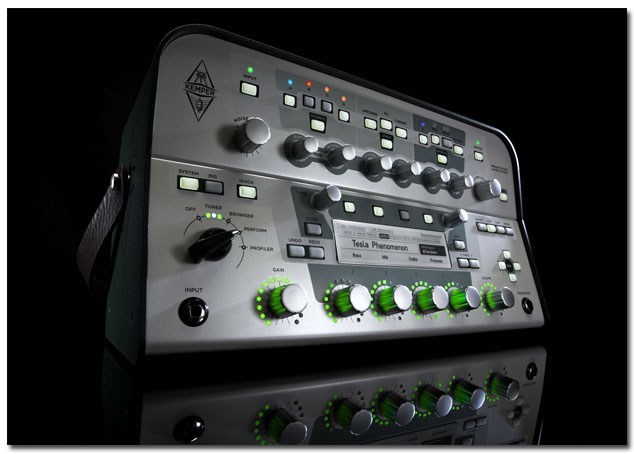
In late 2010, Kemper seemed to come out of nowhere with this sleek, glowing, white box that came with promises of being any amp you want, offering virtually anyone the ability to “profile” any amp quickly and easily. Videos emerged of people running this strange loop of cables through boutique amps, playing a series of sounds that I can only akin to toy laser guns of my youth, and voila, the amp had been “profiled.”
After eight years of watching from the sidelines (and seeing some Kempers appear in a few Nashville sessions with some big names in session work), I bit the bullet and bought one.
The Profiler
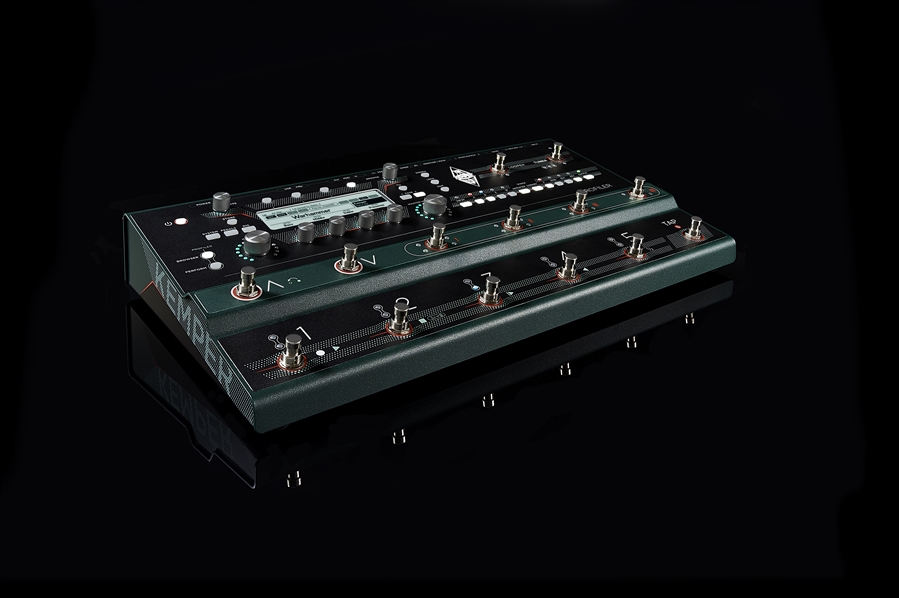
The hardware is quite nice. Buyers can choose between a more amp-like head, a 3U rack-mountable version, or an all-floor-pedal model “Profiler Stage.” Some models can even be purchased with a power amp onboard, allowing the Profiler to behave like its analog counterpart and incorporate various cabinets. On top of multiple models, color options avail with the lighter white version or, the more recent dark version.
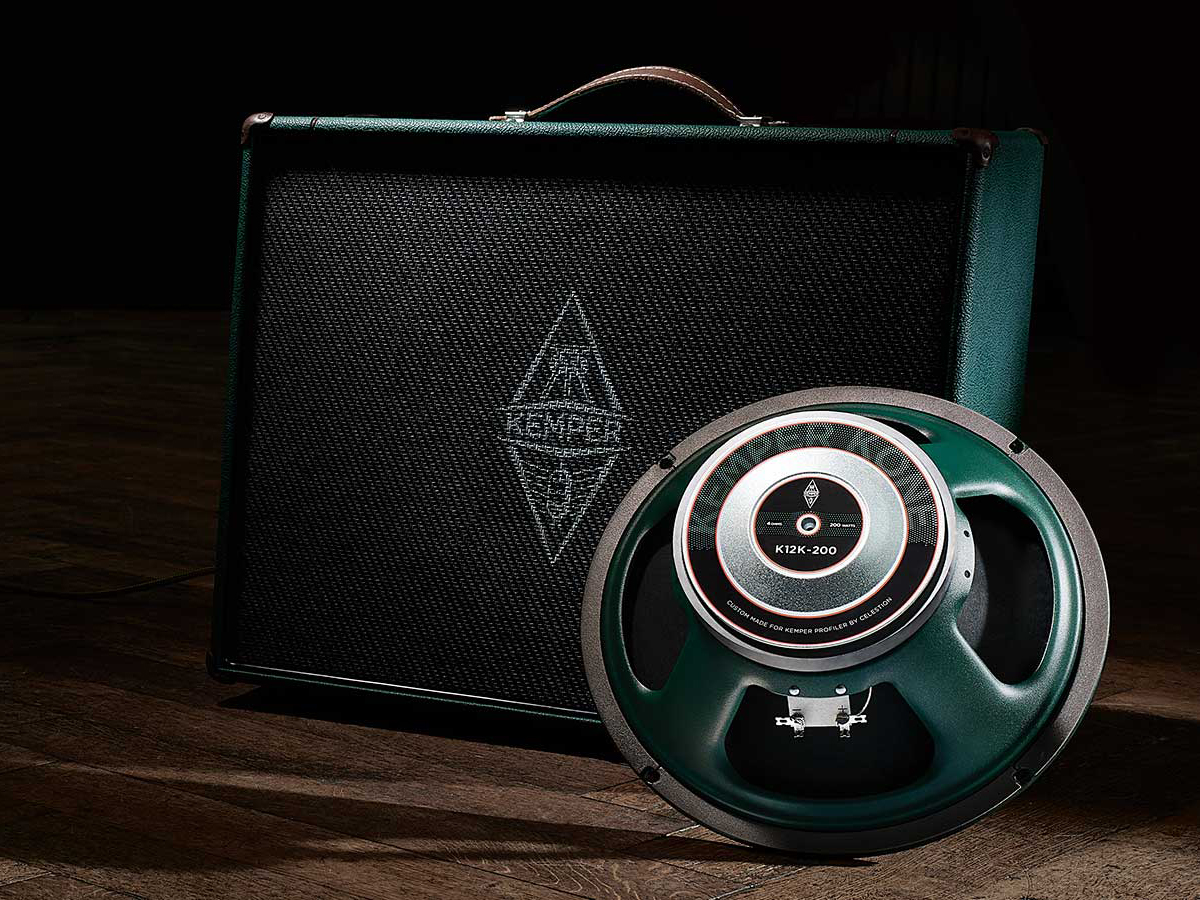
As far as accessories, Kemper has even made a floorboard controller, third-party companies have built expression pedals, and recently, have developed the Kemper Kabinet.
Lights and Knobs
Controls are primarily the same on each model, with the rack mount version being slightly more compact. To make the rack version fit in 3U rack space, the only two knobs that Kemper sacrificed are the two corresponding knobs for the “Mod” section of the effects. All models feature an interactive LCD screen with LED-lit controls on a black and green background (unless you buy the non-rack white model). At first glance, the Profiler may look a bit complicated, but a closer look into each section will offer some clarity. Since I work primarily in a studio, I opted for the non-powered rack version with a Mission EP1-KP expression pedal.
The Controls, although plentiful, are not as daunting as they look. The Profiler breaks up into sections that reflect the signal flow. While the rest of the sections are essential for feedback and controls, the heart of the Profiler lies across the top.

A La Mode
The Power / Mode switch controls what the amp is doing at any given time. This control incorporates a “Chickenhead” style rotary knob with various modes that we explain in detail below. With the knob pointing all the way left, the Profiler’s power is off. By switching to any of the other four modes, the amp goes into a boot sequence that takes a little time to boot. Consider this the digital equivalent to an analog amp “warming up.”
Tuner
Just to the right of the power section is the Tuner. While the LEDs just under the label are always on to give a rough indication of tuning, the Tuner selection will display a more in-depth tuner on the LCD screen. By default, the tuner will also activate if a volume pedal is present and in the “heel” position.” Generally, the LEDs are more than enough due to the way the LEDs brighten and dim to show how close to “in tune” they are.
Browser
Just past the Tuner mode is the Browser mode. The Browse section contains the presets or “Rigs” as Kemper calls them. Essentially, rigs are combinations of profiles, virtual stompboxes, and effects chains (which the Profiler has quite a collection of built-in). If you think this amp is primarily an amp and cabinet simulator, you will be pleasantly surprised at the number of effects and stomps packed in. Kemper has painstakingly modeled over 50 different classic stomp, EQs, and various effects. The Profiler comes standard with 200 rigs to get started with and can hold up to 1000 user rigs.
On top of the stock presets, you can easily import additional rigs via USB. The Profiler app has a Rig Exchange in which users can share profiles and packs can be purchased from various Profilers like Michael Britt. These guys do all of the hard work by profiling all of the amps the mortal man cannot afford using the best of the best preamps and microphones available. At the time of this review, Kemper has also added free Michael Britt and Lars Luettge Rig packs.
Performance
Performance mode gives the option to create a bank of Rigs that correspond to controls on the foot controller. These performances work great for live settings, whereby the verse section of a song might need a different rig than the chorus. These can be organized in banks for each song in your set, giving quick access to each song’s created presets.
Profiler
Finally, the pièce de résistance. Profiler mode is where the Profiler creates digital copies of amps. This mode requires a cable run from the back of the profiler into the desired amp. Then an additional run from either the direct out of the amp or mic’ed cabinet back to the profiler. The Profiler then runs a proprietary set of noises into the amp and creates a digital “fingerprint” of the amp.
Inputs and Outputs
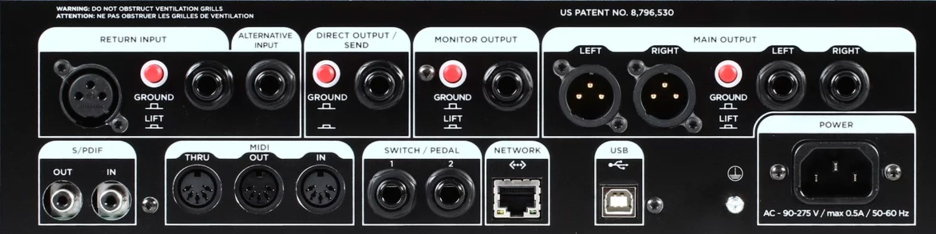
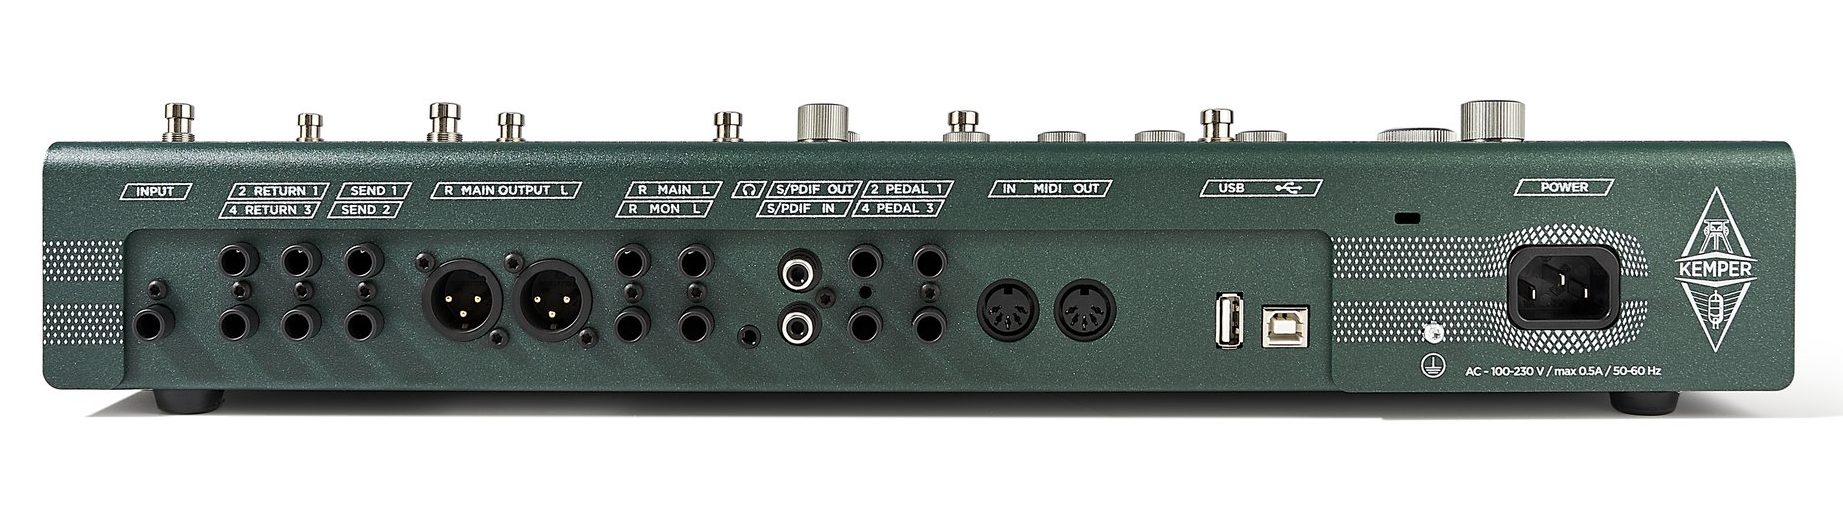
Kemper essentially prepared for virtually any situation as far as inputs and outputs go. There is a total of four separate physical inputs and five independent outputs (six for the Powerhead version’s Speaker Output) that can be configured and used in countless ways. Every one of the input and output sections on the rack versions feature a ground lift to cater to settings where hum can be a problem. The input and output section even features a S/PDIF in and out to run into a studio interface digitally. Just know the SP/DIF can only handle 24bit at 44kHz resolution, so set your DAW session accordingly.
Mixed Signals
Utilizing the Direct Output and Return Input, an effects loop can be used and tied into one of the virtual stomp sections, thus bringing your favorite analog pedals into the mix. If stereo is your thing, incorporating the Alternative input can create a stereo effects loop and tied to the “Mod and X” stomp section of the amp. Flexibility is the name of the game with the Profiler.
On top of sending a separate dry signal for reamping at a later time, Kemper can accommodate just about any combination of outputs for almost any desired situation. For the studio engineer, using all available outputs including S/PDIF, the stereo delay and reverb can be sent to its individual stereo track. The stereo mod effects can be sent to their track, and the raw reamp and Amp rig can be sent on their tracks, giving you ultimate control over all of the effects when mixing. The same approach can be used for live settings, giving a possibility of a stereo stage monitor as well as a stereo output for the front of house.
Routing Controls
Surprisingly, the Profiler’s routing section is straightforward and accessible via the dedicated Input and Output sections on the amp. Controls are as simple as holding down the input or output button and navigating with the soft knobs under the Display. Input and Output presets can even be created and selected for quick changes from studio to stage. Input and output monitoring comes at a glance with LED’s showing if the signal is coming in or going out too hot. Sensitivity settings are additionally available in the input section to bring different pickup types to optimal levels.
The Sections
To better get a feel for how this amp operates, we’ve broken down the Profiler into sections. These follow the logical signal flow from stomp pedals to the cabinet and show just how easy this amp is to operate.
The Stomps
Following the signal flow from the input, we begin with the stomps section. Kemper has over 50 different types of effects and stomps, many based on the all-time great stomp pedals. Countless EQs, Wahs, Pitch Shifting, Distortions, Overdrives, Compressors, as well as many others can be added to the four slots in the Stomp section. Using the routing section mentioned above, analog pedals can also be added into the mix, keeping your hardware still in the mix
The Stack Section
The Stack Section is the heart and soul of the Profiler. Here is where the magic happens – where all of the profiled analog amp heads and cabinets are stored. This area is divided into three sections (Amplifier, EQ, and Cabinet) that can be enabled or disabled separately and even turned off. Depending on how the profile was obtained, different amplifiers can be paired with different heads for countless options.
The Effects
At the very end of any good rig is a solid effects section. Profiler’s Effects Section has four slots that can hold any combination of its vast selection of choruses, flangers, delays, reverbs, and many more. While the last two slots are primarily designed for delay and reverb effects, these can be changed to others. Like the stomps section, the effects section can also be routed similarly for analog effects. One of the standout effects is the rotary speaker section, which can take any cabinet in the profiler’s stack section and convert it to a rotary.
If you can think of an effect, the Profiler probably has it. Like we stated before, Kemper has over 50 different types of effects, many based on actual mainstays in the guitar community. Each type of effect changes the LCD to its corresponding color for quick reference. For instance, if the screen is red, a distortion effect is being adjusted.
Extras
Although Kemper could have stopped here, they understood there were several more things some users could use to ease the transition from analog as well as make it more enticing to stay.
Morphing
To add more versatility to an amp with built-in stomps and effects, the Profiler has a feature called Morphing. To use morphing, an expression pedal or footswitch will need to be incorporated. The Morphing feature is not necessarily an effect but almost more powerful than all the effects combined. This is due in part to how it functions as it can dynamically control almost any adjustable parameter in the Profiler using either a pedal or a stomp. Think of morph like automation that controls different elements of the mix in one fader (like a VCA).
Operation is simple, enable the expression pedal for morphing and place it at the heel position. Once in the heel position, move the pedal to the toe position and change various parameters. This can be anything from amp gain to delay feedback, chorus mix – anything. Now when the pedal goes back to heel, the amp will return to the stock setting. As you’re playing, simply move the expression pedal toward to toe position, and all volume changes will all change together. Alternatively, this can be set to be triggered by a footswitch and slowly increased anywhere from 1 to 64 seconds. Using the tap tempo, the morph feature can be increased based on bars as well, making that dynamic transition from the verse to the chorus fluid during either studio or live performances.
Pure Cabinet and Space
Kemper even understands the transition from analog can be a bit tough at first, especially since hearing a mic’ed amp and cabinet in a room responds differently to hearing a “Profile” of the amp through a monitor. Since a Profile depends on capturing the amp and cabinet through a mic, the tone of the amp can appear much harsher than hearing the amp in a physical space. Some tools have been created to help become accustomed.
Located in the Output menu is Pure Cabinet and Space. Pure Cabinet mode is a control that can tame some of the textbook harsh sounds from miking an amp. Using Pure Cabinet simulates the forgiveness a room offers. Space works similarly by bringing a slight reverb into the output to subtly “bring the room back” into headphones. This is especially helpful for headphones and in-ear monitors by attempting to bring a natural bloom of the response of a cabinet to a space to prevent ear fatigue. On top of all of these features, each factory profile is as level matched as possible to ensure no crazy volume changes deafen the player, especially in headphones. There’s nothing like switching presets only to jump five feet from a preset that is 80 decibels louder. Anyone remember the pod preset volume differences?
Looper
Although I do not personally own a Kemper floorboard controller, I borrowed one from a friend to give it a shot. For the looping and performance mode features, footswitches are a must, but the floorboard is the ideal choice. Of course, third-party footswitches can be used, but Kemper has really tailored its board to work seamlessly. The looping section allows for up to 60 seconds of audio on unlimited “tracks”. Each pass can be played on separate rigs. It must be noted that the loops cannot be stored and are deleted when the unit is powered off. I do wish there was an option to store loops on external media to be used again. On top of unlimited passes, the looper can both reverse and slow the loop to half speed.
Pure Tuning and Formant Processing
While we’re on the subject of half-speed, I did want to go over one last enhancement the Profiler has. Although, most digital effects processors can pitch instruments differently, the result can come across as synthetic, with most giving off artifacts. This is sometimes preferable, but the option to make harmonies or pitch effects more realistic is needed too. Kemper incorporates two technologies to aid in this with Pure Tuning and its Formant and Pitch processing.
With Pure Tuning, notes generated by the Profiler are processed to match the pitch of the original signal more accurately. What this accomplishes is a more realistic harmony of a note. With the formant control, guitars can sound more like basses when pitched down or even tuned many steps below its original tuning and still hold up. I have to admit the option to detune a standard guitar to a baritone without touching the tuning pegs is a godsend. The result is as true to life as I’ve heard any effect attempt, but if you’re looking for that Tom Morello whammy sound, the Profiler can still do it!
Profiling
There are even more countless features I could go over, but there isn’t enough time in the day to keep writing about it – plus, I’d rather be playing this thing than writing anyways, but there is one last section we haven’t covered in detail.
While the Profiling process looks on the surface to be a very overwhelming process, it isn’t. To profile an amp and cabinet, all that is necessary is a microphone and some sort of preamp. To profile an amplifier alone, the only thing you need is two cables. While any mic and preamp can work, higher quality gear will make a higher quality profile. Once the loop is set up between either the amp alone or both amp and cabinet, switch the Power / Mode knob to Profiler mode and follow the prompts on the screen. A series of tones will run through the amp (and or cabinet), and a digital “fingerprint” is made.
Additional facets of an amp can be adjusted that were once unchangeable in an analog amp. Features Tube shape, bias, power sagging, and definition can be freely adjusted to bend the amp to your will. With the Definition control, a vintage amp can be made to sound more modern and vise-versa. The transients of the pick can even be enhanced to soften or bring out the strike of a pick during playing. These controls do not just subtly affect the sound, either. Each control clearly has an impact in a way that solely EQ or compression could accomplish.
Thoughts
I’ve sat with this portion of the review for quite some time. This was mainly due to the learning curve of the amp. There are a lot of menus to use, and I wanted to make sure my opinion wasn’t impeded by my unfamiliarity. Now that I’ve had some time, I love this amp. Take note that initially, you will be a little overwhelmed by the number of options.
Since my workflow is mainly studio, my Profiler stays connected via USB all of the time. I find that I can edit and switch profiles easier from the Rig Manager. I can also add a quick profile during a session if a client is looking for a specific sound. The ability to edit the Profiler presets through the Rig Manager is a game-changer. Initially, when I started, that option wasn’t available. I rarely touch the actual knobs on the hardware anymore.
What I like
All of it. Sure, there may be a slight difference in the sound of a profiled amp versus its analog counterpart, but it’s just that – different. I would say this amp has 90% of its original version easily. While purist may scoff at the extra 10 percent, I would doubt many could consistently guess between the two. Add in the convenience of not having to set up a myriad of mics, position the mics correctly, and crank the amp to get the right sound, and you have a no-brainer situation for studios. Yes, there are sometimes throwing a mic on a particular amp is necessary, but for the majority, the Profiler handles the situation masterfully. Plus, I can play anytime without pissing off the wife. So there’s that bonus too.
Lastly, I love the number of inputs and outputs. Being in a studio environment, routing is key, and I have so many different options that can remain interfaced, I don’t have to fumble around the back of the rack. If I need a stereo track, easy. If I need just a dry output with effects printed to another track, done! The Profiler is an engineer’s dream come true and then some.
What I Would Improve
This is a tough one. Kemper has made a full lineup of different versions with just about every bell and whistle imaginable. My only improvements come in the form of effects. I’d like to see more creative effects similar to Electro Harmonix Freeze and Strymon Mobius. I know the Profiler has countless versions of just about any pedal, but sometimes, you want to go way into the ether, and I wish I didn’t have to take my pedalboard out each time I wanted to do that. This amp is made by the same people who made the Access Virus, so I know they have a few tricks up their sleeve.
Lastly, my only other suggestion comes from the big question I get asked in my studio each time an artist falls in love with this thing – “Is there a cheaper version that doesn’t Profile because I don’t need all of that.” There would be a massive market for performers who don’t need profiling or as many inputs and outputs as the standard Profiler. A scaled-back version that just loads existing profiles would sell like crazy.
In Conclusion
If you own a studio, you should own this, simple as that. Whether it replaces your stable of analog amps or you just use it for quick ideas, the Profiler will spark creativity. Even if you just bought it for the Michael Britt Packs, you won’t be disappointed.
For more information and to buy, please visit our affiliate link HERE.


