


- Search by sample or kit similarity.
- Over 8000 radio-ready one-shots
- Song-ready presets complete with kits and loops
- Master out section with extremely useful FX
- Limited to an A or B pattern
- No way of creating a full song.
- Export will not mass export individual stems of loop
We spend countless hours hoarding, arranging and storing one-shot samples only to spend more hours blindly searching your sequencer of choice for that perfect drum kit. The best alternative most sequencers have is to allow sorting by type, which only narrows samples down to either kick, snare, high hat, etc… The current state of samples is dismal. Finding that perfect sample is a huge inconvenience – until XO.
Overview
XO is XLN’s solution to an industry paved with missed attempts at sparking creativity. This all-in-one solution can run stand-alone, or as a VST, AAX, or AU plugin in a variety of DAW Hosts. While XO comes with over 8000 samples, you can import your entire collection as well. XO then analyzes each sample and places them in a color-coded cloud of dots called the XO Space.
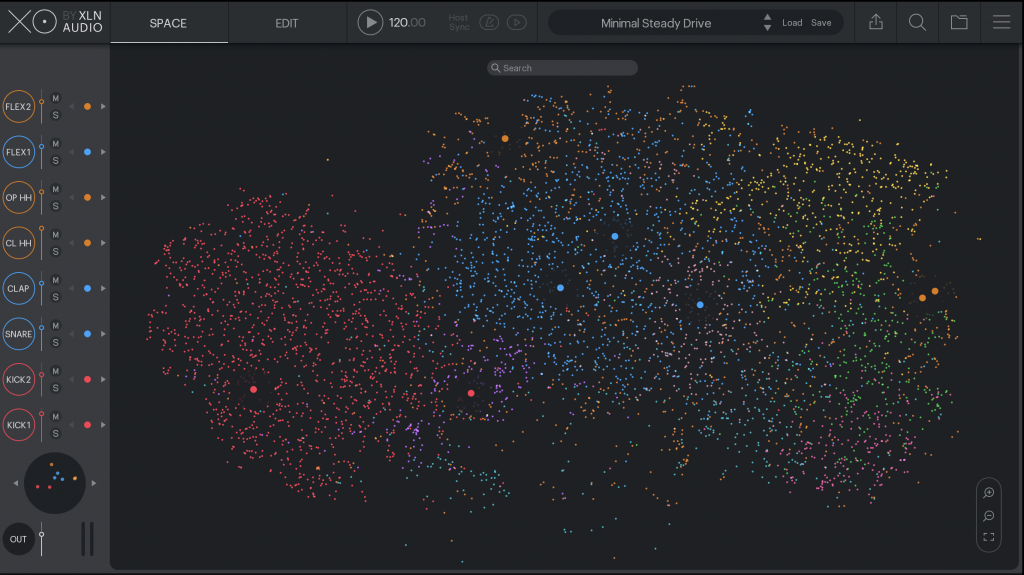
Browsing
Similar types of samples are color-coded, and the same sounding samples cluster together to form a “universe” of samples that are previewed by clicking and dragging through the XO Space. As you browse through the XO Space, the sample is triggered so you can hear it. Once you locate a sample of your liking, the similarity bar on the bottom will cycle through samples within a set radius of the selected sample. XO stores history along with the ability to easily change the Similarity sample. Browsing has never been easier.
Want to browse a particular sounding kick for that Trap Beat? You can further apply refinement with the search and filter. Not only can searching be accomplished via Type but also by Sample Length, Core Frequency, and something called “Drumminess,” which is a scale of how much a sample fits in the category as “being used to create rhythm.” On top of these filters, searching by name and storing favorites can be accessed in this window.
Applying the sample to one of the eight slots is a breeze. Once selected, click the arrow just to the right of the eight slots on the left. The slot will color code to the type of sample, and expanded controls appear at the bottom. While XO has predetermined slots, it can load any sample in each slot. Hot swapping samples is as easy as clicking the dot within the slot and selecting the one-shot from the XO Space. The slot can also cycle Similarity with the arrows on each side of the hot swap dot.
The Presets
If at first, this is a bit overwhelming, use the preset menu for inspiration. The grooves and sample choices are ideal starting points, with some quickly being final solutions to tracks. If something still isn’t quite right with samples, that’s OK; there are even more sorting capabilities. The similarity is a vast theme within XO, and a global Kit Similarity control is just under the eight banks on the left. This control searches similar samples around each bank and changes all at once.
The Edit Control
Once you’ve loaded XO with either a preset kit or preferred samples, further editing or sequencing is available in the Edit control. The Edit control transforms the XO Space window to a full-blown sequencer with an arsenal of powers. While there are the familiar controls in this window, a more in-depth look will show enhancements on virtually every knob and fader. Below is a list of just some of the notable controls.
- Sample control allows XO to control the length, fade in and out, channel width, and phase from one menu
- Pan control allows for HAAS mode, which delays either the left or right side of the sample for a broader sound.
- Pitch control can slightly offset the pitch on either the left or right side.
- Tone works like a Tilt EQ. Turn it to the left, more low-end, turn to the right, more top end
- The Cut slider performs High and Low pass filtering
- VelSens looks to the velocity of the sample to alter the transient based on the velocity of the note in the sequencer
- The Playback section changes the polyphony of the note in the sequencer, mute group, reverses the sample and changes the routing
- The groove can either be global or individual with 14 different types.
- Nudge can let the sample rush or drag.
The Sequencer
The Sequencer section is very straight forward but limited to two bars, which is a little disappointing. Only having two bars can limit creating a song to one total set of two bars with small variations in the order of the two. The sequencer adds notes by clicking the hexagon and velocity is adjusted by clicking the hexagon and dragging either up or down to set velocity. A visual display of velocity is represented by how much of the hexagon is filled.
XO easily adds rolls by clicking the small dots under each note. This is a vast improvement over having to pencil in each note for rolls. The option to show either Bar A or B is displayed with the Show or FOLLOW will display the Sequencer according to where the loop is at any given time. A choice of either turning off the B Bar, turning on the AB Bar, or AAAB bar can be selected to change the order and length of the pattern.
As you can see XLN have masterfully added a ton of individual controls in such a small area without overloading the interface. The Global section at the bottom is no different. The Kit section works to adjust the Level, Pitch, and FX Sends of the whole kit. The FX Section has nine reverb, and six Delay presets to load into two slots.
Master Controls
Master Controls come loaded with a Master Soft Clip, High or Low-Cut Slider with four types of filters and a Crunch control with some seriously unique effects. Crunch features a half circle control and eight different FX ranging from low-end enhancement to all-out distortion. These FX parameters can be as subtle or outright as you possibly could want.
Lastly, the Edit window has one last unique control. The Accentuator changes volume in steps, and the level of each section is adjusted with four sliders. On top of the sliders, the Dice icon will randomize the Accentuator for some unique grooves. This control can either be global or deselected via the squiggly line in front of the Sequencer. Accentuator changes the loop in many ways, from making the kit sound just a little more human, or all-out mayhem infused.
The Beat and Sample Combiner
If all of that isn’t a lot to take in, we have more. Yes… more. Beat and Sample Combiner tabs take all of this even further. While these sections are daunting, it’s meant to be more of an experimental area. You don’t necessarily have to understand it to use these modes, but we will explain as much as we can to help.
What the Beat and Sample Combiner do is allow for different patterns and samples to be automated and swapped for incredibly unique combinations of each slot. The Random button and lock controls are your friends in this mode. If you don’t like what you’re hearing, cancel the window. While this section is fun, I wish there were a global revert to original control to use even if you click the accept checkbox.
The Export Menu
Finally, we come to the export section where XO exports audio. There are quite a few options for MIDI and Audio export, with the ability to export raw or processed single shots, full beat as WAV or as MIDI. Level exporting expands beyond the Normalize control to either output max volume or a relative to each sample in the loop.
What They Did Right
Overall XO does a LOT of things right. The interface layout is very inviting, and the sheer amount of options is astounding. The samples that come with XO are radio-ready with presets for making just about any style of loop without ever touching the sequencer. Finding the perfect sample is as easy as clicking and dragging in the XO Space. Using history shows past browsed sounds in the order they were selected.
The export menu also tackles an issue I’ve had with every other sampler. I dial in effects and processing on the entire kit, but most sequencers will not export these settings on each sample. XO exports each particular slot and applies the master processing blended in each into the specific WAV file. This makes creating new samples to be put back into XO a breeze. Just export them into a directory you have added in XO and have XO rescan.
What They Could Do Better
Let me preface this next section by saying XO has become my go-to for both finding the perfect sample and making a simple loop. However, there are several issues that I need to address that hopefully become features in later versions. I’ll start with some of the more obvious ones.
While XO provides several workarounds, life would be MUCH easier if some options were integrated into the interface.
Creating a full song:
Sure, having only eight slots for instruments is a little annoying. An easy fix in a DAW by adding another instance. Having only two bars and one loop per preset is cumbersome. This makes creating a full song in XO virtually impossible. I’m semi-OK with the stand-alone version not being able to program a whole song, but a dropdown with slots for an Intro, Verse, Chorus, and Bridge patterns would allow for saving a full song’s worth of patterns in one preset. Right now, either multiple presets have to be saved and loops exported, or the midi exported for each pattern and applied to the track in a DAW. This is time-consuming and against the spirit of XO being a conduit for inspiration.
Exporting:
I get that XLN have added quite a few export options, but they missed some very important export features for producers who work in DAWs. Even though XO exports a full stereo WAV file, it can’t export a loop of individual stems of instruments. When I bring loops into a DAW to mix, I want stems of each separate sample. Sure, I can solo each sound and export, but that can be time-consuming and a bit tedious. I also want the option to export either mono or stereo WAV files of each looped instrument.
Favorite and Random options missing from certain features:
While I have the option to Favorite and shortlist sounds, the option to Favorite Presets doesn’t exist. Also, I can randomize patterns, accentuator, and the Combiner tab, but I also would like the Random control for selecting samples for the entire kit. This would make combinations of kits I never even thought of and can spark inspiration. If the option exists in one spot, it shouldn’t be tough to integrate it into other useful areas.
What I would add
The rest of my issues are merely enhancements I’d like to see like. Below is a list of things I would like to see added
- Ability to change the search radius Similarity to a bigger circle.
- Ability to actually control reverb and delay instead of just presets.
- Additional control for Crunch (for example, the ability to make the resonance control not only the pitch of the resonance but also the wet/dry).
- In XO (Standalone) Automation of features like Pan, Crunch, Pitch, Etc…
- Allowing the user to add Crunch individually to Samples.
- Custom sized Window (Mac can do this but Windows can’t).
- Ability to apply preset patterns to existing kits
- Linking multiple instances of XO’s effects to one master XO control in a DAW
Overall Impressions:
While there are a few things XO could do differently, XO does so much more right. Overall XO is in a league of its own when it comes to its approach. XLN have made an ambitious sequencer that in its initial stage, is already eons ahead of others. The tooltips section that appears when hovering over controls makes thumbing through a manual a thing of the past.
After a few sessions, XO was beginning to get more use than my old go-to stand-alone sequencer and is already my go-to for sequencing in a DAW. The browsing power combined with the masterful layout of this Sequencer makes it a must-have for any producer. I highly recommend picking XO up and I’m excited to see the direction XLN takes this groundbreaking virtual instrument.


