


BABY Audio has been on a tear this year, first with COMEBACK KID, then PARALLEL AGGRESSOR. Today, they’ve released their most ambitious plugin yet with SPACED OUT. This delay and reverb plugin combines modulation FX into a chain that would rival Travis Scott’s entire FX Chain, all in one window. We got an advanced copy and have a review ready on release day – and as a bonus, we have made a custom preset to get that ASTROTHUNDER “Sample and Hold” Delay Travis uses on a ton of his tracks.
Getting Spacey
Like every other BABY Audio plugin, SPACED OUT isn’t a one-for-one digital replica of a particular piece of vintage hardware, but it retains the best parts of gear they like. The folks at BABY Audio set out to make their ideal version of the infamous Space Echo. Of course, just a delay plugin wasn’t enough and somehow, over 50 effects ended up in the mix. The result is a boundless playground of modulated delays and chaotic reverbs.
Interface
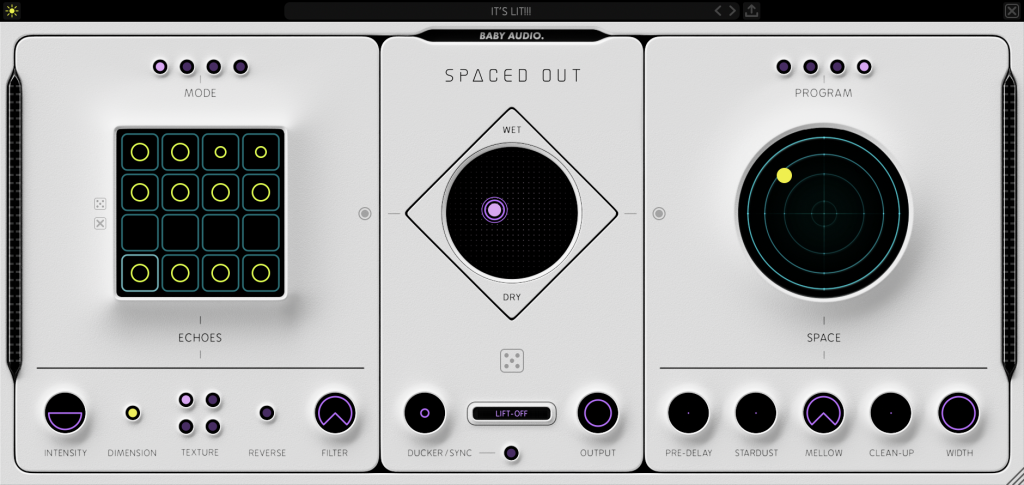
With a plugin pushing over 50 effects, you’d expect the interface to be a complete disaster of sub-menus, dropdowns, and a manual that would give Microsoft’s Terms of Service a run for its money. Don’t worry, SPACED OUT knows you don’t have time to take a college course on a plugin so they’ve integrated all controls into three main sections of the interface. Everything is right where you need it, with most controls combined into logical combinations.
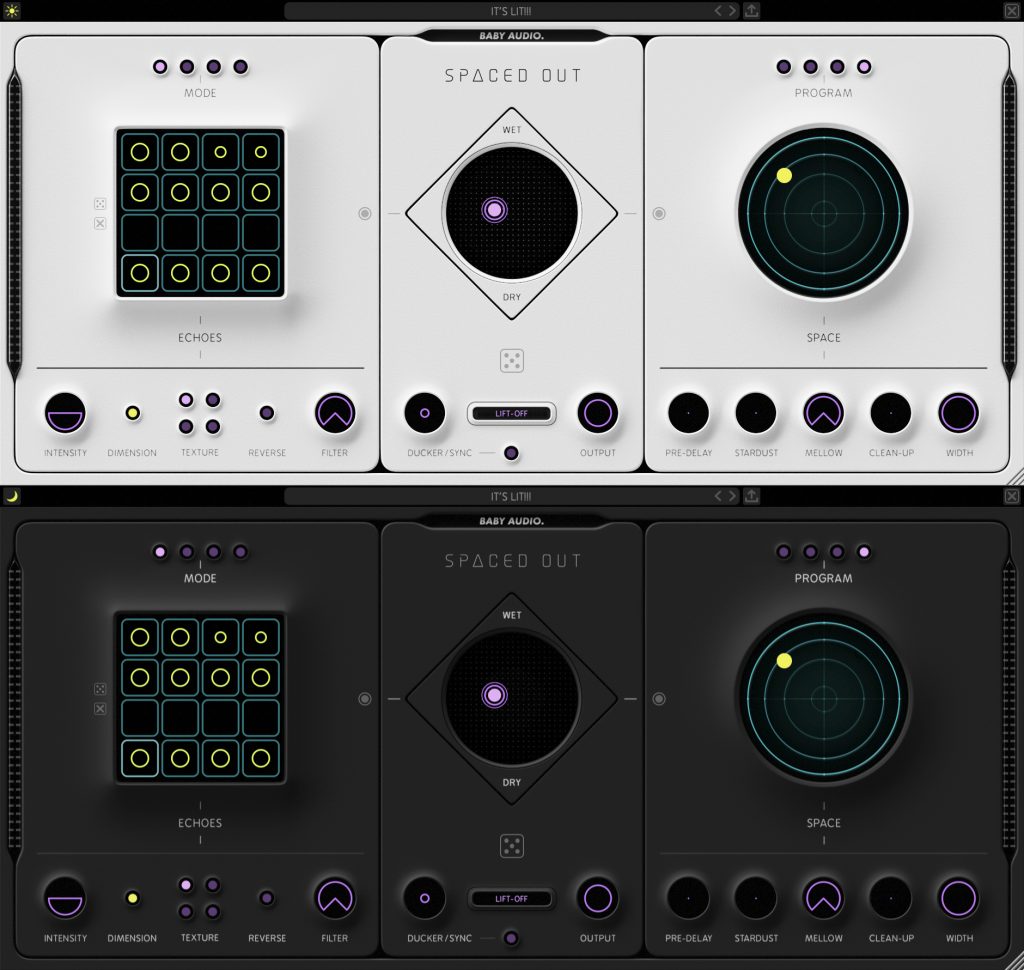
From the looks of the GUI, it’s obvious that BABY Audio keeps pushing the envelope on the design aspect. We at Everything Recording understand a pretty interface doesn’t make for good mixes, but the paint on a race car doesn’t make it faster. Yet Formula One and NASCAR sink millions into how the cars look and we still ogle pics each year. Along the same vein, SPACED OUT looks incredible. Like PARALLEL AGGRESSOR and COMEBACK KID, this GUI comes in a Light and Dark theme, with each looking as good as the other.
While I know this plugin does not look conventional by any stretch of the words, an open mind is key. With a few pointers from yours truly, you’ll have it mastered in no time. We will demystify the interface and soon every one of your tracks will have stepped delays with flanged long reverb tails that pump with the music. For starters, we found it useful to utilize the ON / OFF buttons on the inner edges of the ECHOES and SPACE Engines. Start by using each engine individually while turning the other off.
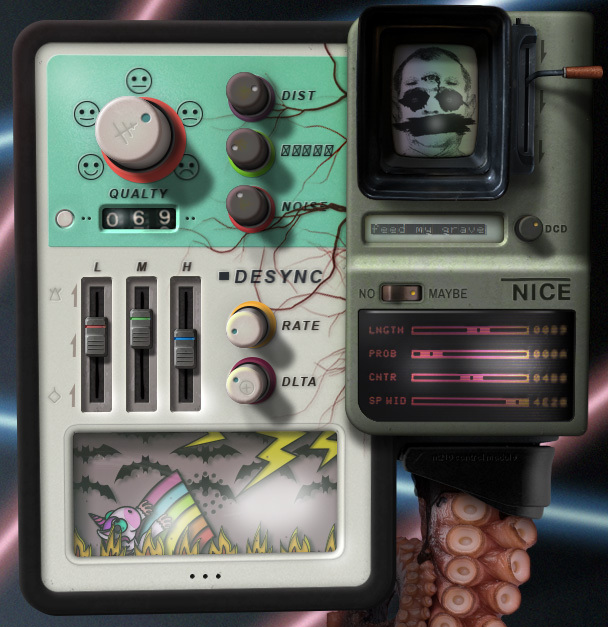
ECHOES ENGINE
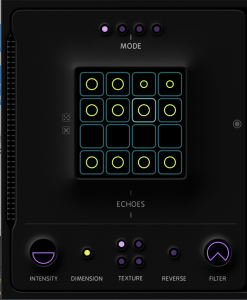 Starting on the left side of the plugin is the delay module. Don’t let the unorthodox controls scare you. Everything will all make sense by the end of this review. The delay section is by default, synced to your DAW’s tempo. The MODE selector at the top offers STRAIGHT, 2x (which is two times faster than STRAIGHT), DOTTED, and TRIPLET.
A Delay That Would Bring A Tear to Travis Scott’s Eye
With the timing of the delay repeats set, the echo matrix starts to come into play. Instead of simple boring repeats, SPACED OUT’s ECHOES section lets you control precisely when and how intense the repeats are. For an unfiltered, exact repeat, click once on a square in the grid. If you want the repeat filtered (of low accented), click again. The circle will appear smaller. Only want one delay repeat on the up-beat? Simple, click the first square of the second row with the MODE set to straight. If Travis Scott’s “Sample and Hold” delay is what you’re going for, click them all. Congrats, your track is “LIT” as they say.
To clear all of the repeats quickly select the “X” to the left of the matrix. For the more adventurous, the Dice icon beckons. This control will randomly repopulate the grid with both regular and filtered repeats. Click as many times as you want, SPACED OUT will provide a different result each time.
Fine-Tune Those Repeats
Further control of the repeats and texture of the delay comes with the bottom controls. The INTENSITY control actually houses two features in one. Click the left side of the circle outline to tailor the SUSTAIN of the later steps in the delay. The right side tweaks the FEEDBACK of the delay repeats.
DIMENSION works to add stereo effects to your delays. OFF leaves the delays unaffected, clicking once will widen the stereo field with ULTRA WIDE, and another click will auto pan with the MOTION setting. To spice up the repeats, the TEXTURE module has three additional modes that incorporate various filters, modulation, saturation, and bit crushing. Rounding out the delay controls is a REVERSE button for repeats and a High and Low-pass filter.
SPACE ENGINE
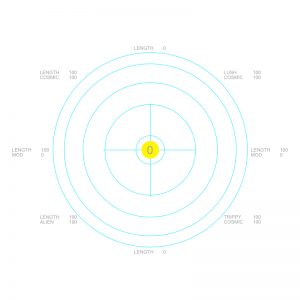
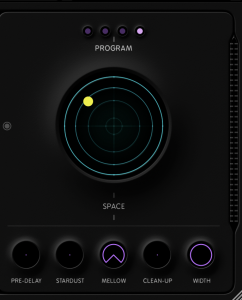 The right side of the plugin is all about reverb. At its core is an algorithmic reverb with four different PROGRAMS: Vacuum, Small Space, Medium Space, and Outer Space. Additionally, the SPACE ENGINE has four modulation effects baked into the algorithm. What exactly are the modulation effects? Well, we’re not explicitly told, but our assumption based on a quick listen is ALIEN incorporates a Flange, COSMIC has a Vibrato feel, LUSH sounds like a Chorus / Flange, and TRIPPY is very phaser heavy.
Once you select the reverb mode you want via PROGRAM, use the circle matrix to blend the length of the reverb with the modulation effect. Since a picture is worth a thousand words, we’ve made a graph showing what each position of the circle matrix represents.
Just like the ECHOES ENGINE, the SPACE ENGINE has additional tools to shape your reverb. PRE-DELAY does exactly what any other reverb does and is adjusted by dragging the small circle outward. STARDUST adds a shimmer effect to the reverb tails. Mellow works just like the ECHOES ENGINE’S High and Low-Pass Filter with the left side being the Low-Pass and the right side being High-Pass. CLEAN UP works like a density setting, and WIDTH will adjust the stereo width from mono to full stereo.
MIXER
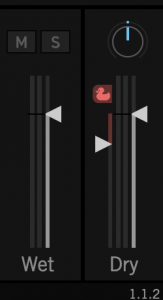
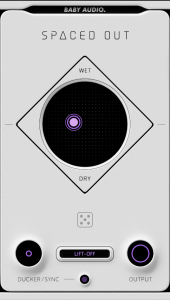 Tying all of this in is the MIXER section in the center. The X/Y Joystick gives you total control over the blend of the individual engines as well as an overall wet/dry control. The DUCKER control lets the source audio cut through before your SPACED OUT takes over. You can also use the DUCKER/SYNC to pulse the ducker for rhythmic movement of your effect. LIFT OFF does some proprietary “sound-bettering” incorporating compression, Mid/Side, and EQ and the OUTPUT controls the level of the entire effect.
Lastly, we have the GENERATE (Dice) button. While BABY Audio has a ton of incredible curated presets to start with, the GENERATE control randomly creates a new effect configuration each time you click the icon. Using this button can get quick inspiration or at the least, a starting point to begin your custom preset.
What We Liked
Taking loads of effects and stuffing them into one window could have easily gone wrong and sounded very wrong, but BABY Audio has found the blueprint. Once you learn the interface, you can create effect combinations that would take massive chains of plugins and busses, saving you time, countless faders, and plugin windows.
Sonically, SPACED OUT is spectacular. You’d think this much reverb and delay on a track would completely wash the source audio out, but BABY Audio has performed a lot of behind-the-scenes trickery to keep the effects perfectly seated in the track. The ECHOES ENGINE fills a huge void missing in the delay plugin space. They’ve accomplished what usually would take a delay plugin and a lot of automation. There is a layer of magic that combining delay and reverb in one plugin can only accomplish and SPACED OUT has it in spades.
What I’d Like to See
While there isn’t anything sonically wrong at all with SPACED OUT, I feel there are a few little functional additions I’d like to see. I don’t like that you have to click and drag the dot in the reverb matrix and mixer X/Y. I’d like to be able to click a random area in the circle and the dot move there. I’d also like a way to easily automate the position of the reverb matrix and the mixer X/Y. You could create some even crazier FX if you could randomly change the blend of each element. I’d even take a button that randomly moved the controls around on its own.
In Conclusion
SPACED OUT is easily my favorite plugin of 2020. I don’t have much else to say because I want to get back to see how this can bring new life into tracks. Bye!
Price: (Intro) $39 (Regular) $69
To purchase, please consider our affiliate link HERE. It doesn’t cost you any extra, and it helps support your favorite site!
- The Delay Matrix makes getting those old school sample and hold delays (ala Travis Scott) fast and easy
- Blends perfectly with the source audio without washing it out.


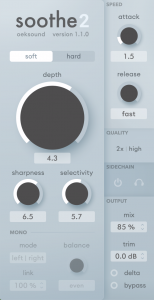 Yes, the interface has “compressor-like” controls but is not quite a compressor. The above-mentioned nodes work in tandem with the five knobs in the depth and speed section to control just how Soothe will handle your problem frequencies. The depth knob serves as the main control for how much overall processing should be applied to all boosted nodes. Just above the depth knob are two choices for different modes of processing. These two modes determine how the depth control will affect the audio, with each name being pretty self-explanatory.

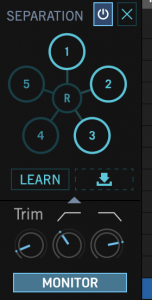 Sometimes the source material won’t play nice no matter how many controls a plugin has. Usually, this results in copying audio to a new track, separating each sample in your DAW, and preserving only the initial transient. UVI has turned to the future to fix this by utilizing “machine learning”. The Separation section breaks your audio down to its very core and separates it into sections based. Think of this as an extremely smart gate. Once analyzed, audio is placed in one of six different divisions, with “Section 1” containing the most energy going all the way down to the “R” for the remainder of the content. To remove each section for better detecting, deselect the corresponding number. Want to hear what you’re removing? Use the Monitor button. Tip: this can also be used to remove mic bleed by leaving the Monitor on and removing the sections that contain the bleed. Usually, all you need to deselect is the “R”.
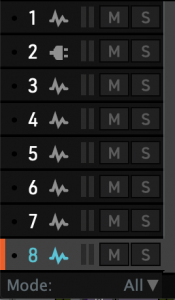 Eight slots abound with countless options for how samples will trigger. Drag and drop is the name of the game. Want eight samples? Select them and drag them into the slot area and each will populate in a slot. The mode selector at the bottom gives you the power to choose how they will play. The All mode plays every sample loaded at once, Sequence goes in numerical order, Random does just that, and Velocity will play sample based on how far the source hit goes over the threshold.
 A Ducking control has been added to the output section to sidechain compress your source material based on the samples. A slider next to the clever Duck icon controls how much you want the original to hide behind the sample. If you want further control, the same Settings menu you used to scan for plugins has expanded controls for ducking.


