- Very Versatile Rig Pack. There's not many genres this pack can't cover. <br?
- Presets give instant starting points to get your creative ideas flowing
- The Performance presets are my favorite. I hope to see more presets like this in future packs.
Cons
- None
Summary
Whether you play live or in studio, there is something for everyone in the MBritt 2020 Pack.
Rating
I know you’ve watched the YouTube videos, heard some of the samples by guitar players much better than me, but I’m going to take the less beaten path with a written review of Michael Britt’s latest Kemper Profile pack: MBritt Profiles 2020 Pack. Written reviews tend to allow for more detail, so we’ll go over more of the specifics of the pack. We also featured a Kemper Profiler Review last month and it can be found HERE.
Personal Stash
It’s been close to two years since Michael Britt (aka Dr. Kemper) has released a new pack. This wait is in part due to his focus on quality over quantity. It’s refreshing to see someone who isn’t just out for your wallet. While Mr. Britt is constantly looking for new profiles, his previous packs have become harder to beat. The 2020 Pack represents most of his personal amp profiles and a few interesting amps, he’s profiled along the way.
What’s Inside
This pack contains the following:
126 Studio Profiles of 16 amps
13 LDW – Divided by 13 LDW
3P Am Dream – 3rd Power American Dream
3P Brit Dream – 3rd Power British Dream
57 Deluxe – Fender 57 Deluxe (hand-wired)
63 VibroV RI – Fender 63 Vibroverb Reissue
67 Pro Reverb – Fender 67 Pro Reverb
68 Mars Plexi 50w – Marshall 68 Plexi 50 watt (Belonged to Eric Johnson)
72 Mars 50w– Marshall 72 50 w (flooded but Dylana from 3rd Power rebuilt it. Has been profiled in pack 1 but improved and tweaked)
Mars 800R – Marshall 800 (Red Tolex)
Boggy Metro – Bogner Metropolis
CA OD100 – Custom Audio Amplifiers OD100
CA Tripper – Custom Audio Amplifiers Tripper
Match Club Man – Matchless Clubman
T Hat Royalty – TopHat Amps Club Royale
Too Rocky CRS – TwoRock Custom Reverb Signature
Wrekt DML – Trainwreck Dirty Little Monster
7 Plug’n’Play Performances
3P Country – Just a basic group of tones that would work for most classic to modern country tones.
Basic FxxxxR – This performance highlights the CA amp tones available in this pack, from brownface and blackface to thick tweed overdrive.
Britt Basic – He always keeps a “britt basic” performance as his first performance on my Kemper, so if he’s doing songs that he doesn’t have specific performances programmed for, he can use this performance for most songs. This has some of Michael’s favorite tones in it.
Classic Rock – This performance is predominantly Mars based because that is the tone of classic rock IMO. From the gorgeous Plexi clean to Plexi drive to metal front lead tones.
EL84 Basic – For those who like to live on the AC side of things tone-wise. The way EL84s break up is really nice. This is a performance of AC style amps that cover everything from clean to leads.
Inspired – This is a collection of tones for when you’re just looking for a sound, whether it’s something song-specific or just to be inspired to play a bit.
Variety – This is a random collection of tones that are more style-specific than song specific.
32 Effect Presets
12 String – simulated 12 string tone using Pitch Shifter
Analog Tape 1 – basic analog tape Delay
Analog Tape 2 – another variation of the tape Delay sound Big
80’s Comp – lots of compression for 80’s sound
Comp + – Mr. Britt’s basic compressor with just a bit more oomph
Comp 1 – Mr. Britt’s basic compressor setting, parallel and can be left on
Comp Dyna – simulation of a great Dyna comp for more squish
Crystal Del – Dual Crystal Delay with some octave shimmer
Franken – Pitch Shifter for up/down octave, great for Frankenstein
Harm G Maj Pent – Smart Pitch Shifting Mr. Britt use live in G major pentatonic, great for Jessica Hyper-Lite – nice, light, airy chorus
Legacy Basic – one of his basic, go-to Reverbs
Lush Swell – Cirrus Reverb with a bit of shimmer that he love for ballads
Magic Cab* – one of my favorite Cab modules that he uses on a lot of rigs
Magic Cab 2 – slight variation of the Magic Cab
Nat Basic – Natural Reverb that he uses a lot
Octave Down – simple octave down effect
Quad Delay – He uses this for thick swell effects among other things
Rabin 5ths – straight chromatic 5th Pitch Shifter for Owners of Lonely Hearts
Rat Crunch – Mouse overdrive to push an overdriven amp
RCA 3 – another Cab that Mr. Britt finds useful for other rigs
Rotary – my fave Rotary sound, often set for morphing into
Scream Big – one of my fave Tube Screamer stomp settings, adjust to taste
Scream Crunch – lighter gain Screamer stomp
Scream Push – this TS stomp is nice to push a clean amp into the edge of breakup
Trem Dukt – he loves the ducking trem, play hard and it’s not there, play soft and TREM! Uni Gilmour – Phaser Vibe for some Floyd type tones, one of his faves
VIB Wobble – one of Mr. Britt’s basic Vibrato effects
Vibrato – another variation of one of his fave effects
Wall Delay – Another Brick delay setting
Decoding the Preset Names
Before we get too far, we should go over the naming conventions. At first, you may be slightly confused by letters and numbers at the end of the preset names. These actually represent notes pertaining to specific versions of profiles he’s created and certain special pieces of gear that he used. Below is a description of what the letters stand for
Pedals
K – Klon or Klon-type pedal
R – Red (His custom-built Colonel Angus Overdrive) – Similar to a BluesBreaker
T – Paul Cochrane Tim or Timmy Pedal
805 – Seymour Duncan 805 Overdrive Pedal
BD – Blues Driver
PJ – Pettyjohn Electronics Gold Overdrive
Misc Notations
MC – Magic Cab Speaker Cabinet Preset
B – Bright Channel (Vibroverb) OR Channel B (CA Tripper)
C – Channel C (CA Tripper)
V – Vibrato Channel (Proverb) OR veteran 30 speaker (Boggy Metro)
Let’s Get into it
This pack was created in Firmware 7.x and utilize .krig. Make sure your OS is 7.x and above. A word of warning – if you use prior versions, these presets could cause trouble and if they did work, they would not have all of the effects and parameters.
With the technicals out of the way, let’s get into the collection. Each of the 14 amp models has anywhere from three to thirteen versions per amp, usually ascending from cleaner to more overdriven. Individuality is encouraged by Mr. Britt and he gives the keys to make these models your own. He kept the EQ section of the amps fairly neutral and suggests using the Definition control to make presets brighter or darker. By using the Definition as a “tilt” EQ, turning it up will make the model brighter, turning it down will make it darker. Some other considerations he mentions is utilizing the Power Sagging, Compressor, Clarity Control, and Speaker Character controls. These can help make these presets your own.
So How do They Sound?
How do you think? They sound amazing! I own all of the previous packs, and while you could surmise Michael Britt couldn’t raise the bar any more than he did with other packs, he has certainly raised it even higher. The presets are virtually “mix ready” and work for just about any genre.
The T Hat profile is one of the most versatile presets and I bet I’ve used it on every track that needs a tone that can transition from cleaner to break up just by dialing the volume. The Wrekt model with the low end turned down a little is one of the best distortion models for rhythm on just about any genre. Simply dial the drive in and you’re all set.
The presets are great, but what shines, even more, are the presets and performances. I found myself playing more in the performance presets than anything. I would really like to see him create a new pack of creative presets like what he created in the “Inspired” and “Variety” section. He really has an incredible ear for recreating classic song presets as well as his own.
Conclusion
I think Michael Britt is doing all of us a great deed by offering his personal amp profiles. I think he could easily charge double what he does simply based on the quality of the models and presets. My Kemper pretty much stays on the MB folder in my Profiler. There’s just no need for much else unless you’re going for detuned metal presets, but even some of his models can be purposed for this and add a unique touch to even those tracks.
For more information and to purchase, visit MBritt’s site HERE.
A secret tool for most engineers for years, the “sub-kick” was originally made from a monitor woofer wired to work as a microphone. This, paired with a mic on the beater is responsible for the extra oomph in tracks. Now Avantone Pro has made one so you don’t have to!
Avantone Pro is proud to announce availability of Kick — an aptly-named sub-frequency kick drum microphone that effectively brings back to life a well-known extinct example by utilising the affordable high-quality audio products producer’s own reproduction ‘white cone’ low-frequency driver to capture lower frequencies than a standard dynamic microphone, giving kick drum sounds that still-sought-after subsonic signature — as of June 1…
While using a speaker as a low-frequency capture microphone is nothing new — after all, The Beatles used this technique on their chart-topping ‘Paperback Writer’ way back in May 1966, watching people dangling a speaker from a makeshift stand, rewiring a monitor driver, or hot-wiring a combo amp to try and capture those lows is far from a pretty experience with results not necessarily assured, Kick ably addresses this by bringing the boom from appropriate instruments out to the forefront, making large-sounding sources sound massive. Moreover, it neatly does so with a sub-frequency microphone that utilises its well-known reproduction ‘white cone’ low-frequency driver — not just any driver, though… the driver!
Avantone Pro’s AV-10 MLF low-frequency replacement driver used in its CLA-10 recreation of an iconic studio reference monitoring mainstay — and compatible with the Japanese original — is also at the beating heart of Kick. Indeed, it has a single continuous press-formed cone to match that classic sound and allows a much higher level of quality control and consistency during the manufacturing process as well as delivering strong bass reproduction. In Kick’s case, the AV-10 MLF’s distinctive 18cm cone acts as a microphone element. The microphone itself is of a moving coil dynamic type, with a 50Hz to 2kHz frequency response, 6.3 Ω output impedance, and figure-eight pattern, plus a male XLR connector. All are housed in a birch plywood drum shell with a 10-inch mesh drum head.
Having said all that, to then mount Kick on a standard mic stand simply would not do the job justice — which is exactly why Avantone Pro provides a stage- ready, double-braced drum stand. Studio-bound or on the road, the comprehensive Kick package is really ready to deliver!
Kick is available for $349 / €399
To purchase, please consider our affiliate link HERE
Way early in Everything Recording’s infancy, we reviewed Saturn and loved it. Now the insanely diverse distortion box is back with more modes as FabFilter releases Saturn 2
FabFilter is proud to announce immediate availability of FabFilter Saturn 2, a major update to their award-winning multiband distortion and saturation plug-in. Saturn 2 sees a top-to-bottom redesign of the Saturn interface for even greater ease of use and visualization, as well as a host of new features and improvements, including 12 new distortion styles, a radically overhauled and expanded modulation system, enhanced envelopes, linear phase processing, and a pristine new ‘Superb’ High Quality mode.
Beautiful new interface with modulation visualization
Saturn 2 looks better and flows faster than ever. The darker color scheme makes the plug-in easier to look at for extended sessions, and four interface size options and a stunning full-screen mode enable adaptation to any workspace. Modulation is now comprehensively visualized at both source and target, too, with color-coded collars and tracks on knobs and sliders animating in response to modulation input, the source flow area giving an eye-catching overview of all mod signals, and indicators on controls and bands showing which parameters are being modulated at a glance.
More distortion types
Saturn 2 almost doubles the number of distortion styles on board from 16 to 28. ‘Subtle’ versions of the Tape, Tube, and Saturation styles provide low-intensity warming, while four new British (Rock, Pop) and American (Tweed, Plexi) Amp styles perfectly model well-known guitar amplifiers, three Transformer styles (Subtle, Gentle, Warm) open up abrasive new possibilities, and the Foldback and Breakdown FX styles reshape and mutate sounds beyond recognition, the latter combining down-pitching with heavy distortion.
Big modulation changes
With virtually no limit placed on the combination of 16-step XLFOs, Envelope Generators, Envelope Followers, XY Controllers, and MIDI sources that can be used in a preset, Saturn has always been serious about creative modulation, and Saturn 2 takes the whole system to the next level. Curve the Envelope Generator’s Attack, Decay, and Release stages for a smoother or more aggressive response, activate the Envelope Follower’s new Transient detection mode to tightly track drums and percussion, and route discrete band inputs to both Envelope sources as triggering signals — pulverize hi-hats to the rhythm of the kick drum, for example. The XY Controller’s new Slider mode, meanwhile, slims it down to vertical-only operation, and the XLFO benefits from legato MIDI triggering and targeting of the Frequency Offset and Balance parameters for modulation. And with custom naming of individual mod sources now possible, users can customize their Saturn 2 presets for effortless navigation.
Mastering grade saturation
The new ‘Subtle’ saturation types make Saturn 2 the mastering engineer’s secret weapon, bringing enlivening presence and fizz to final mixes. In order to meet the exacting demands of such mission- critical application, the band crossovers now offer a choice of 6, 12, 24, 36, and 48 dB/octave roll-off slopes, the new ‘Superb’ High Quality mode switches the plug-in to 32x oversampling for almost total elimination of aliasing, and the Linear Phase option ensures maximum coherence for the crossovers and High Quality modes.
Key features:
28 diverse distortion styles, from warming tube and tape saturation to screaming American and British guitar amps, Transformers, bit crushing, smearing, rectification, and more
Up to six separate processing bands, with variable crossover slopes: 6, 12, 24, 36, and 48 dB/octave
Independent Drive, Mix, Feedback, Dynamics, Tone, and Level controls for every band
Two High Quality modes for 8x and 32x oversampling
Regular stereo and mid/side processing
Intuitive interactive multiband display
Powerful, flexible modulation system: drag and drop as many 16-step XLFOs, XY Controllers, Envelope Generators, Envelope Followers, Sliders, and MIDI Sources as required
Full visual feedback of modulation via parameter animation and ‘source flow’
Linear phase mode for mastering applications
Four interface size options and full-screen mode
Carefully curated factory preset library for amp modeling, coloration, lo-fi degradation, and FX
All the usual FabFilter features users have come to expect: perfectly fine-tuned knobs and controllers, interactive MIDI Learn, undo/redo and A/B switch, Smart Parameter Interpolation for smooth parameter transitions, an extensive help file with interactive help hints, sample accurate automation, SSE optimization, and more
FabFilter Saturn 2 is now available for EUR 129, USD 154 or GBP 114, supporting both Windows and macOS in VST and VST 3, Audio Units, AAX, and AudioSuite plug-in formats.
Existing FabFilter customers can purchase or upgrade to FabFilter Saturn 2 with very attractive discounts by logging into their online user account: www.fabfilter.com/myaccount
System requirements are either Windows 10, 8, 7, Vista or XP (32-bit and 64-bit) and a VST 2/3 host or Pro Tools, or Mac OS X 10.8 or higher (64-bit only) with Intel processor, and an Audio Units host, VST 2/3 host, or Pro Tools.
To make self-quarantine just a little bit easier during the COVID-19 pandemic, FabFilter offers free 30-day evaluation extensions for all their plug-ins, including Saturn 2.
To purchase, please consider buying from our affiliate link HERE.
- Insanely Quick Workflow
- Beautiful Reverb that fits ideally in any mix
- Three effects modules that push this plugin into creative territory
Cons
- No real cons. Just improvements
- Wish I could resize the GUI
- Preset menu could use a dropdown on the preset name.
- I'd like a saturation module
Summary
This is one of the absolute best reverb plugins I've heard in a long time. I couldn't go back to not owning it.
Rating
Naming your plugin “Perfect Room” is quite the audacious move. In an already diluted market of reverb plugins, it can be tough to stand out. The team at Denise has quite a collection of new and innovative tools like Noise 2, Slappy, and Punisher. It seems utterly fitting that Denise includes a reverb in their arsenal, but it can’t just be your standard-issue reverb. That wouldn’t fit in their repertoire of unique audio tools. In this post, we Review the Denise Perfect Room Reverb to see if it meets the hype of its name.
The Harbinger of Room
Most run-of-the-mill algorithmic reverb plugins use a series of short delays with feedback to recreate the sound of a room. Although this is a novel approach to creating space, it comes with setbacks. The two big ones are spikes in frequency response and that metallic “plinking” sound you sometimes hear in reverb tails. Sure, we can use EQ to cut the highs, but that results in loss of the “halo” that top-end reverb can have on some tracks.
Perfect Room doesn’t have any of these peculiarities. The Denise team took the “you can’t have metallic reverbs if you don’t have delays” approach and created TXVerb Technology. This all-new approach to reverb results in a smoother response with no weird spikes or tinny resonance. How does TXVerb Technology work? Well, they don’t say, but the results need to be heard, not read in a review. Before we get to that part, let’s look at some of the more unorthodox controls.
Interface
Following their minimalist aesthetic, Perfect Room lays out all of the controls exquisitely. I simply like this user interface. Everything is just right there—no BS, no fluff. It just feels right.
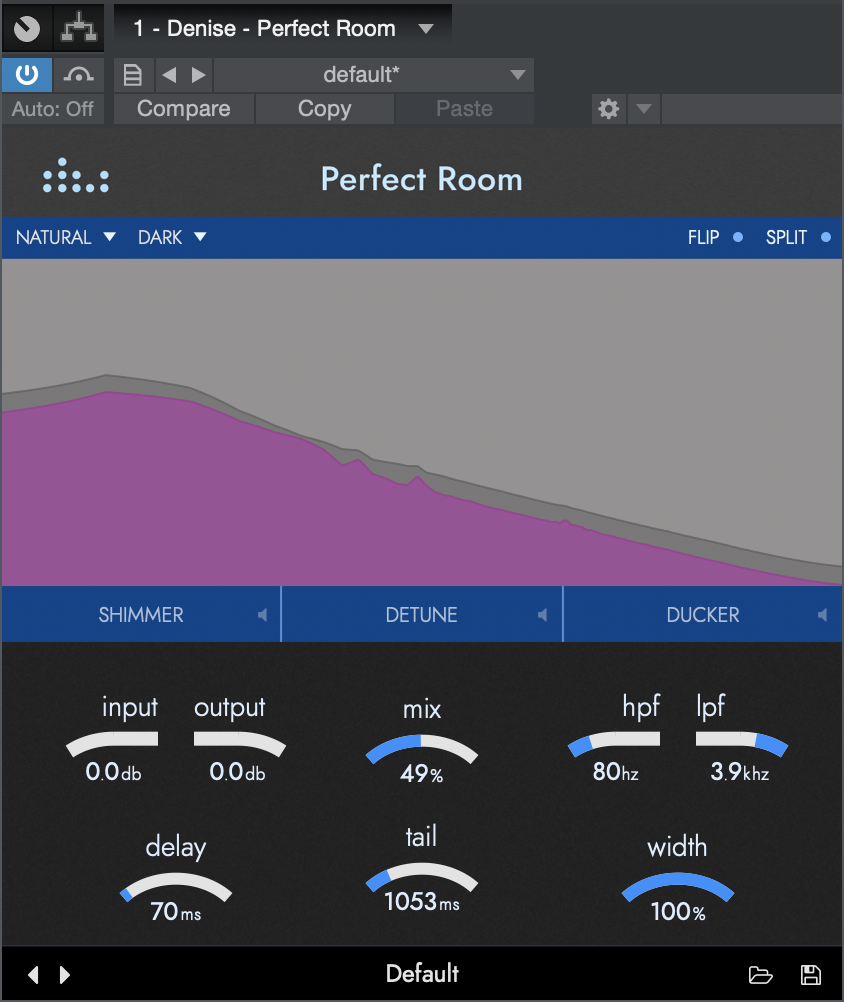
The Perfect GUI
The top section hosts the main reverb type controls. These parameters are going to have the most substantial impact on your sound. The middle section houses the spectrum analyzer and special effects. Lastly, the bottom area is a multi-purpose section. Mainly it contains the standard reverb controls, but when the SHIMMER, DETUNE, and DUCKER effects are selected, the lower part transforms into the particular effect’s controls (see image below).
Advanced controls pop up only when you need them.
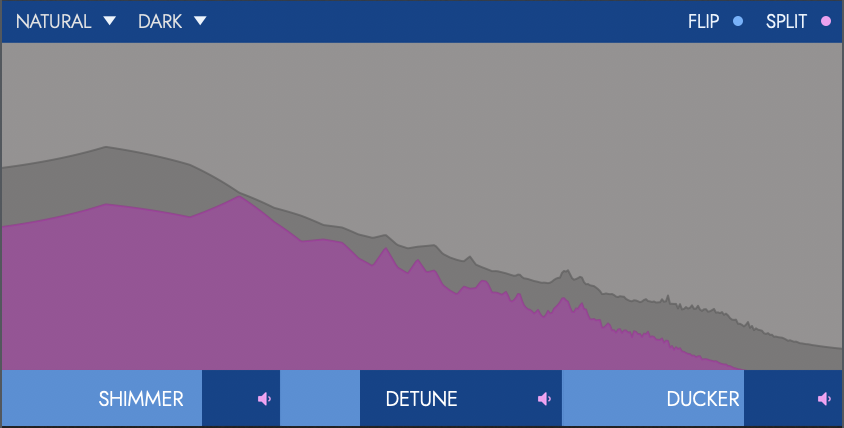
An enabled control will display in pink. For instance, if the Flip or Split is turned on, the dot next to each control will turn pink. Likewise, if any of the three effects under the spectrum analyzer are enabled, the speaker to the right of each name will be pink.
Pink means things are happening!
Speaking of the analyzer, here is how it works: the gray spectrum is your input signal. This color will be the only display with the reverb mix as 0%. As you turn the mix control up, you will see a pink spectrum start appearing. That is your reverb. As your mix control creeps past 50%, the pink spectrum will begin to overtake the gray, with the gray disappearing totally the closer to 100% wet reverb.
Legion of Room
Since this is not your ordinary reverb plugin, we don’t have the usual controls.
Room Type
At the top left corner of the plugin window is your room type. This menu controls the Style of the room’s response.
Natural decays logarithmically over time for the perfect room response.
Triangle doesn’t decay linearly for longer, tight reverbs.
Square doesn’t decay at all and drops off instantly for a more gated sound.
Tone Response
To complement the different Room Types, Perfect Room has five Tone Response settings. These are preset EQ curves that represent the overall tone of the reverb. This of it as a stepped tilt EQ setting.
Flat has a perfectly flat frequency response
Bright and Bright XL bring out the highs
Dark and Dark XL accentuate the lows
Each of these settings is very powerful and completely transforms the reverb sound. These five controls make dialing in the exact sound you hear in your head very fast.
Put My Thing Down Flip it and Reverse it
Who knew a reverb would have something in common with a Missy Elliott song? The Flip control actually does precisely what the song does and reverses your reverb tail. Just next to the Flip control is the Split. This can take a mono signal and create a true stereo reverb. Enable the Split and use the Width control at the bottom to tweak just how far on the edges of your mix you want the reverb.
The Usual Suspects
Just because a plugin is unique, doesn’t mean it won’t have the standard lineup of controls. Perfect Room is no different from the rest with its usual set of knobs that every reverb plugin needs. We have an input and output trim, mix, high and low pass filtering, pre-delay, and reverb tail. These all work like any other plugin. Where this plugin breaks free from the pack is just above these controls.
The Big Three
Effects in reverb have been a trick that many pros have used for quite some time but now you don’t have to stack inserts on your bus to get the unique vibe you’re going for. Perfect Room has three right at your fingertips. To engage, click the speaker icon on the right of the name. To expand the controls, click on the name. Finally, turning up the effect is as easy as clicking on the name a dragging up. Let’s get into what each effect does.
SHIMMER is a pitch shifter that can add an octave above and below into your reverb.
Source controls how much of the original reverb goes into the SHIMMER effect
Lo and Hi Octave add more of each respectively.
DETUNE adds random pitch modulations to the reverb
Wow is a slow detune
Shake is a fast detune
Speed controls both Wow and Shake speed
DUCKER hides the reverb behind the source. It uses basic compression controls to creatively make the reverb “pump” or just tuck slightly behind a vocal. It’s an extremely powerful tool that has been a secret weapon for many top engineers. The typical, Threshold, Ratio, Attack, and Release controls work just like any other compressor. The Hold feature is the only unorthodox control and stabilizes the gain reduction of the reverb for more precise ducking.
Presets
Lastly, we come to the very bottom of the plugin with the presets section. This area contains your basic preset browser, forward and back arrow, and preset name. The presets they’ve curated are very versatile and span from subtle to outright madness.
The Verdict
This is the reverb I’ve been looking for. While most plugins are trying to be one thing specific, they were always missing that certain something that makes the space behind the mix gel into the song. Yes, I’ve been able to create good reverbs… with other plugins stacked in front and behind, but rarely do I see one that can do it right out of the box.
Perfect Room lives up to the name. I love how this plugin handles low end. Putting reverb on a kick is usually a chore. You have to stack plugins and filter very carefully to keep the space from taking over the whole mix. Perfect Room does it in a few mouse clicks.
Complaints? Nothing substantial. Although the interface is incredibly intuitive, I do wish I could resize it. Also, I found myself clicking the preset name to bring up a drop-down menu. Eventually, I figured out you have to press the folder icon to open presets. This is a little outdated but since it doesn’t affect the quality of sound, I can deal with using the previous, next, and open folder icons. Now that I think about it, you don’t really need presets because the workflow of the interface is so quick. The only other thing I wanted to see was one more effects module under the spectral graph – a saturation module. Sure, this can be remedied by either buying one of their incredible distortion or saturation plugins, but I like having all of these existing effects in the window, I just want one more!
Conclusion
Perfect Room has a permanent spot in my template. The versatility, quality, and ease of use make this a “desert island” reverb. If there’s any reverb plugin you buy this year, buy Perfect Room
Everyone has a Podcast these days. Everyone usually wonders what they need to get started. RØDE has the solution with the RØDEcaster Pro. Now they’ve offered some accessories to make creating that new multi-part deep dive into “which Bluegrass song pairs with this BMW” a little easier. (I’m looking in your direction on that one Schug)
RØDE Microphones is excited to announce a new range of accessories for the RØDECaster Pro Podcast Production Studio: the DC-USB1 power cable, SC9 TRRS to TRRS cable, HJA-4 headphone adaptors, and XLR-ID cable identification rings. These four new products have been specifically designed to make the RØDECaster Pro more portable, more versatile, and even easier to use.
WHAT IS THE RØDECASTER PRO?
Released in late 2018, the RØDECaster Pro revolutionised podcasting. Featuring four high-quality XLR inputs and headphone outputs, eight sound pads for triggering sound effects and stings, seamless smartphone connectivity, world-class audio processing, one-touch recording to microSD or a computer via USB, and so much more, the RØDECaster Pro is the ultimate podcasting console. With a simple, intuitive interface and powerful recording and editing options, it’s ideal for beginners and professionals alike, simplifying podcast production while delivering the superb audio quality that RØDE is renowned for.
THE NEW ACCESSORIES
Since its release, the RØDECaster Pro’s capabilities have been expanded with multiple firmware updates, which introduced multitrack recording, new professional features, powerful audio enhancements, and more. These updates have been the result of user feedback and listening to requests for new features from the podcasting community.
Now we are pleased to present a host of new accessories to compliment the RØDECaster Pro’s hardware:
DC-USB1
The DC-USB1 is a handy power adaptor for powering the RØDECaster Pro from any compatible USB output, making the console completely portable. A high-power (2.4A minimum) USB output is required for operation.Power bank is not included.
SC9
The SC9 is a high-quality 1.5m TRRS to TRRS cable for easy and reliable connection of smartphones to the RØDECaster Pro.
HJA-4
The HJA-4 is a pack of four high-quality adaptors for converting headphones with 3.5mm plugs (as used on most consumer models) for use with the RØDECaster Pro’s ¼-inch headphone outputs.
XLR-ID
The XLR-ID is a set of eight colour-coded rings that can be affixed to any XLR plug, making them easier to identify and keep organised. The colours of the rings match the colours used for each of the microphone channels on the RØDECaster Pro.
Watch RØDE Product Specialist Ryan Burke run through the features and specs of the new accessories below.
The RØDECaster Pro is the world’s most powerful podcasting console, and it keeps getting better. Whether you’re a beginner or a seasoned professional, it’s all you will ever need to create incredible podcasts. Find out more at rode.com/rodecasterpro.
To purchase RØDEcaster Pro please consider our affiliate link HERE.
We at Everything Recording have used Melodyne since its first version. Funny story, we still have the box from the version we bought from Sweetwater. Ah, nostalgia – when you received physical copies of software. Anywho, I can’t believe we’ve arrived at version 5. Let’s see what they have in store for us.
Celemony is pleased to announce the immediate availability of the new Melodyne Version 5. The Grammy-Award-winning software Melodyne is used all over the world every day for the correction, perfection, reshaping and transformation of vocal tracks, samples and audio recordings of all kinds. A studio standard, in fact. But even the best things can be improved.
The most important new features of Version 5 relate to Melodyne’s core competence: the correction of poor intonation on vocal tracks. The algorithm now detects – along with a host of other phenomena – the presence and extent of the unpitched (noise-like) components of the vocal sound as well as breaths, which it then processes separately from the pitched components. This leads to better results, less time spent editing, and a more natural sound.
Factor in the improved weighting of pitch deviations and Melodyne 5 now hands you back – virtually in two shakes – a musically perfect vocal performance.
The volume balance between the pitched and unpitched components can be adjusted – syllable by syllable if desired. This not only helps with double-tracking and vocal harmonies but gives you a perfect and precisely targeted de-esser into the bargain.
Totally new possibilities for dynamic contouring are afforded also by the Fade Tool and the Leveling Macro, as they too work on a per-note basis – even with polyphonic audio material.
A new degree of musical freedom
But Melodyne 5 also supports new workflows that further musical creativity: With the Chord Track (and the Pitch Grid configured accordingly), recordings and samples can be adapted at lightning speed to the harmonic structure and chords of your own compositions and songs. So any library sample now harmonizes instantly with your song. That’s perfect for songwriters but also for remixers. And thanks to the integrated chord recognition, no knowledge of music theory is required.
The most important new features of Melodyne 5 in a nutshell:
with the Melodic algorithm, separate editing of pitched and unpitched components of the vocal sound (sibilant detection). Better results, less time spent editing, more natural sound
the ability to control the volume ratio between the pitched and unpitched components – a precisely targeted de-esser function
improved weighting of pitch deviations, musically perfect intonation
a Chord Track and Chord Grid to adapt any recordings and samples to your song – thanks to integrated chord recognition, no knowledge of music theory required
the Fade Tool and Leveling Macro let you edit the dynamics of each note – even in polyphonic material
a new algorithm, “Percussive Pitched”, plus various other algorithm enhancements
fuller implementation of keyboard shortcuts
Melodyne 5 runs in stand-alone mode as well as with 64-bit DAWs under MacOS and Windows – DAW integration via ARA, VST3, AU or AAX. The update costs 49 €/US$ for Melodyne assistant, 99 €/US$ for Melodyne editor and 149 €/US$ for Melodyne studio. For Melodyne essential and users who registered Melodyne after 1 March 2020, it is free of charge.
- A unique and innovative approach to an EQ Interface
- Gets tracks and mixes dialed in quick and easy
- Can teach you how to properly EQ while doing so masterfully
Cons
- No Cons. I just wish there were a way to couple MIXROOM with BASSROOM
Summary
Whether you are new to the mixing game or old hat, MIXROOM is a must-have in your arsenal.
Rating
To celebrate the release of their new plugin MIXROOM, the kind folks at Mastering the Mix sent us over a copy to test drive. This plugin drops today, so head on over after this review to get a trial and see what you think.
Intro
Sometimes, we all need a helping hand. Factors like ear fatigue, masking, and even just lack of experience can make determining issues on a track a challenge. Maybe you’ve hit that point on your journey where you can tell something is wrong but can’t quite put your finger on it. You could even be a pro on a deadline and need a tool to blast through tracks. Whether you are at one end of the spectrum or the other, MIXROOM has something for you.
Overview
MIXROOM is an intelligent EQ plugin developed by Mastering the Mix that assists specifically with your song’s mid and high frequencies. Instead of dealing with EQ in your normal visual sense of an XY graph, MIXROOM uses a more “true-to-life” representation of frequencies in space. The plugin analyzes your individual tracks or entire mix against a “target” and makes suggestions to bring out the best in your mids and highs. It is the perfect companion piece to its older sibling BASSROOM, which does a similar thing for your low end. It comes in all of your typical DAW flavors of AAX, AU, and VST.
Interface (Old Guard Shakeup Edition)
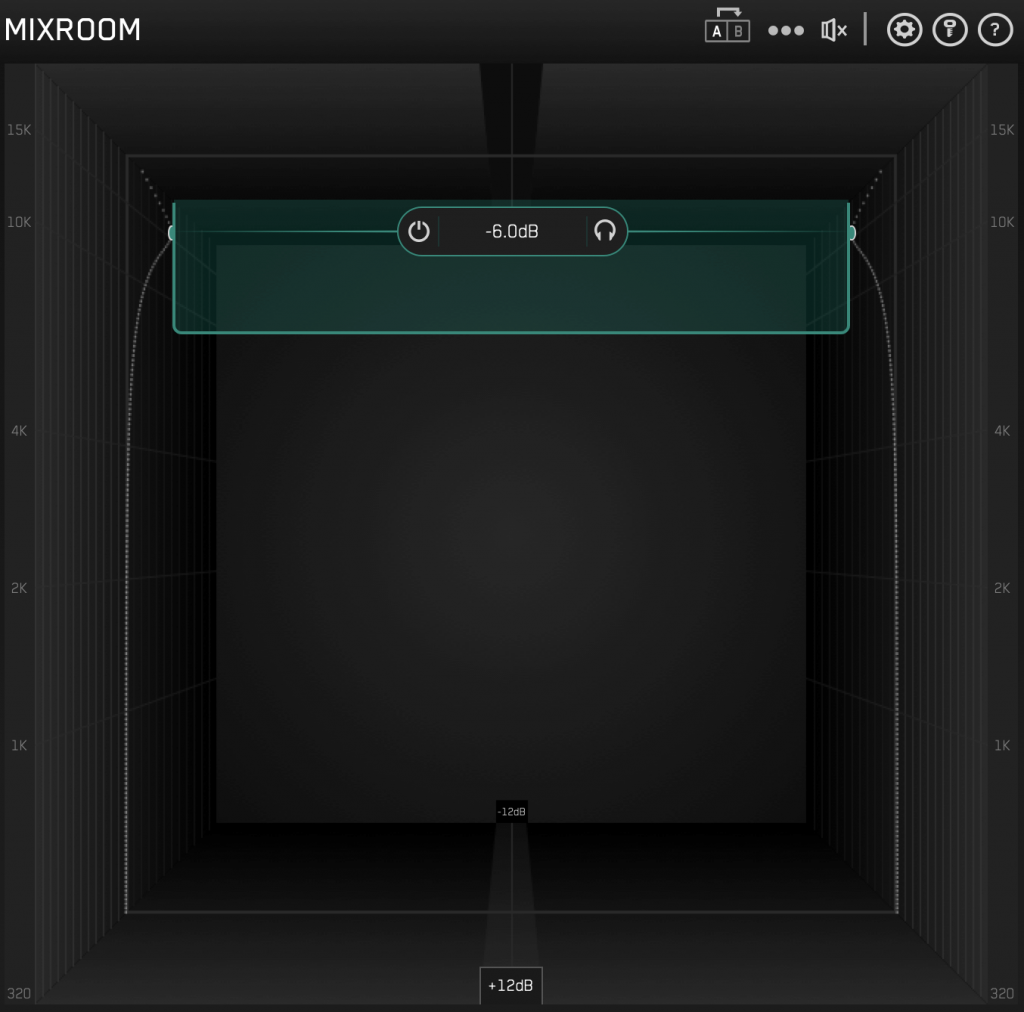
The modern EQ plugin interface is useful in its own right. Frequencies on the horizontal plane of your GUI, amplitude on your vertical. It makes sense from a “neckbeard” technical standpoint, but with today’s lingo of “taller mixes” and “put a halo of air around that track,” the standard EQ interface doesn’t quite translate. With MIXROOM, the interface is set up as if you were sitting in a three-dimensional room facing the back wall. Volume is represented by how far forward of back in the room, and frequency is vertical with low-mids being closer to the floor and highs being on the ceiling. If you have a 15kHz band attenuated 6dB, it would appear at the top of the “room” away from you toward the middle of the space. Confused? Here is an example.
“But what about the EQ curve? Where is that?” I knew you thought that, and I’ve got your back. If you look at the left and right sides of the “room,” you will see that the slightly bold gray line has curved at the green nodes of the 15khz band. This section Is where you v what affect your EQ choices are making. It also is the very same place where the Target EQ curve displays, but more on that later on.
Referring back to the image above, look at the +12dB at the bottom center. Depending on how much your mix needs adjusting, the front and back walls of your room can be scaled. If your mix is near perfect (aren’t all of ours in our own eyes/ears?), you can display a more refined scale. This scale ranges from 2, 4, 8, and 12dB levels. Lastly, when you’re playing audio, the far edges of the interface will light up in grayscale to show you frequency areas where a lot is going on. This visual doesn’t necessarily equate to a bad thing, but it’s a great indicator.
Let’s Make EQ a Game with Targets
Targets are EQ curves based on commonalities found in certain types of instruments or genres of music. Depending on what you’re EQing, you can reach for the TARGETS menu at the bottom left and pick one for what you’re mixing. If you happen to have an EDM track up, you want a frequency curve similar to what most of the hottest EDM tracks have. Arm your mix bus with MIXROOM, navigate down to the TARGETS section, and select “EDM” from the Electronic “Mix / Master Presets.” Then play your track around an area where a lot of energy is happening (usually the drop), and a green band will appear. This band represents the EQ curve you need to match for your song to sound more EDM’y. Pretty simple, huh? It’s even more straightforward than that. Click the “Add Smart Bands,” and MIXROOM will automatically set your bands and levels to match the target curve. From there, you can make slight adjustments to match the curve more or push the limits to something different. Let’s take this one step further.
Or Let MIXROOM Do it for You
Say you think your big band pop track cover of “Mambo No. 5” could use that authentic Lou Bega mix tone. Click the bullseye with a slash through it looking icon on the bottom. Now drag the actual Mambo No. 5 track in, select the hook section (or the part where he randomly yells “Tha TROOOMMPET”) and play your track around a similar snippet of audio. MIXROOM will set the same target curve as the original track and boom, add smart bands. You are now one step closer to 1999! You are all welcome for having that song stuck in your head for the rest of the day. Bonus points for remembering all of the girls’ names.
But Wait There’s More
The target feature of this alone should already have you in another browser tab buying MIXROOM, but we have more features to go over. The plugin has some other goodies. The devil is in the details, and MIXROOM has some additional tools under its belt.
One issue regarding EQ many people face is the false sense of security that boosting can impose on a mix. Louder just sounds better sometimes and can lead you to hours of wasted time and wrong EQ moves. MIXROOM has an intuitive Level Match feature that analyzes the audio and determines an overall value that your EQ changes have made. This is not just a one-time analysis, either. Level Match runs while the track is running, and the speaker icon will turn orange when the perceived volume has changed by more than 2dB. Clicking on the speaker will open up a slider control for adjusting the level. The goal is to match your slider with the white level indicator at the top. With the level changed, click the speaker icon again, and the plugin will bypass. The icon will turn red to show bypassed. Now, your playing field is level.
Many Modes
Mastering the Mix knows that at some point, you may be mixing, and other times mastering. They’ve developed modes to accommodate each. Clicking the three dots to the right of the A/B controller opens frequency band options. Filter Mode can tailor the bell shapes to the task at hand. Mix mode has steeper gain and Q settings for individual channels, while Master Mode is limited to +- 4dB and a 0 – 1.5Q, more suited for subtle overall finishing moves. This menu also has a Linear Phase and Minimum Phase mode. The Linear Phase mode does not color the phase but can affect transients. Mastering the Mix has minimized these artifacts, but this mode can still have some influence over the fast peaks. Minimum Phase mode does the opposite. It does introduce coloration to the phase but does not affect transients.
Got Front Back, and Mid to Side
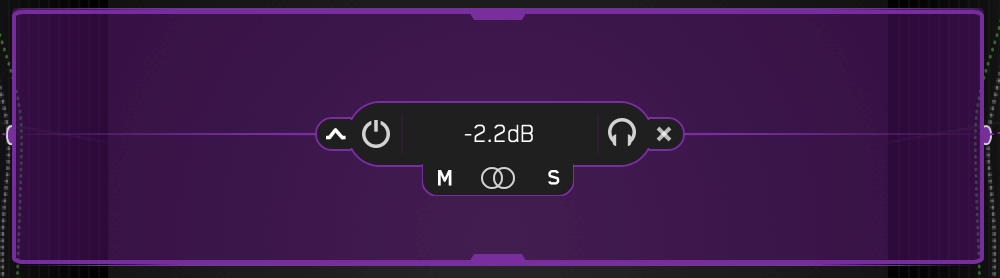
FINALLY, an opportunity to rep my hometown in a review (RIP Pimp C) Ok, sorry about that, back to the plugin. MIXROOM has one last trick up its sleeve. Mid/side can be adjusted per band with the STEREO control in each band’s control section.
By clicking the icon in between the M and S, you can adjust whether the band’s gain change is affected stereo, mid, or side. Drag the icon left to go more mid, drag right to go more side. Conversely, you can click the M to go full mid and the S to go entirely side.
Lastly, we can solo bands with the headphone icon on the right side of the band menu or delete the band altogether with the x icon. On the left, we can turn the band off with the power icon and switch from a bell or shelf with the icon on the far left. Want to add the band you deleted back? Double click in the middle section of the GUI. Bands overlapping? Click on the center line of the frequency hidden in the back, and control is yours.
What I Like
Honestly, I like all of it. MIXROOM is a double threat, an innovative EQ, and a learning tool. Seeing your mix against a target trains you to learn tricks that once took years to figure out. It’s a win-win. Your mixes shine, and you learn how to hear the difference between your frequency choices, and a pro’s. Even if you are utterly new to mixing all together, this plugin will get your mixes where they need to be in seconds. If you’re a pro, MIXROOM will speed up workflow and do it in style. There’s something for everyone. You seriously need to own this plugin.
On top of owning this plugin, you need BASSROOM. The two go hand in hand. BASSROOM is the perfect companion, allowing you to achieve a solid low end using the same approach. These two plugins have made a permanent spot on my mix bus.
What I’d Like to See Added
As far as an EQ plugin goes, I don’t see anything that could be added. You couldn’t have built a better plugin with a more immersive interface. The ONLY thing I would like to have is a way to combine MIXROOM and BASSROOM into one interface. Other than that, I can’t find anything I would have done differently.
Conclusion
I’ve said enough, by the time you’ve finished this review, your purchase was complete, and I bet your download is finished. Go install and see for yourself. If you haven’t bought it, go get the trial. Standing Ovation Mastering the Mix!
For more information, visit Mastering the Mix
If you appreciated this review and like to support our site, buy from our affiliate link HERE.
- Versatile effects, can be as subtle or vicious as you want.
- Intuitive Interface
- Great presets, with most needing very little tweaking
Cons
- No real cons. Only suggestions
- Could use a Tape Delay
- Tempo Sync on Wobble and Magnetic
Summary
If your tracks are repetitive, verging on boring, you need RC-20.
Rating
To celebrate XLN Audio releasing RC-20 for Splice Rent-to-Own, we have assembled a “mini-review” of reasons explaining why this plugin is more than worth $4.99 per month for 20 months. If you know you want it already, head on over to Splice to start renting.
Everything Recording Review
Inspiration Lost
Sometimes, that spark of creativity doesn’t come in the chords you play or the sample you’re using. It comes in the effects you incorporate. The problem with some effects is the time it takes to get everything just right. Usually, this involves multiple plugins that do separate things, and by the time you’re all ready to go, the spark is gone. Wouldn’t an all-in-one solution be helpful?
XLN RC-20
Although the RC stands for “Retro Color,” don’t mistake this plugin for a one-trick pony. This plugin is just as comfortable in a Vaporwave track as it would be in a Country chart-topper. Sporting six different modules, each can be used either singularly or in combination to create a vast array of textures. To add more of each module, turn the individual knob underneath each effect you want to push into your signal. Also, each module has a custom-tailored Flux parameter that introduces non-linear random fluctuations. These differences can either be subtle or all-out entropy.
Since versatility is the name of the game, you need a tool that encourages that. The Magnitude slider facilitates this by working as a master VCA / blend. As these presets can introduce all-out audio mayhem, it’s best to be able to present just the right amount of crazy in your signal. Turn the Magnitude up; you get more color, turn it down and get more original signal.
FX Galore
Across the middle is the FX Module, which works as the heart and soul of RC-20. This area is where all of the magic happens. Each section has clear icons across the top to explain what they do. Below are the various modules and what they do.
Noise
What once was a nuisance to mix engineers has become the new “vibe.” With digital being a more sterile medium, having a moderate amount of hiss is encouraged to breathe vintage life into a track. Noise comes in the form of many devices from the days of yore. RC-20 has everything from the hiss of a cassette tape to the crackle of vinyl. Tone works in concert with each type as a tilt control to impact either more of the high or low end of the Noise. Follow mode has the noise work in concert when the signal is active. If left at 0%, the noise stays when the signal stops (although the noise fades when the track is stopped). Duck control hides the noise behind the incoming audio peaks. Additionally, you can use this control for even more movement with a pumping effect.
Wobble
Wobble modulates the pitch of the signal but in a controllable way. Wow is the slower artifact and Flutter is the fast. You can use the slider to get just the right balance of each. Both wow and flutter has an individual Rate control. To add more versatility, a Stereo and Mix can also be incorporated to add a lush chorus to tracks.
Distort
Everyone loves a good “dirt box” and RC-20 has it in spades. On top of a Types selector, a Focus Filter slider will only distort the frequency area you’ve selected. The Mix knob blends the signal.
Digital
In your youth, you downloaded tracks off of Napster. Don’t try to deny it – your HP Pavilion desktop was loaded with “Lincoln Park” songs that took days to download and had a lovely warble at the top end. Ah the early years of MP3’s. We can bring that vibe (in a good way) back to your tracks with Digital. Just like the Wobble control, a slider for Rate/Bits Balance will dial in the sample rate and bit depth reduction. If the sound is a bit too harsh, don’t worry, we have a Smooth control to ease the edge. Also, we have a Focus Filterto only degrade a specific frequency range. Mix knob does what it always does!
Space
Reverb always helps, especially when chaining effects like what we have in front of this control. Space is a reverb effect with a bit of resonator and has the standard reverb controls like Decay and PreDelay. Focus Filter works just like the other modules to dial in the right resonance and damping. Stereo can widen existing stereo signals and even change a mono to stereo.
Magnetic
Remember when you overplayed that Joey Lawrence cassette tape to the point where it warped and would slightly change pitch? No? “shifts eyes”. Well I don’t either, but apparently Magnetic does. Using controls like Wear, Flutter can give you the warping of your cassettes and Dropouts can give your tracks the sound of a plugin that you’re still using on trial (again, in a good way). Stereo spreads how the wear and dropouts behave in each speaker.
Master Section
To top off the interface, we have global controls at the end of the modules. For easy reference, the Master Section is divided into three controls: IN, EQ, and Out. The IN section has a Gain, to give you that little extra push, especially with Distort and Digital. EQ has the Focus Filter to dial in frequencies. There are also controls for the high and low pass filters with different modes – the low end has a soft cut and hard cut that puts a bit of a bump at the cutoff frequency. The high end has either a soft or hard cut filter as well. For overall finishing, the Tone control consists of two modes: Tilt or Mid. The Tilt mode works in conjunction with the Tone knob just like a tilt EQ. Mid mode has a fixed frequency that can be boosted or cut with the Tone knob. Lastly, the OUT section features a Width and Gain control. The Width goes from full mono to 200% (exaggerated) width and everything in between.
What I Like
If you’re looking for vibe, you’ve come to the right place. RC-20 spans the gamut of effects from subtle to all out bedlam. The controls are laid out perfectly straight-forward and the interactive nature of the interface is very inviting. I like how the icons above each module’s control move and change to show different parameter changes. The color-coded modules make finding the sound you’re looking for quick.
As far as sounds, each control on their own sound great, but combining them adds a whole new layer of magic. Some of these effects combinations create textures I never even thought of. Throw in the master section and things get even more interesting. I love very subtly mixing crazy combinations as much as I like completely destroying audio.
What I’d Like to See
While RC-20 has six modules already, I found myself wanting one more. A Tape Delay would round this set out masterfully. I also wanted the Wobble and Magnetic to be tempo synced. I think some rhythmic modulation would be an added secret weapon to producers who use the side chain effect in EDM. Lastly, a Soft-Clip Limiter would be the icing on the top of the cake. You could push the input even further and still be able to maintain a useable signal.
Conclusion
You can’t go wrong with RC-20. Just like with XLN Audio’s other creative brainchild XO this plugin is a home run. Old sounds are new again, new sounds are even more new, everyone wins with RC-20.
So head over the Splice and start renting-to-own this incredible tool.
Some of us have a sound in their head but just can’t quite get it out. We spend hours with the DAW pencil, drawing notes for chords so why not actually learn the chords you hear in your head? Piano 4 Producers Masterclass can have you on your feet in no time.
Have you ever felt limited by your musical knowledge and abilities?
Have you ever gotten stuck trying to figure out the music in your head?
Have you ever felt like if you just “knew” what notes to play you could make much better music much faster?
Forget Fur Elise, Jingle Bells, and all that boring sheet music teachers make you learn before you get to the “good stuff”…
Because when you learn how to play with GRIPs…
You learn how to play all that Advanced R&B, Neo-Soul, & Jazz Harmony right away!
And the best part is…
You don’t even have to learn to read music to do it!
I know you’ve probably never heard of GRIPs before…
But haven’t you always wondered how Robert Glasper, Moonchild, Brian McKnight, Musiq Soulchild, and all these cats get those juicy chords so effortlessly?
It’s really not magic, it’s all in the GRIPs!
BruceBeats is an accomplished multi-instrumentalist & producer with credits on Netflix, ESPN, Fox Sports, MLB, and more. He has also toured the U.S. and South America for 4 years as live musician and has been teaching musicians and producers for over a decade.
He put together a Free Masterclass showing you EXACTLY how to:
✔️ Play using the GRIP Formula (so easy a 2-year-old can follow along)
✔️ Only your “must-know” theory (no sheet music or Fur Elise)
✔️ How to BURN this into your muscle memory (so you can Stevie Wonder it)
- Can be just about any amp you need in a flash
- Rigs can be added quickly
- Incredibly life-like sound that I never thought I would hear in a digital modeling amp.
Cons
- No Cons. Just suggestions
- Would like to see a few niche effects
Summary
Every studio should own one of these. With fast workflow and uncompromising tone, the Profiler belongs in every person's arsenal, whether you still use analog amps or not.
Rating
Humble Beginnings
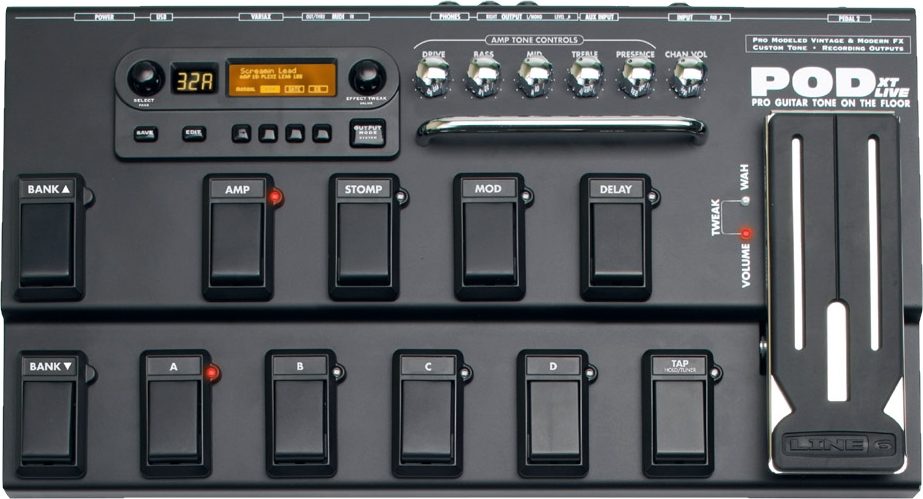
My first venture away from analog amplifiers started of necessity. I was a broke teenager who wanted to step away from either borrowing amps from friends or using my hand-me-down Peavey Blazer amp. Finally, I bought my friend’s half functional Digitech RP-6 and felt like I was on top of the world. I could release all of my 90’s grunge angst from the comfort of my headphones in my bedroom. After graduating high school and moving into an apartment, I upgraded to a Behringer V-Amp. Then, later on, I hit the jackpot when someone bought me a POD-XT Live. The Line 6 black box with pedals was one of the first digital guitar processors I could get a decent sound out of, thus starting my intro to recording directly to a Digidesign Mbox1.
Remember these guys?
Eventually, I began a career where I could make enough money to buy a house and afford some decent gear. I dove headfirst into mid to high-end amplifiers, buying Bogner, Orange, Vox, and finally settling on an extremely rare two-channel Matchless Avalon and a handful of guitar pedals. Since my amp was now in the analog domain, I needed mics and preamps. This sparked another costly journey into achieving the tone my amp was creating in a room, into a DAW.
My history probably aligns with most readers of this review, as each of us went through what we possibly jokingly refer to as when we went “all digital.” I’ll admit, I do prefer analog tube amps but understand the utility of digital. Even though digital technology had come a long way, I never thought I would see a digital company crack the code on analog. Then one day, I get a press release.
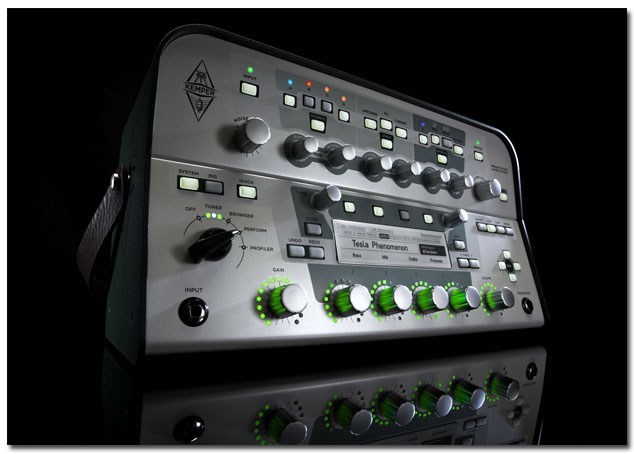
Then Came Kemper
The initial press image of the Kemper Profiling Amp
In late 2010, Kemper seemed to come out of nowhere with this sleek, glowing, white box that came with promises of being any amp you want, offering virtually anyone the ability to “profile” any amp quickly and easily. Videos emerged of people running this strange loop of cables through boutique amps, playing a series of sounds that I can only akin to toy laser guns of my youth, and voila, the amp had been “profiled.”
After eight years of watching from the sidelines (and seeing some Kempers appear in a few Nashville sessions with some big names in session work), I bit the bullet and bought one.
The Profiler
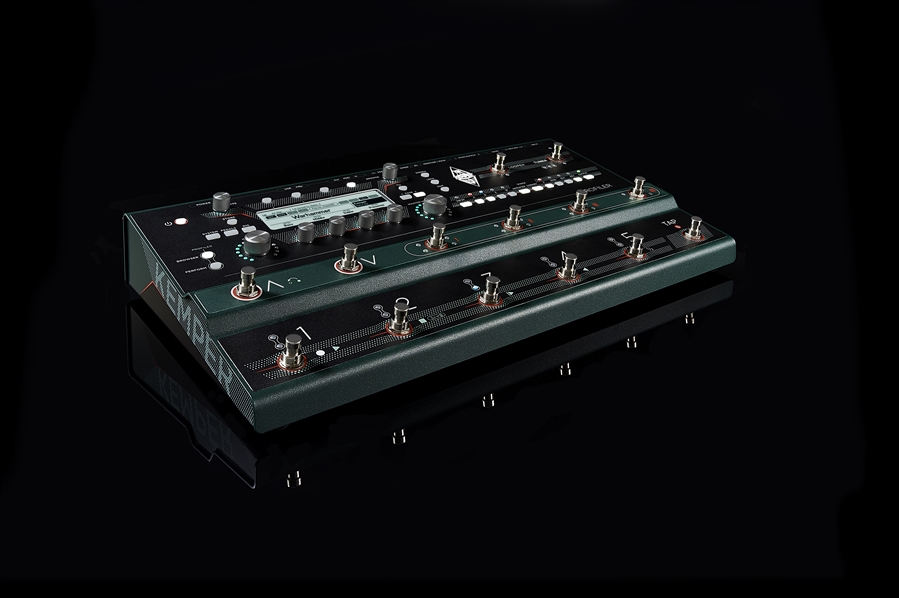
The hardware is quite nice. Buyers can choose between a more amp-like head, a 3U rack-mountable version, or an all-floor-pedal model “Profiler Stage.” Some models can even be purchased with a power amp onboard, allowing the Profiler to behave like its analog counterpart and incorporate various cabinets. On top of multiple models, color options avail with the lighter white version or, the more recent dark version.
The Kemper Profiler Stage. An All pedal model of the Kemper Profiler
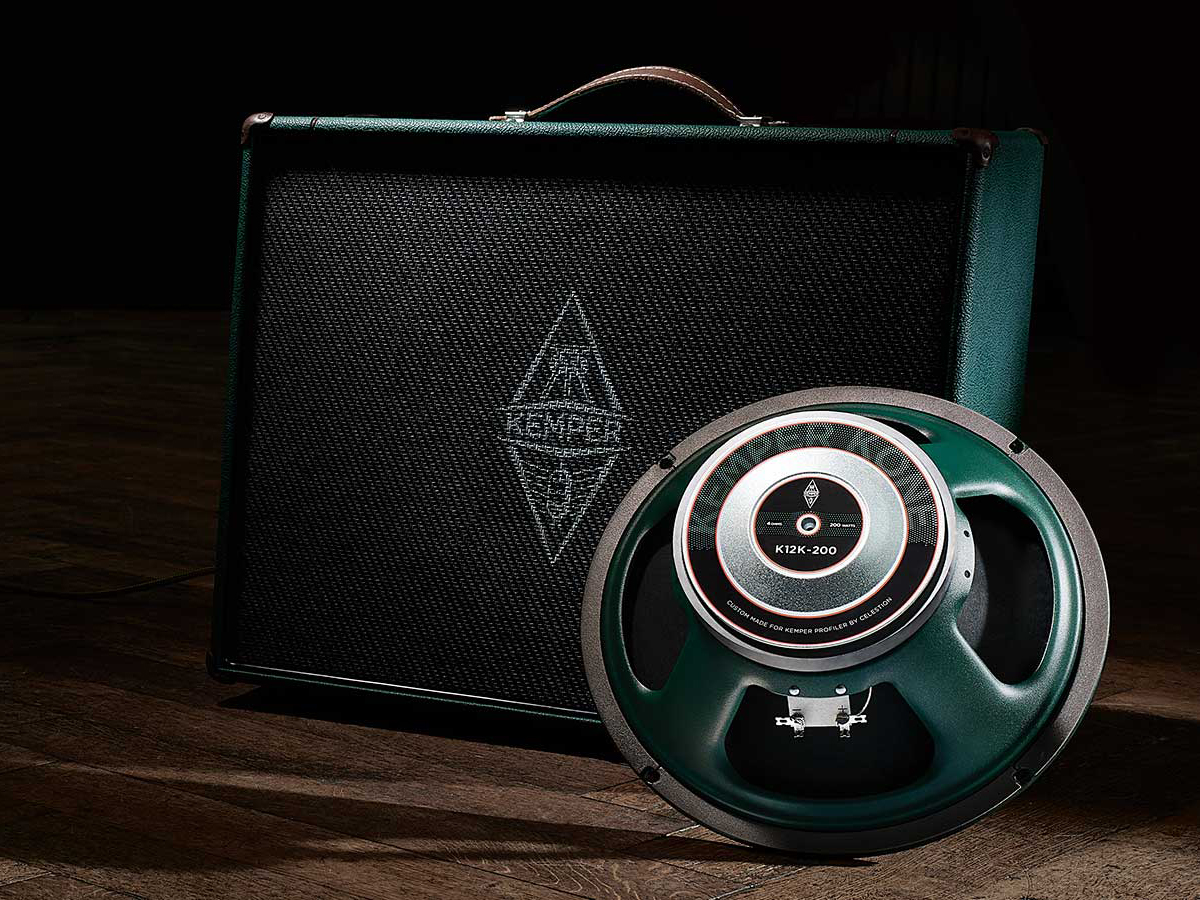
As far as accessories, Kemper has even made a floorboard controller, third-party companies have built expression pedals, and recently, have developed the Kemper Kabinet.
Behold, the Kemper Kabinet with Kone
Lights and Knobs
Controls are primarily the same on each model, with the rack mount version being slightly more compact. To make the rack version fit in 3U rack space, the only two knobs that Kemper sacrificed are the two corresponding knobs for the “Mod” section of the effects. All models feature an interactive LCD screen with LED-lit controls on a black and green background (unless you buy the non-rack white model). At first glance, the Profiler may look a bit complicated, but a closer look into each section will offer some clarity. Since I work primarily in a studio, I opted for the non-powered rack version with a Mission EP1-KP expression pedal.
The Controls, although plentiful, are not as daunting as they look. The Profiler breaks up into sections that reflect the signal flow. While the rest of the sections are essential for feedback and controls, the heart of the Profiler lies across the top.
Just like a normal analog rig, the signal flows from left to right across the top (Power / Mode Switch > Input > Stomp Section > Stack Section > Mod Section > Output Section).
A La Mode
The Power / Mode switch controls what the amp is doing at any given time. This control incorporates a “Chickenhead” style rotary knob with various modes that we explain in detail below. With the knob pointing all the way left, the Profiler’s power is off. By switching to any of the other four modes, the amp goes into a boot sequence that takes a little time to boot. Consider this the digital equivalent to an analog amp “warming up.”
Tuner
Just to the right of the power section is the Tuner. While the LEDs just under the label are always on to give a rough indication of tuning, the Tuner selection will display a more in-depth tuner on the LCD screen. By default, the tuner will also activate if a volume pedal is present and in the “heel” position.” Generally, the LEDs are more than enough due to the way the LEDs brighten and dim to show how close to “in tune” they are.
Browser
Just past the Tuner mode is the Browser mode. The Browse section contains the presets or “Rigs” as Kemper calls them. Essentially, rigs are combinations of profiles, virtual stompboxes, and effects chains (which the Profiler has quite a collection of built-in). If you think this amp is primarily an amp and cabinet simulator, you will be pleasantly surprised at the number of effects and stomps packed in. Kemper has painstakingly modeled over 50 different classic stomp, EQs, and various effects. The Profiler comes standard with 200 rigs to get started with and can hold up to 1000 user rigs.
On top of the stock presets, you can easily import additional rigs via USB. The Profiler app has a Rig Exchange in which users can share profiles and packs can be purchased from various Profilers like Michael Britt. These guys do all of the hard work by profiling all of the amps the mortal man cannot afford using the best of the best preamps and microphones available. At the time of this review, Kemper has also added free Michael Britt and Lars Luettge Rig packs.
Performance
Performance mode gives the option to create a bank of Rigs that correspond to controls on the foot controller. These performances work great for live settings, whereby the verse section of a song might need a different rig than the chorus. These can be organized in banks for each song in your set, giving quick access to each song’s created presets.
Profiler
Finally, the pièce de résistance. Profiler mode is where the Profiler creates digital copies of amps. This mode requires a cable run from the back of the profiler into the desired amp. Then an additional run from either the direct out of the amp or mic’ed cabinet back to the profiler. The Profiler then runs a proprietary set of noises into the amp and creates a digital “fingerprint” of the amp.
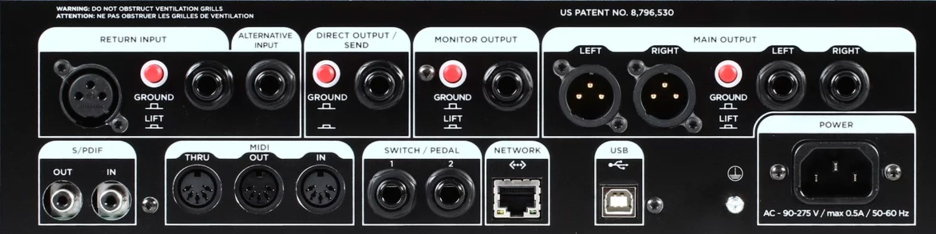
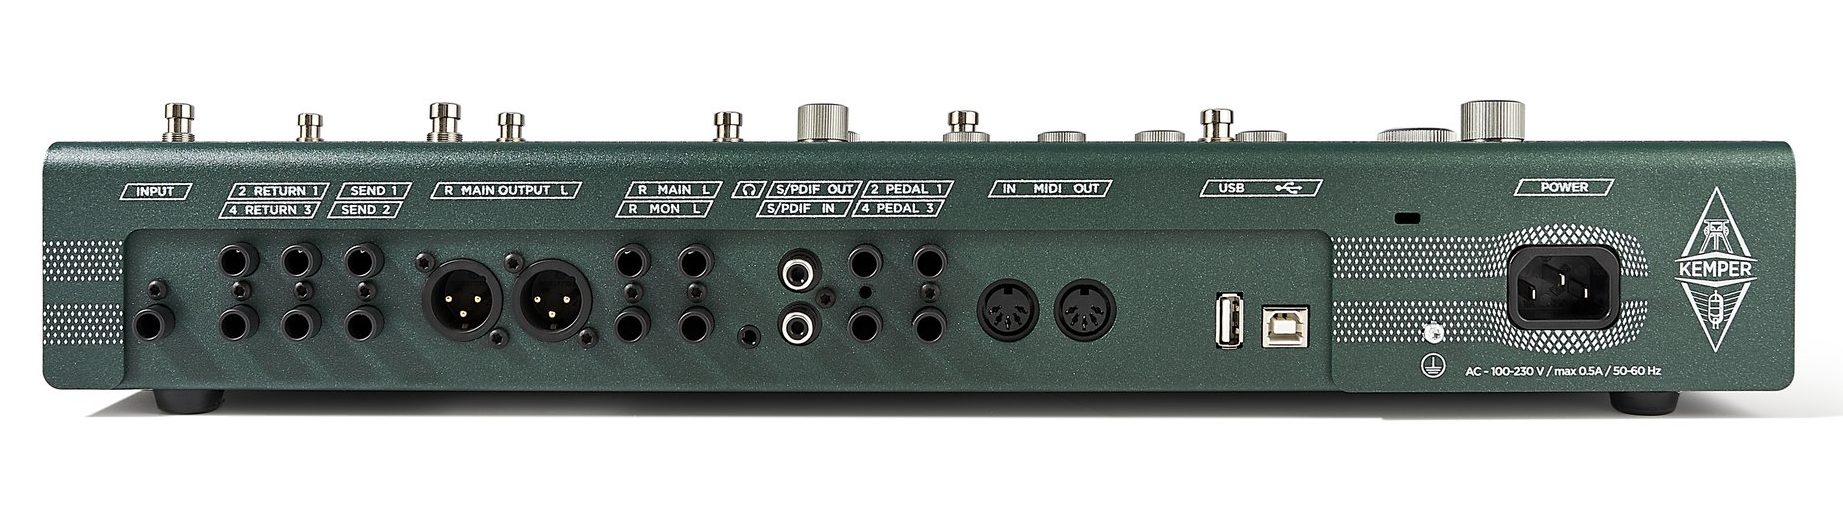
Inputs and Outputs
Confession, I put this in the review for my reference so I can find it easy. Feel free to do the same!Profiler Stage Outputs
Kemper essentially prepared for virtually any situation as far as inputs and outputs go. There is a total of four separate physical inputs and five independent outputs (six for the Powerhead version’s Speaker Output) that can be configured and used in countless ways. Every one of the input and output sections on the rack versions feature a ground lift to cater to settings where hum can be a problem. The input and output section even features a S/PDIF in and out to run into a studio interface digitally. Just know the SP/DIF can only handle 24bit at 44kHz resolution, so set your DAW session accordingly.
Mixed Signals
Utilizing the Direct Output and Return Input, an effects loop can be used and tied into one of the virtual stomp sections, thus bringing your favorite analog pedals into the mix. If stereo is your thing, incorporating the Alternative input can create a stereo effects loop and tied to the “Mod and X” stomp section of the amp. Flexibility is the name of the game with the Profiler.
On top of sending a separate dry signal for reamping at a later time, Kemper can accommodate just about any combination of outputs for almost any desired situation. For the studio engineer, using all available outputs including S/PDIF, the stereo delay and reverb can be sent to its individual stereo track. The stereo mod effects can be sent to their track, and the raw reamp and Amp rig can be sent on their tracks, giving you ultimate control over all of the effects when mixing. The same approach can be used for live settings, giving a possibility of a stereo stage monitor as well as a stereo output for the front of house.
Routing Controls
Surprisingly, the Profiler’s routing section is straightforward and accessible via the dedicated Input and Output sections on the amp. Controls are as simple as holding down the input or output button and navigating with the soft knobs under the Display. Input and Output presets can even be created and selected for quick changes from studio to stage. Input and output monitoring comes at a glance with LED’s showing if the signal is coming in or going out too hot. Sensitivity settings are additionally available in the input section to bring different pickup types to optimal levels.
The Sections
To better get a feel for how this amp operates, we’ve broken down the Profiler into sections. These follow the logical signal flow from stomp pedals to the cabinet and show just how easy this amp is to operate.
The Stomps
Following the signal flow from the input, we begin with the stomps section. Kemper has over 50 different types of effects and stomps, many based on the all-time great stomp pedals. Countless EQs, Wahs, Pitch Shifting, Distortions, Overdrives, Compressors, as well as many others can be added to the four slots in the Stomp section. Using the routing section mentioned above, analog pedals can also be added into the mix, keeping your hardware still in the mix
The Stack Section
The Stack Section is the heart and soul of the Profiler. Here is where the magic happens – where all of the profiled analog amp heads and cabinets are stored. This area is divided into three sections (Amplifier, EQ, and Cabinet) that can be enabled or disabled separately and even turned off. Depending on how the profile was obtained, different amplifiers can be paired with different heads for countless options.
The Effects
At the very end of any good rig is a solid effects section. Profiler’s Effects Section has four slots that can hold any combination of its vast selection of choruses, flangers, delays, reverbs, and many more. While the last two slots are primarily designed for delay and reverb effects, these can be changed to others. Like the stomps section, the effects section can also be routed similarly for analog effects. One of the standout effects is the rotary speaker section, which can take any cabinet in the profiler’s stack section and convert it to a rotary.
If you can think of an effect, the Profiler probably has it. Like we stated before, Kemper has over 50 different types of effects, many based on actual mainstays in the guitar community. Each type of effect changes the LCD to its corresponding color for quick reference. For instance, if the screen is red, a distortion effect is being adjusted.
Extras
Although Kemper could have stopped here, they understood there were several more things some users could use to ease the transition from analog as well as make it more enticing to stay.
Morphing
To add more versatility to an amp with built-in stomps and effects, the Profiler has a feature called Morphing. To use morphing, an expression pedal or footswitch will need to be incorporated. The Morphing feature is not necessarily an effect but almost more powerful than all the effects combined. This is due in part to how it functions as it can dynamically control almost any adjustable parameter in the Profiler using either a pedal or a stomp. Think of morph like automation that controls different elements of the mix in one fader (like a VCA).
Operation is simple, enable the expression pedal for morphing and place it at the heel position. Once in the heel position, move the pedal to the toe position and change various parameters. This can be anything from amp gain to delay feedback, chorus mix – anything. Now when the pedal goes back to heel, the amp will return to the stock setting. As you’re playing, simply move the expression pedal toward to toe position, and all volume changes will all change together. Alternatively, this can be set to be triggered by a footswitch and slowly increased anywhere from 1 to 64 seconds. Using the tap tempo, the morph feature can be increased based on bars as well, making that dynamic transition from the verse to the chorus fluid during either studio or live performances.
Pure Cabinet and Space
Kemper even understands the transition from analog can be a bit tough at first, especially since hearing a mic’ed amp and cabinet in a room responds differently to hearing a “Profile” of the amp through a monitor. Since a Profile depends on capturing the amp and cabinet through a mic, the tone of the amp can appear much harsher than hearing the amp in a physical space. Some tools have been created to help become accustomed.
Located in the Output menu is Pure Cabinet and Space. Pure Cabinet mode is a control that can tame some of the textbook harsh sounds from miking an amp. Using Pure Cabinet simulates the forgiveness a room offers. Space works similarly by bringing a slight reverb into the output to subtly “bring the room back” into headphones. This is especially helpful for headphones and in-ear monitors by attempting to bring a natural bloom of the response of a cabinet to a space to prevent ear fatigue. On top of all of these features, each factory profile is as level matched as possible to ensure no crazy volume changes deafen the player, especially in headphones. There’s nothing like switching presets only to jump five feet from a preset that is 80 decibels louder. Anyone remember the pod preset volume differences?
Looper
Although I do not personally own a Kemper floorboard controller, I borrowed one from a friend to give it a shot. For the looping and performance mode features, footswitches are a must, but the floorboard is the ideal choice. Of course, third-party footswitches can be used, but Kemper has really tailored its board to work seamlessly. The looping section allows for up to 60 seconds of audio on unlimited “tracks”. Each pass can be played on separate rigs. It must be noted that the loops cannot be stored and are deleted when the unit is powered off. I do wish there was an option to store loops on external media to be used again. On top of unlimited passes, the looper can both reverse and slow the loop to half speed.
Pure Tuning and Formant Processing
While we’re on the subject of half-speed, I did want to go over one last enhancement the Profiler has. Although, most digital effects processors can pitch instruments differently, the result can come across as synthetic, with most giving off artifacts. This is sometimes preferable, but the option to make harmonies or pitch effects more realistic is needed too. Kemper incorporates two technologies to aid in this with Pure Tuning and its Formant and Pitch processing.
With Pure Tuning, notes generated by the Profiler are processed to match the pitch of the original signal more accurately. What this accomplishes is a more realistic harmony of a note. With the formant control, guitars can sound more like basses when pitched down or even tuned many steps below its original tuning and still hold up. I have to admit the option to detune a standard guitar to a baritone without touching the tuning pegs is a godsend. The result is as true to life as I’ve heard any effect attempt, but if you’re looking for that Tom Morello whammy sound, the Profiler can still do it!
Profiling
There are even more countless features I could go over, but there isn’t enough time in the day to keep writing about it – plus, I’d rather be playing this thing than writing anyways, but there is one last section we haven’t covered in detail.
While the Profiling process looks on the surface to be a very overwhelming process, it isn’t. To profile an amp and cabinet, all that is necessary is a microphone and some sort of preamp. To profile an amplifier alone, the only thing you need is two cables. While any mic and preamp can work, higher quality gear will make a higher quality profile. Once the loop is set up between either the amp alone or both amp and cabinet, switch the Power / Mode knob to Profiler mode and follow the prompts on the screen. A series of tones will run through the amp (and or cabinet), and a digital “fingerprint” is made.
Additional facets of an amp can be adjusted that were once unchangeable in an analog amp. Features Tube shape, bias, power sagging, and definition can be freely adjusted to bend the amp to your will. With the Definition control, a vintage amp can be made to sound more modern and vise-versa. The transients of the pick can even be enhanced to soften or bring out the strike of a pick during playing. These controls do not just subtly affect the sound, either. Each control clearly has an impact in a way that solely EQ or compression could accomplish.
Thoughts
I’ve sat with this portion of the review for quite some time. This was mainly due to the learning curve of the amp. There are a lot of menus to use, and I wanted to make sure my opinion wasn’t impeded by my unfamiliarity. Now that I’ve had some time, I love this amp. Take note that initially, you will be a little overwhelmed by the number of options.
Since my workflow is mainly studio, my Profiler stays connected via USB all of the time. I find that I can edit and switch profiles easier from the Rig Manager. I can also add a quick profile during a session if a client is looking for a specific sound. The ability to edit the Profiler presets through the Rig Manager is a game-changer. Initially, when I started, that option wasn’t available. I rarely touch the actual knobs on the hardware anymore.
What I like
All of it. Sure, there may be a slight difference in the sound of a profiled amp versus its analog counterpart, but it’s just that – different. I would say this amp has 90% of its original version easily. While purist may scoff at the extra 10 percent, I would doubt many could consistently guess between the two. Add in the convenience of not having to set up a myriad of mics, position the mics correctly, and crank the amp to get the right sound, and you have a no-brainer situation for studios. Yes, there are sometimes throwing a mic on a particular amp is necessary, but for the majority, the Profiler handles the situation masterfully. Plus, I can play anytime without pissing off the wife. So there’s that bonus too.
Lastly, I love the number of inputs and outputs. Being in a studio environment, routing is key, and I have so many different options that can remain interfaced, I don’t have to fumble around the back of the rack. If I need a stereo track, easy. If I need just a dry output with effects printed to another track, done! The Profiler is an engineer’s dream come true and then some.
What I Would Improve
This is a tough one. Kemper has made a full lineup of different versions with just about every bell and whistle imaginable. My only improvements come in the form of effects. I’d like to see more creative effects similar to Electro Harmonix Freeze and Strymon Mobius. I know the Profiler has countless versions of just about any pedal, but sometimes, you want to go way into the ether, and I wish I didn’t have to take my pedalboard out each time I wanted to do that. This amp is made by the same people who made the Access Virus, so I know they have a few tricks up their sleeve.
Lastly, my only other suggestion comes from the big question I get asked in my studio each time an artist falls in love with this thing – “Is there a cheaper version that doesn’t Profile because I don’t need all of that.” There would be a massive market for performers who don’t need profiling or as many inputs and outputs as the standard Profiler. A scaled-back version that just loads existing profiles would sell like crazy.
In Conclusion
If you own a studio, you should own this, simple as that. Whether it replaces your stable of analog amps or you just use it for quick ideas, the Profiler will spark creativity. Even if you just bought it for the Michael Britt Packs, you won’t be disappointed.
For more information and to buy, please visit our affiliate link HERE.